15 Creative Garden Crafts Ideas That Look Amazing
There’s something truly special about creating something with your hands and watching it bloom alongside your garden. Whether you have a sprawling backyard or a tiny balcony, these garden crafts ideas will inspire you to get creative outdoors.
From upcycled planters to handmade garden markers, every project on this list is affordable, fun, and beginner-friendly. You don’t need any special skills — just a little time and a love for nature.
15 Garden Crafts Ideas to Get You Started
1. Painted Rock Garden Markers
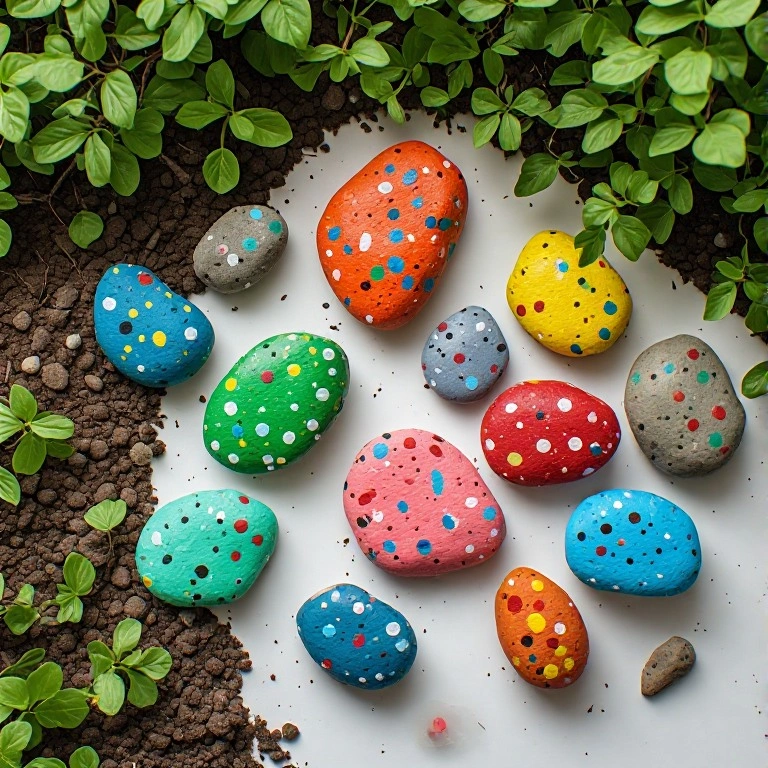
Give your herb or vegetable garden a personal touch with hand-painted rock markers. They’re durable, weatherproof, and add a charming, artistic feel to any garden bed.
Materials:
- Smooth flat rocks
- Acrylic paint
- Fine-tip paint pen
- Clear sealant spray
Steps:
- Wash and dry the rocks thoroughly.
- Paint a base color and let it dry.
- Write plant names using a paint pen.
- Allow to dry completely.
- Seal with a clear outdoor sealant spray.
- Time: 20–30 minutes
- Difficulty: Easy
💡 Tip: Use a chalk pencil to sketch your design before painting for cleaner, more confident results.
2. Mason Jar Herb Planters
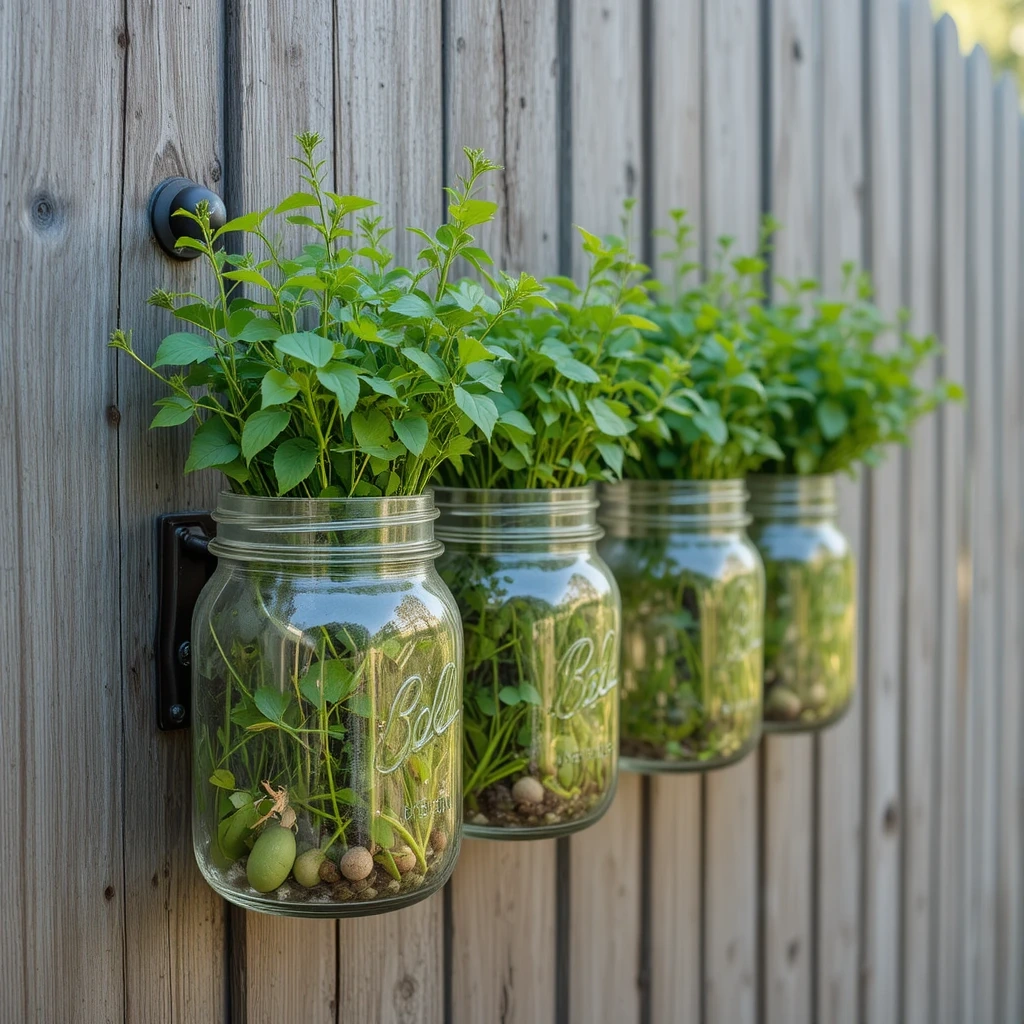
Hang a row of mason jars filled with fresh herbs on a fence or wall for a functional and gorgeous vertical garden. Perfect for small spaces and balconies.
Materials:
- Mason jars
- Hose clamps
- Wooden board
- Potting mix
- Herb seedlings
Steps:
- Mount a wooden board securely on your fence or wall.
- Attach hose clamps to the board at even intervals.
- Fill mason jars with potting mix.
- Plant herb seedlings into each jar.
- Slide the jars into the clamps and water lightly.
- Time: 15–25 minutes
- Difficulty: Easy
💡 Tip: Drill small drainage holes in jar lids and flip them to create a simple drainage system.
3. Twig Bird Feeder
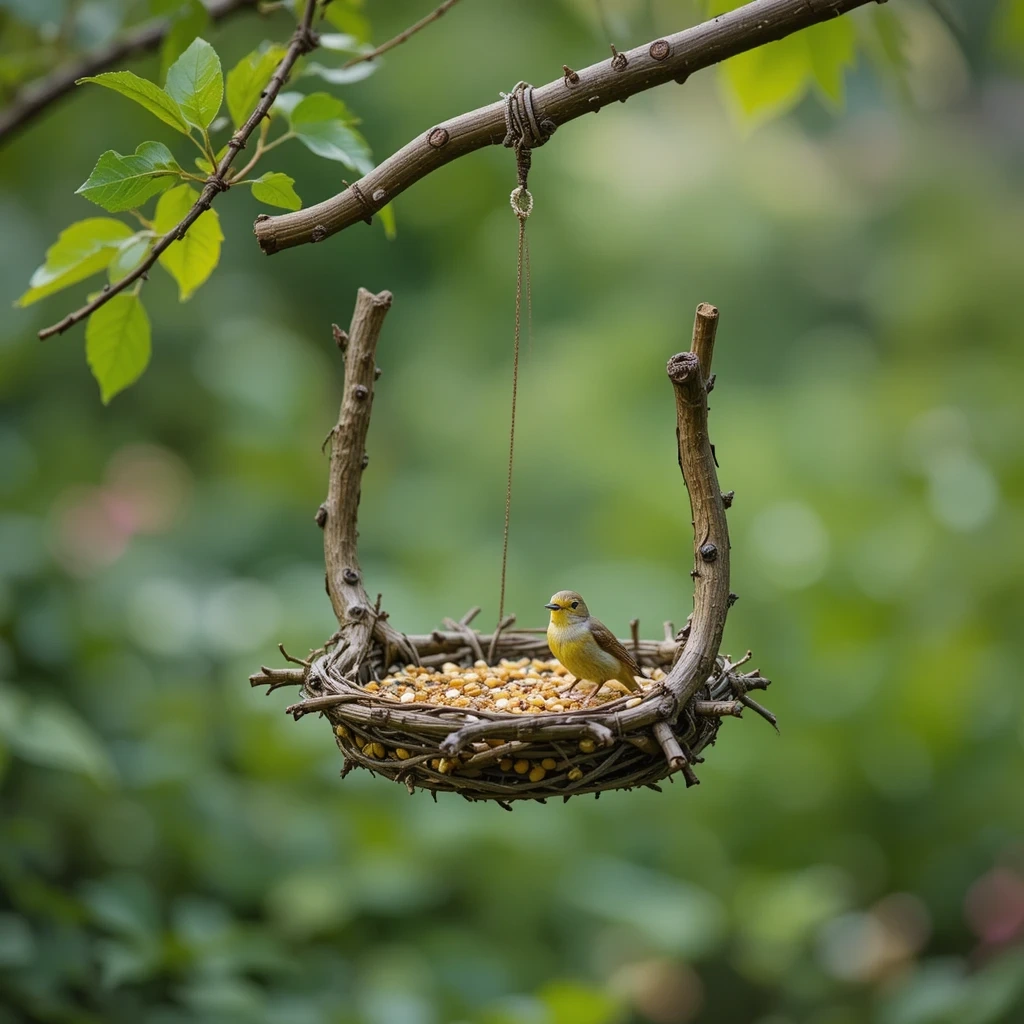
Craft a rustic bird feeder using sticks collected from your yard. It blends naturally into the garden and invites beautiful birds to visit throughout the season.
Materials:
- Straight twigs
- Hot glue gun
- Twine or jute
- Small tray or plastic lid
- Bird seed
Steps:
- Cut twigs to equal lengths (about 15 cm).
- Glue them in a log-cabin square pattern, layering upward.
- Attach a flat tray or lid as the base.
- Tie twine to the top four corners for hanging.
- Fill the base tray with bird seed.
- Time: 30–45 minutes
- Difficulty: Medium
💡 Tip: Apply a thin layer of non-toxic wood sealant to extend the life of your feeder outdoors.
4. Tin Can Lanterns
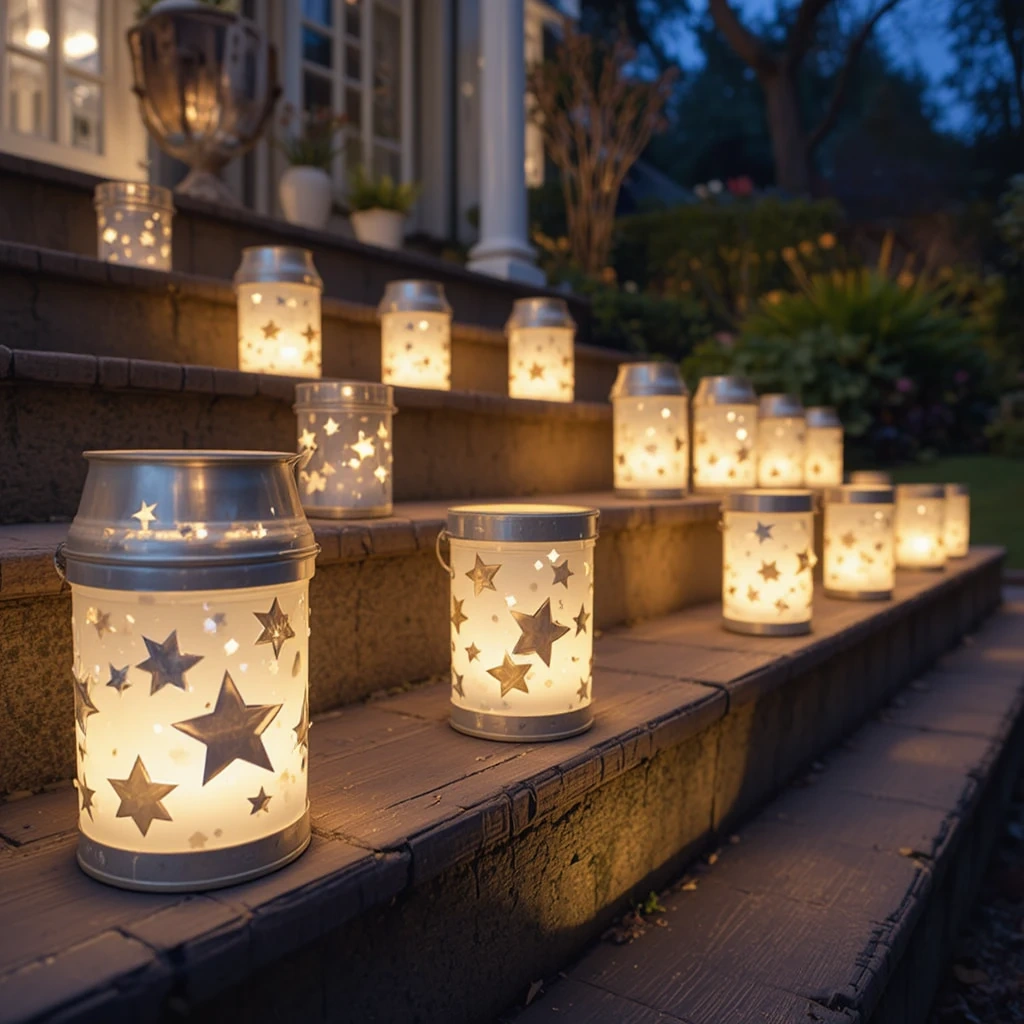
Upcycle old tin cans into beautiful punched-metal lanterns that cast stunning light patterns in your garden at night.
Materials:
- Large tin cans (cleaned)
- Hammer and nails
- Tea light candles or LED lights
- Permanent marker
- Wire for hanging
Steps:
- Fill cans with water and freeze solid.
- Draw a pattern on the outside with a marker.
- Use hammer and nail to punch holes along the design.
- Let the ice melt and dry the can completely.
- Add a tea light or LED and hang with wire.
- Time: 20–30 minutes (+ freezing time)
- Difficulty: Easy
💡 Tip: Freezing the can first keeps the metal firm so it won’t dent while you punch holes.
5. Pallet Wood Planter Box
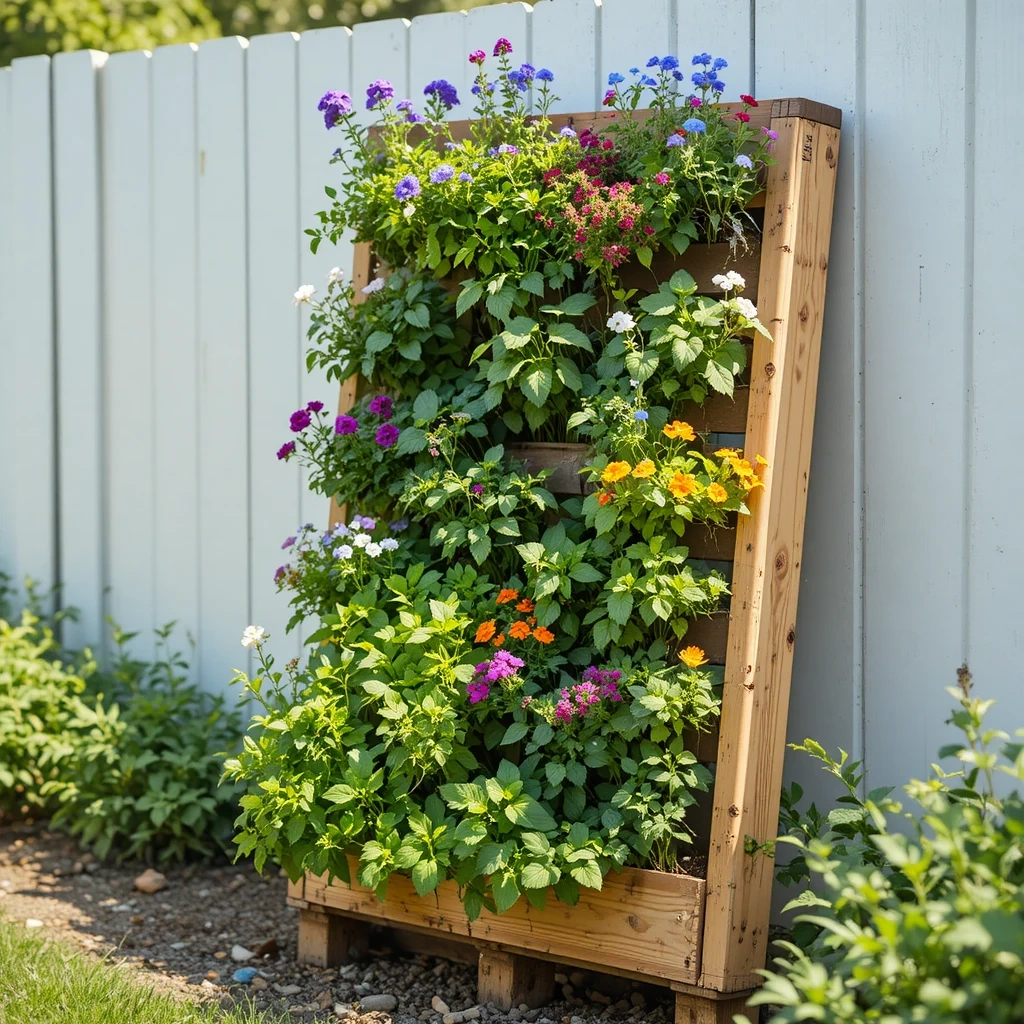
Transform a discarded wooden pallet into a stylish raised planter box that’s perfect for flowers, herbs, or strawberries.
Materials:
- 1 wooden pallet
- Landscape fabric
- Staple gun
- Potting soil
- Plants or seeds
- Sandpaper
Steps:
- Sand the pallet to remove splinters.
- Line the back and base with landscape fabric.
- Staple the fabric securely in place.
- Stand the pallet upright and fill pockets with soil.
- Plant your chosen plants into each section.
- Time: 45–60 minutes
- Difficulty: Medium
💡 Tip: Choose heat-treated (HT) pallets — they’re safe for growing food, unlike chemically treated ones.
6. Mosaic Stepping Stones
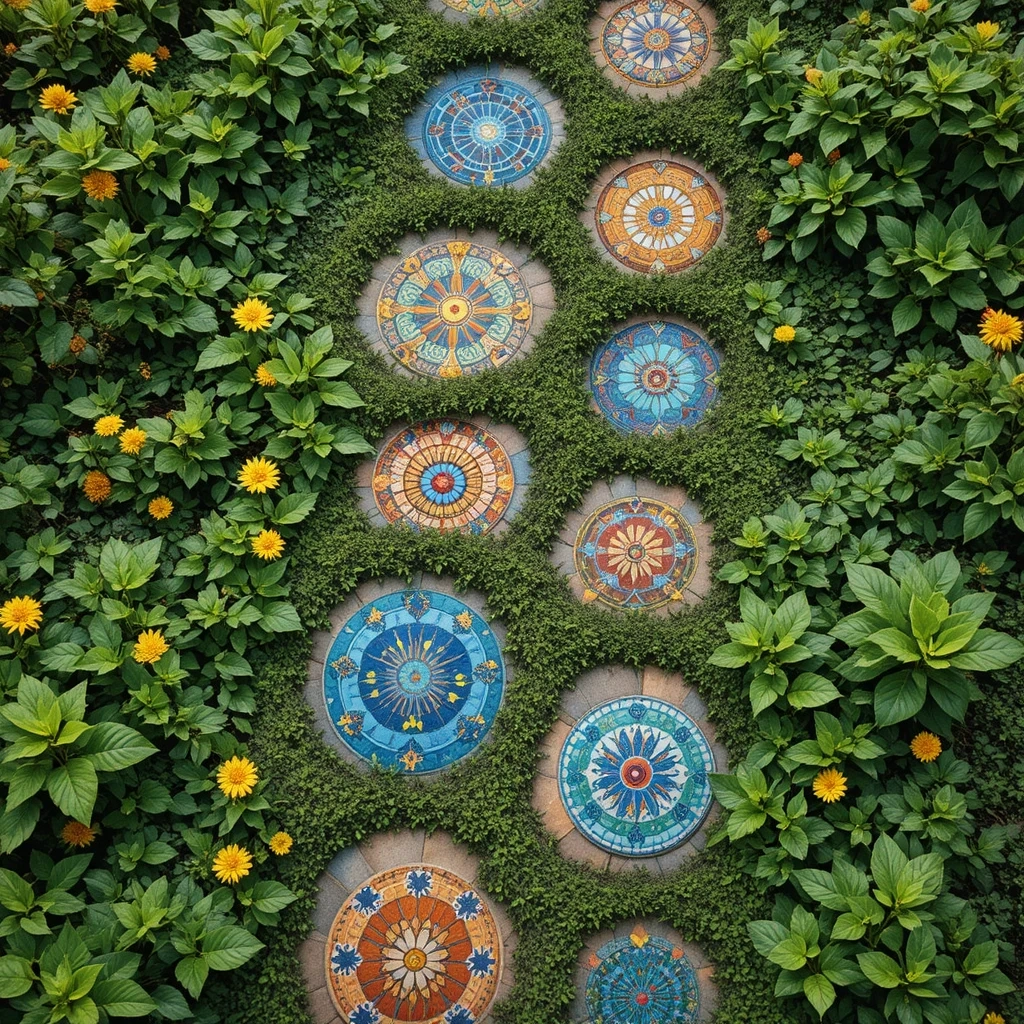
Create unique mosaic stepping stones that add color and personality to any garden path. Each one can be a little work of art.
Materials:
- Quick-set concrete mix
- Mold (pie tin or stepping stone mold)
- Broken tiles, glass gems, or pebbles
- Gloves
- Stick for smoothing
Steps:
- Mix concrete according to package instructions.
- Pour into your mold and smooth the surface.
- Press tiles, gems, or pebbles into the surface in a pattern.
- Let cure for at least 24 hours.
- Remove from mold and place in your garden path.
- Time: 30 minutes (+ 24 hours curing)
- Difficulty: Medium
💡 Tip: Spray the inside of the mold with cooking spray before pouring for easy release.
7. Upcycled Boot Planter
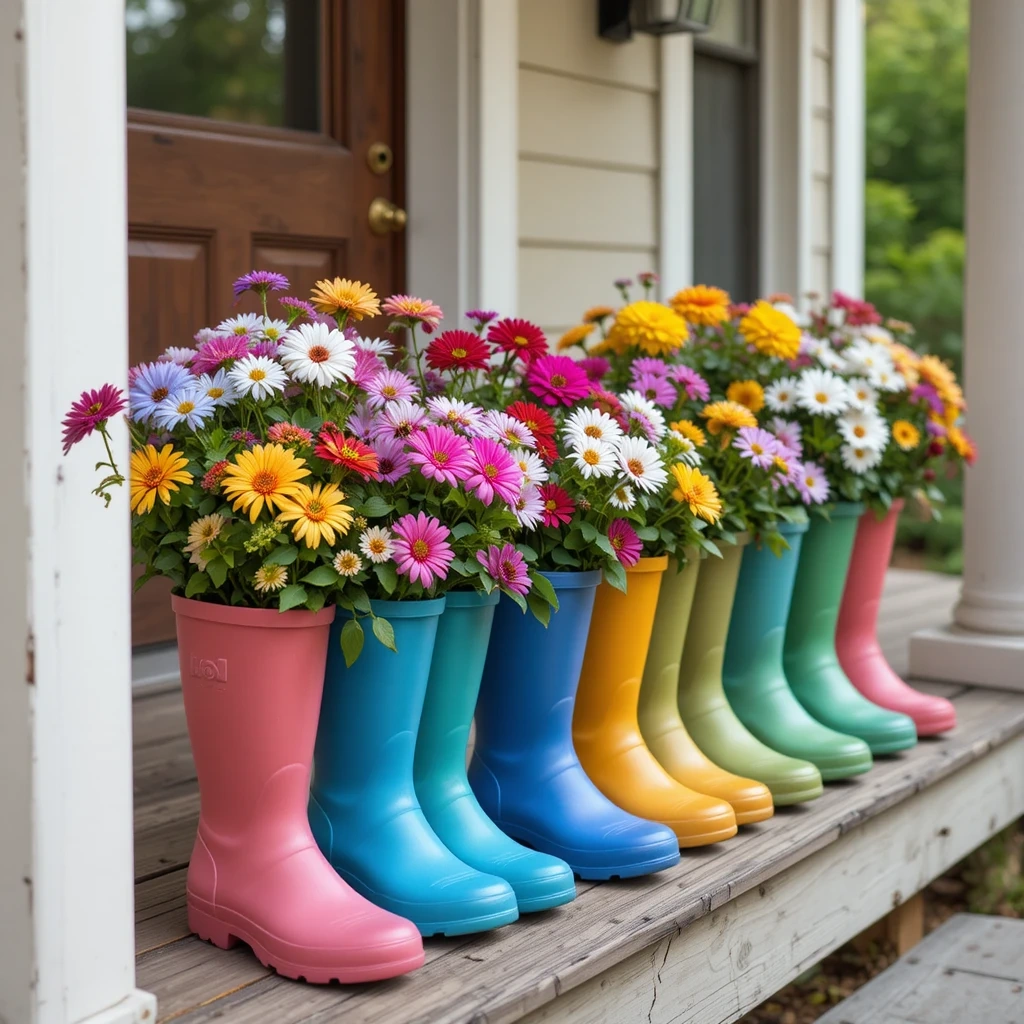
Give an old rubber boot a new life as a quirky and eye-catching garden planter. These make great gifts and doorstep decorations.
Materials:
- Old rubber or rain boot
- Potting soil
- Small plants or succulents
- Drill or nail (for drainage)
- Outdoor paint (optional)
Steps:
- Poke several holes in the sole for drainage.
- Paint or decorate the boot if desired.
- Fill with potting soil to about 5 cm from the top.
- Plant a small plant or succulent inside.
- Place in a sunny spot and water lightly.
- Time: 10–20 minutes
- Difficulty: Easy
💡 Tip: Use the boot as part of a collection — mix and match sizes and colors for a playful display.
8. Macramé Plant Hanger

Add bohemian charm to your garden or porch with a hand-knotted macramé plant hanger. No weaving experience needed.
Materials:
- Macramé cord (3–5 mm)
- Scissors
- Wooden dowel or ring
- A pot to hang
Steps:
- Cut 8 cords, each about 3 meters long.
- Fold in half and loop onto the dowel or ring.
- Tie a series of square knots down the length.
- Create a basket section with alternating knots.
- Knot the bottom together and hang your pot inside.
- Time: 45–60 minutes
- Difficulty: Medium
💡 Tip: Watch one short video tutorial on the square knot — once you’ve learned it, the whole hanger practically makes itself.
10. Seed Packet Pinwheels
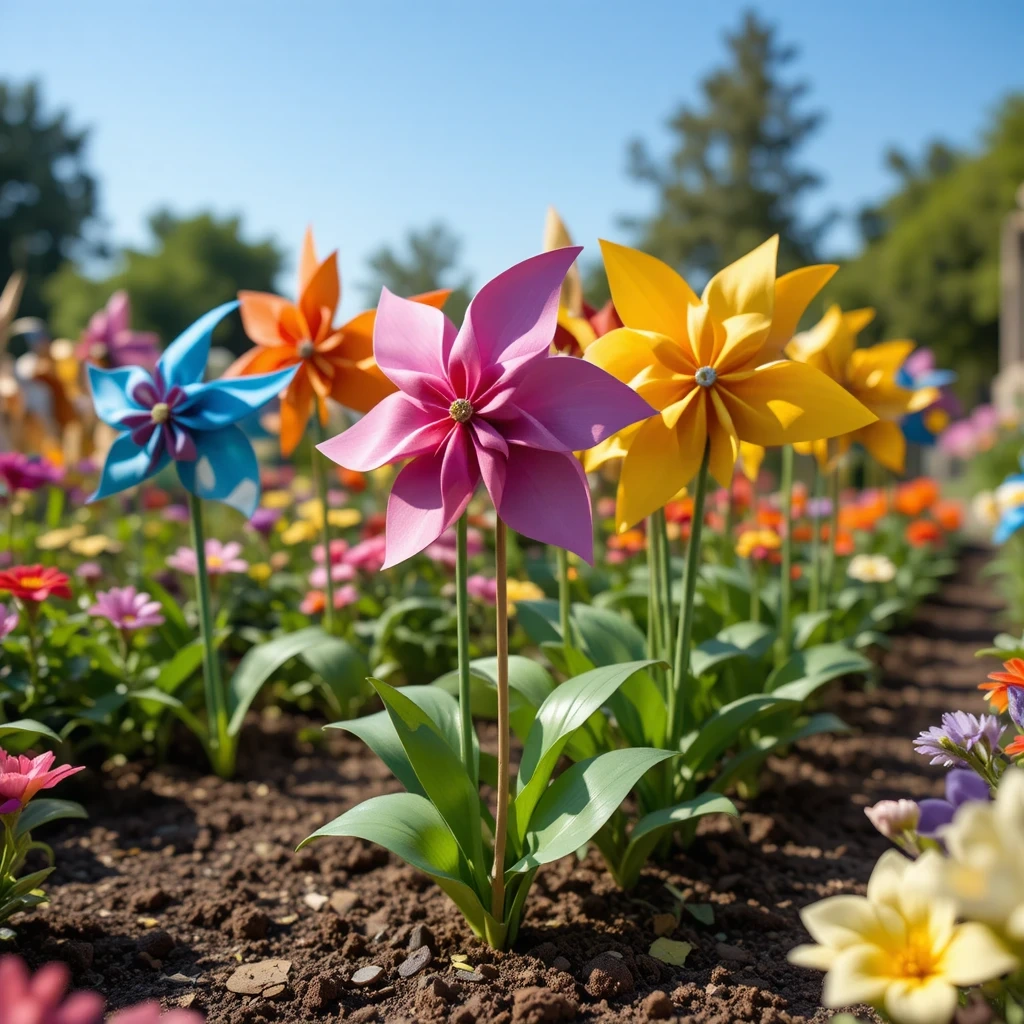
Turn colorful seed packets or craft paper into spinning pinwheels that double as cheerful garden decorations and wind indicators.
Materials:
- Colorful cardstock or seed packets
- Scissors
- Pencil with eraser
- Straight pin
- Ruler
Steps:
- Cut paper into a 20 cm square.
- Draw diagonal lines from corners toward the center (stop 3 cm short).
- Cut along each line.
- Fold every other corner point to the center.
- Push a pin through all layers and into a pencil eraser.
- Time: 10–15 minutes
- Difficulty: Easy
💡 Tip: Laminate the paper first for a pinwheel that survives light rain and wind.
11. Garden Wind Chimes
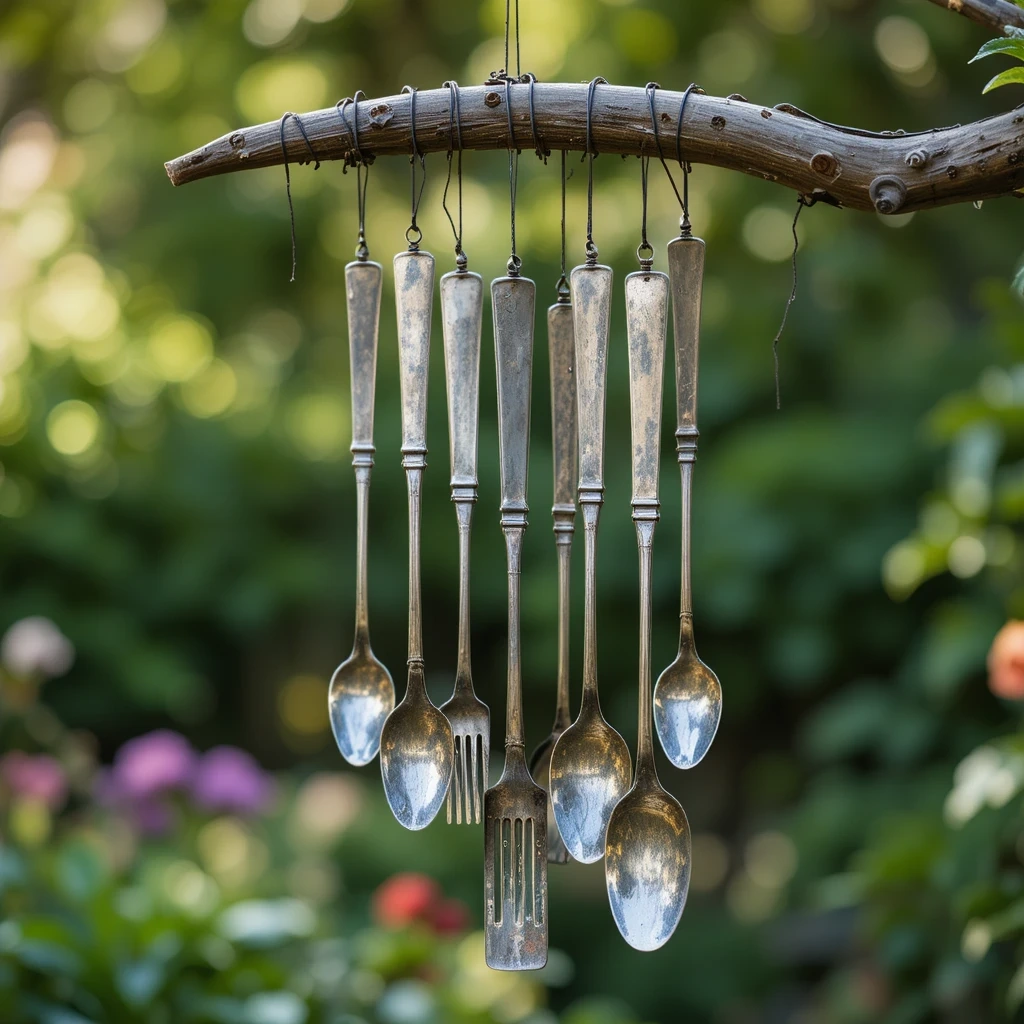
Repurpose old silverware, shells, or clay beads into soothing garden wind chimes. Each one sounds and looks completely unique.
Materials:
- Old spoons or forks
- Fishing line or twine
- Driftwood branch or dowel
- Drill or awl
- Beads or shells (optional)
Steps:
- Drill small holes through the handles of each utensil.
- Cut varying lengths of fishing line.
- Thread utensils and optional beads onto each line.
- Tie each line to the driftwood branch.
- Attach a hanger line to each end of the branch.
- Time: 30–45 minutes
- Difficulty: Medium
12. Succulent Wreath
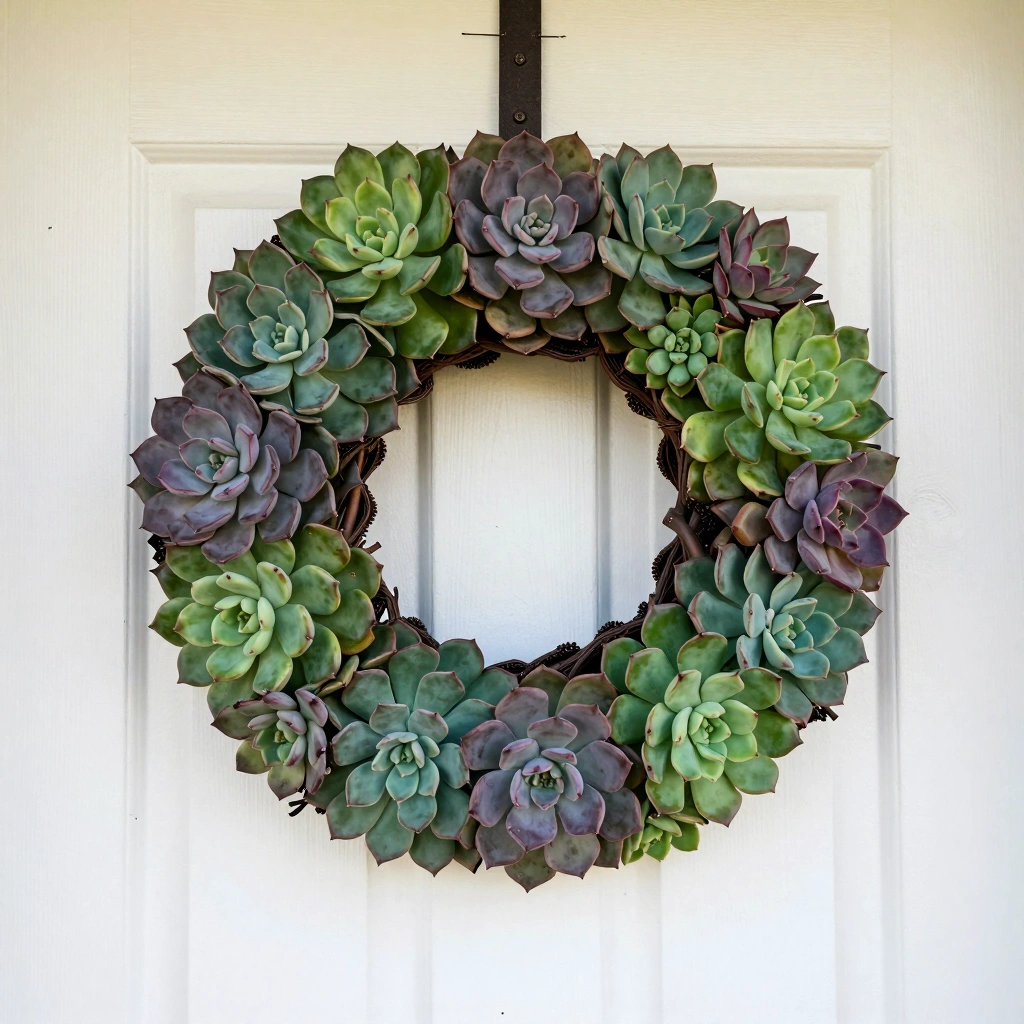
Create a living wreath using hardy succulents that stays beautiful for months with almost no maintenance. Great for front doors or fence displays.
Materials:
- Wire wreath frame
- Sphagnum moss
- Fishing line
- Assorted succulent cuttings
- Floral pins or U-pins
Steps:
- Soak sphagnum moss in water, then wring out.
- Pack the moss thickly around the wire frame.
- Secure with fishing line wrapped around the whole wreath.
- Use a pin or stick to make holes in the moss.
- Insert succulent cuttings and pin them in place.
- Time: 45–60 minutes
- Difficulty: Medium
💡 Tip: Lay the wreath flat for 2–3 weeks while succulents root before hanging it vertically.
13. Painted Terra Cotta Pots — A Classic Garden Craft Idea
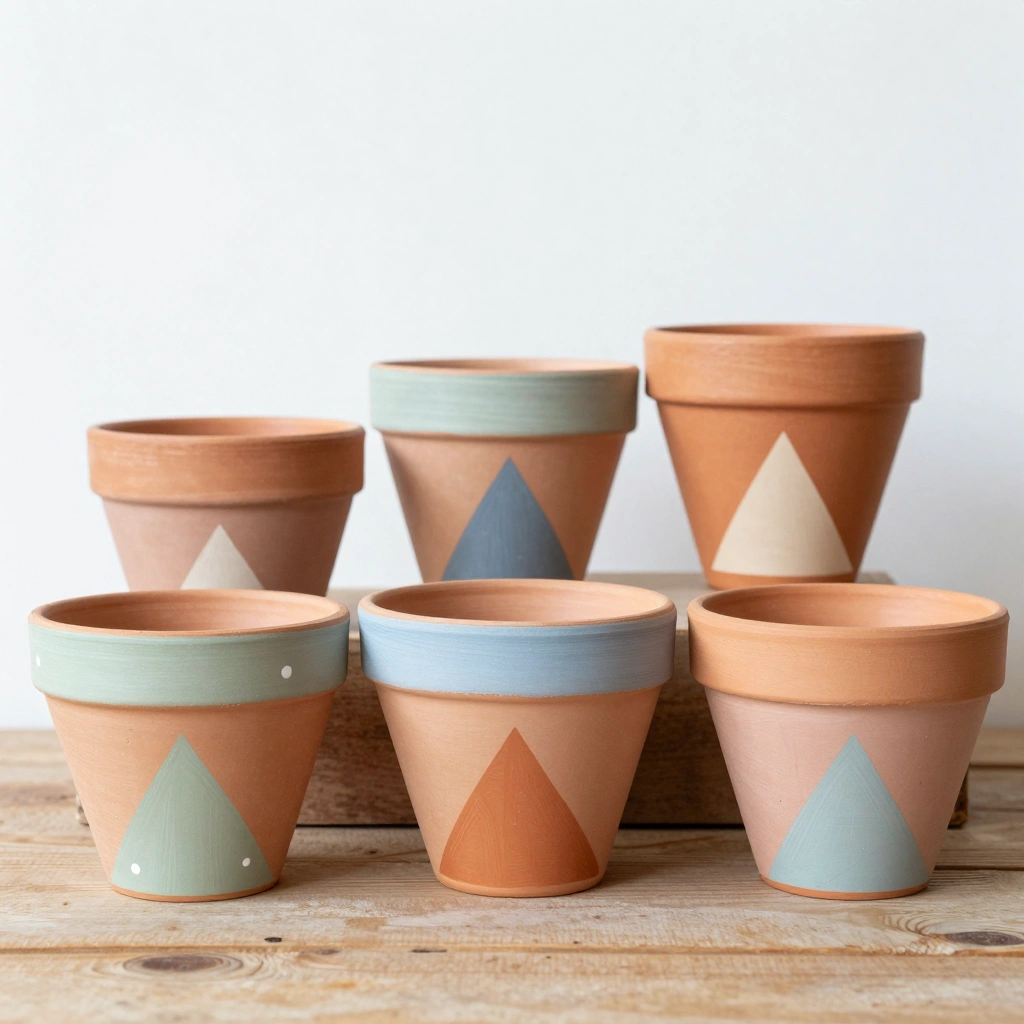
Plain terra cotta pots become stunning statement pieces with just a coat of paint. Use geometric patterns, florals, or abstract brushwork for unique garden crafts that truly stand out.
Materials:
- Terra cotta pots (any size)
- Acrylic or chalk paint
- Paintbrushes
- Painter’s tape (for clean lines)
- Outdoor sealant
Steps:
- Clean and dry the pot completely.
- Apply a base coat and let dry.
- Use tape or freehand to add your design.
- Apply additional colors and details.
- Finish with an outdoor sealant once fully dry.
- Time: 20–40 minutes
- Difficulty: Easy
💡 Tip: Use chalk paint for a matte, rustic look that doesn’t require primer on terra cotta.
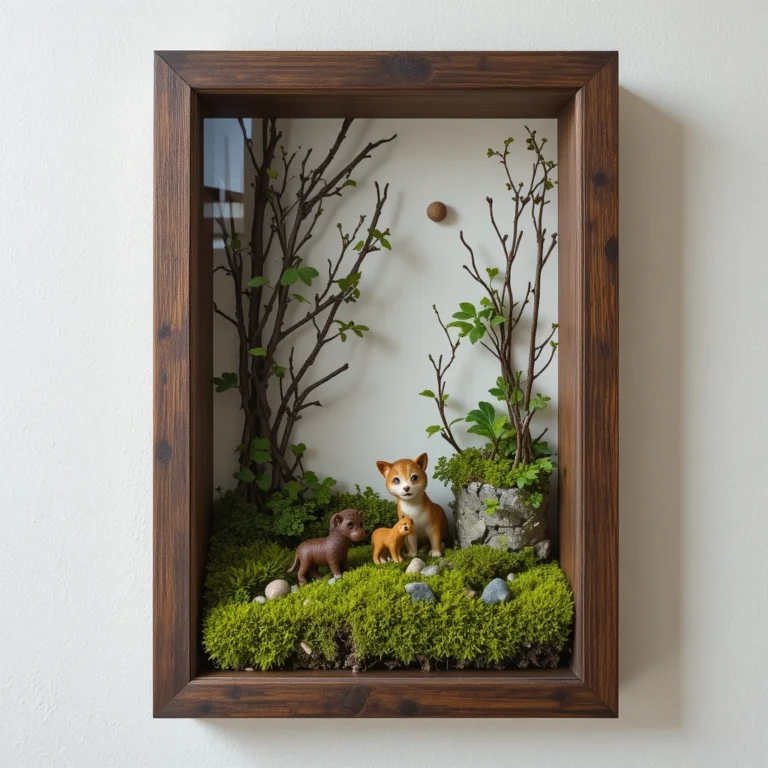
14. Fairy Garden Miniature Scene
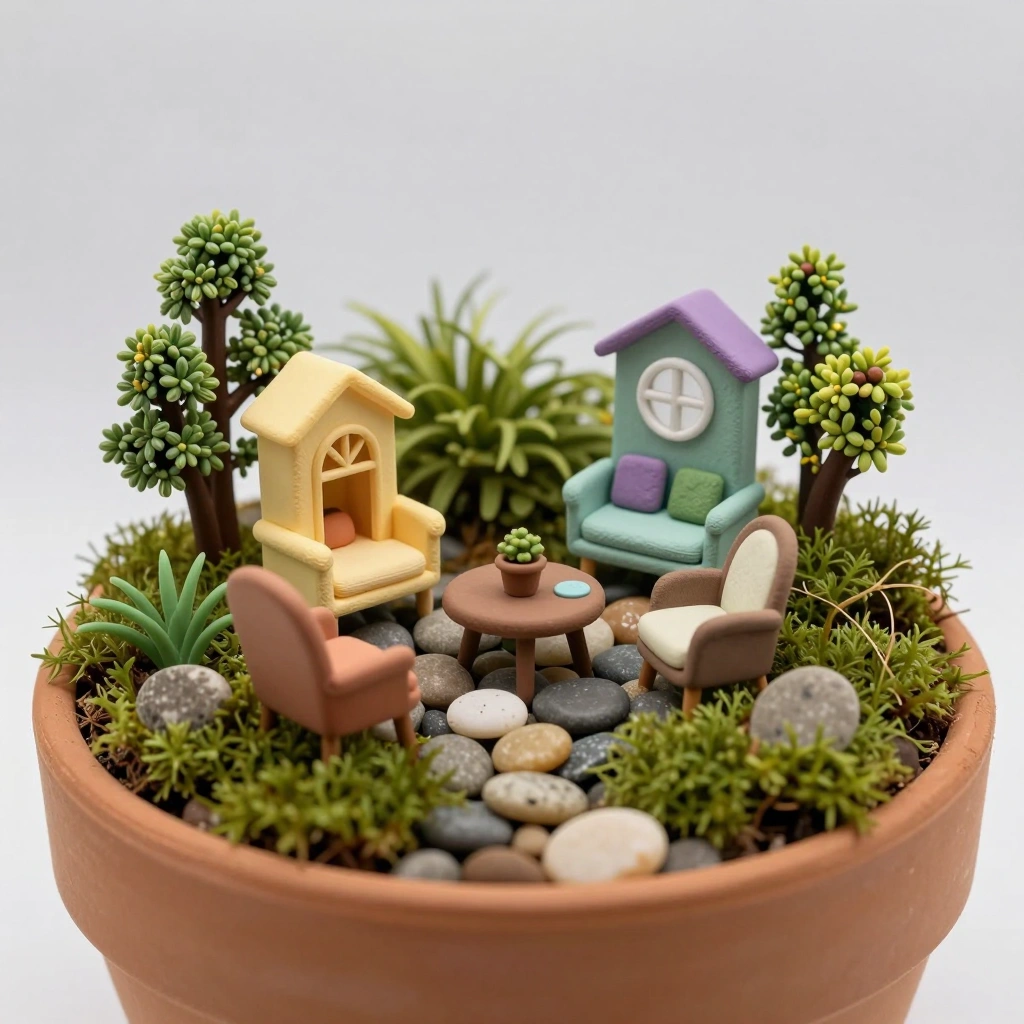
Build an enchanting miniature world inside a container or garden corner. Fairy gardens spark creativity and delight visitors of all ages.
Materials:
- Large pot or shallow container
- Potting mix
- Small plants (moss, thyme, or ferns)
- Miniature figurines and furniture
- Pebbles and sand
- Small mirror (for a pond effect)
Steps:
- Fill the container with potting mix.
- Create hills and levels by mounding soil.
- Plant small greenery to act as trees and ground cover.
- Press a small mirror into soil for a pond.
- Arrange figurines, pebbles, and mini furniture to create a scene.
- Time: 40–60 minutes
- Difficulty: Easy
💡 Tip: Use a terra cotta pot broken in half as a “fairy door” leaning against a rock or tree trunk.
15. Driftwood Plant Stand — One of the Most Beautiful Garden Crafts Ideas
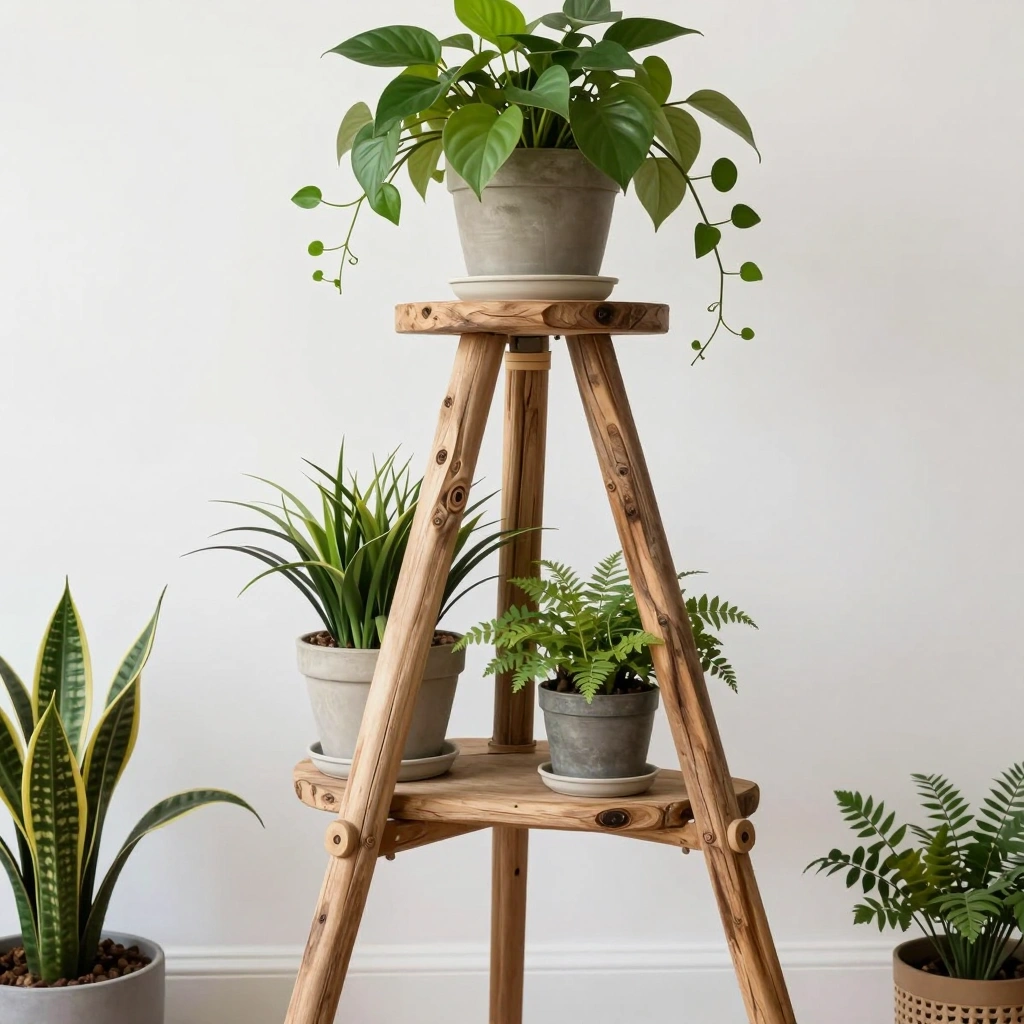
Natural driftwood pieces stacked and secured make for a stunning, one-of-a-kind plant display stand. No two look the same, making this one of the most special garden crafts ideas in the list.
Materials:
- Large driftwood piece or branches
- Rope or heavy twine
- Drill
- Plank of wood (optional base)
- Plants in pots
Steps:
- Select 3 sturdy driftwood branches of similar height.
- Arrange them in a tripod shape.
- Drill small holes near the tops and thread rope through.
- Bind the tops tightly together with rope knots.
- Test stability, then place pots on the natural platform at the base.
- Time: 30–45 minutes
- Difficulty: Medium
💡 Tip: Seal your driftwood with a clear outdoor varnish to prevent it from softening in rain.
Common Mistakes to Avoid
1. Skipping the sealant on outdoor projects Paint and decorations fade fast without weatherproofing. Always finish outdoor crafts with a clear outdoor sealant or varnish to protect your work from rain, sun, and humidity.
2. Using the wrong soil or drainage Planting in containers without drainage holes — or using garden soil instead of potting mix — leads to root rot. Always ensure containers can drain and use a lightweight potting mix.
3. Rushing the drying time Many crafts need proper curing time — concrete, paint, glue. Rushing to the next step before things are fully dry causes cracks, smears, and structural weakness.
Tips for Best Results
- Start simple. Choose a one- or two-material project for your first attempt — confidence builds fast.
- Work outdoors or in a well-ventilated space when using sprays, sealants, or strong glue.
- Gather all materials before you begin to avoid stopping mid-project.
- Involve kids — painted rocks, pinwheels, and fairy gardens are fantastic family activities.
- Repurpose what you already have. Tin cans, old boots, and wine bottles make excellent free materials.
- Take photos as you go — you’ll want to remember your process for future projects.
Frequently Asked Questions
What are the easiest garden crafts for beginners? Painted rock markers, upcycled boot planters, and tin can lanterns are ideal starting points. They require minimal materials, no special tools, and can be completed in under 30 minutes.
How do I make my garden crafts weather-resistant? Use outdoor-grade acrylic paint and always finish with a clear UV-resistant sealant spray. For wooden crafts, apply a waterproof varnish or deck sealant.
Can I do these garden crafts with kids? Absolutely. Painted rocks, seed packet pinwheels, and fairy gardens are especially kid-friendly. Supervise closely with any tools like hot glue guns or hammers.
How much do these projects typically cost? Most of these projects can be made for under $10 using materials you already have at home or can buy inexpensively. Upcycled projects like boot planters and bottle borders cost almost nothing.
Do I need a large garden to enjoy these crafts? Not at all. Mason jar herb planters, macramé hangers, and painted pots work beautifully on balconies, windowsills, and small patios.
What’s the best time of year to start garden crafts? Spring and early summer are ideal — your decorations will be ready just as the garden comes to life. However, many indoor crafts like macramé and painting can be done year-round.
Conclusion
There’s no better time to get your hands a little dirty and let your creativity grow. These 15 garden crafts ideas prove that you don’t need a big budget or professional skills to create something beautiful outdoors.
Pick one project that excites you, gather your materials, and start crafting. Your garden — and everyone who visits it — will thank you.