12 Creative Fall Wreaths Crafts Ideas for Beautiful Autumn Decor
Fall is the perfect time to refresh your home’s entrance with warm colors and cozy textures. Whether you’re a seasoned crafter or just starting out, making your own wreath is easier than you think.
These 12 fall wreaths Crafts ideas cover every style — from rustic farmhouse to elegant minimal — so you’ll find something that fits your home perfectly.
1. Classic Dried Corn Husk Wreath

A dried corn husk wreath brings an authentic harvest feel to any door. The natural texture and warm golden tones make it a timeless fall staple. It’s budget-friendly and uses simple materials you can often find at a craft store or farmers market.
Materials:
- Dried corn husks (natural or dyed)
- Wire wreath frame (12–14 inch)
- Floral wire
- Scissors
- Optional: small dried flowers or twine bow
Steps:
- Soak corn husks in warm water for 5 minutes to soften.
- Fold each husk in half lengthwise and attach to the wire frame using floral wire.
- Continue layering husks around the frame, overlapping each row slightly.
- Once fully covered, let it dry completely (24 hours).
- Add a twine bow or small dried flowers to finish.
- Time: 45–60 minutes
- Difficulty: Easy
Tip: Use a mix of natural and dyed husks for a richer, more layered look.
2. Velvet Pumpkin and Eucalyptus Wreath
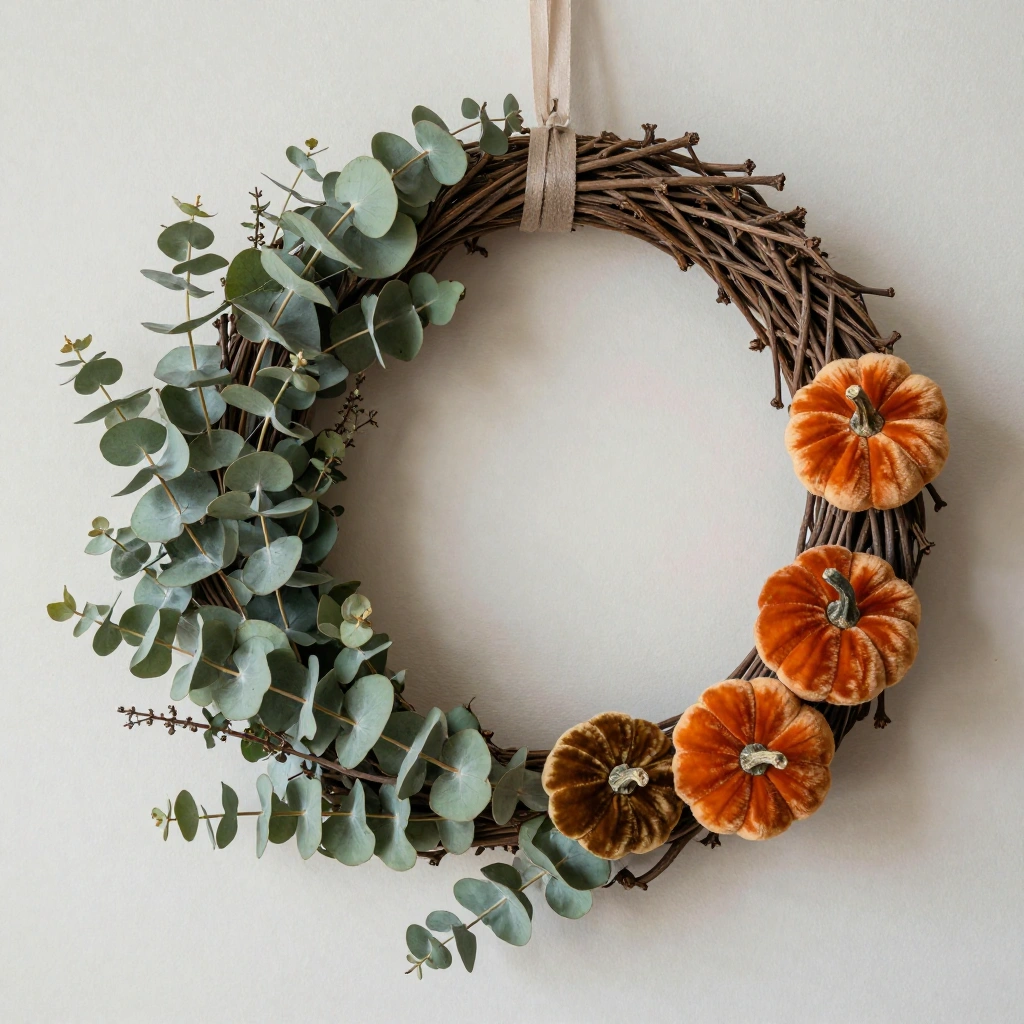
This wreath blends the softness of velvet pumpkins with the fresh, muted tones of eucalyptus. It feels elevated and modern while still staying seasonal. Perfect for homeowners who want something that looks store-bought but costs less.
Materials:
- Grapevine wreath base
- 3–5 velvet mini pumpkins (craft store)
- Fresh or faux eucalyptus stems
- Hot glue gun
- Ribbon or wire for hanging
Steps:
- Arrange eucalyptus stems around the grapevine base, securing with wire or hot glue.
- Space velvet pumpkins evenly across the lower half of the wreath.
- Glue pumpkins firmly in place.
- Fill any gaps with additional eucalyptus or small berries.
- Attach a simple ribbon loop for hanging.
- Time: 30–45 minutes
- Difficulty: Easy
Tip: Use sage green and dusty pink velvet pumpkins for a more modern, muted fall palette.
12 Fall Wreaths Ideas: Sunflower and Burlap Farmhouse Wreath

A sunflower and burlap wreath is a farmhouse classic that never goes out of style. The bright yellow blooms against the rough texture of burlap create a cheerful, welcoming look. This one is beginner-friendly and assembles quickly.
Materials:
- Foam or straw wreath base
- Burlap ribbon (2.5 inch wide)
- Faux sunflowers (6–8 stems)
- Hot glue gun
- Twine or jute rope
Steps:
- Wrap burlap ribbon tightly around the wreath base, securing with hot glue at start and end.
- Arrange sunflowers in a cluster on one side of the wreath.
- Glue each sunflower stem into place securely.
- Add a looped twine bow at the top of the cluster.
- Hang with a jute rope hanger.
- Time: 20–35 minutes
- Difficulty: Easy
Tip: Mix in a few small faux leaves or berries between sunflowers to add depth.
4. Maple Leaf Monogram Wreath
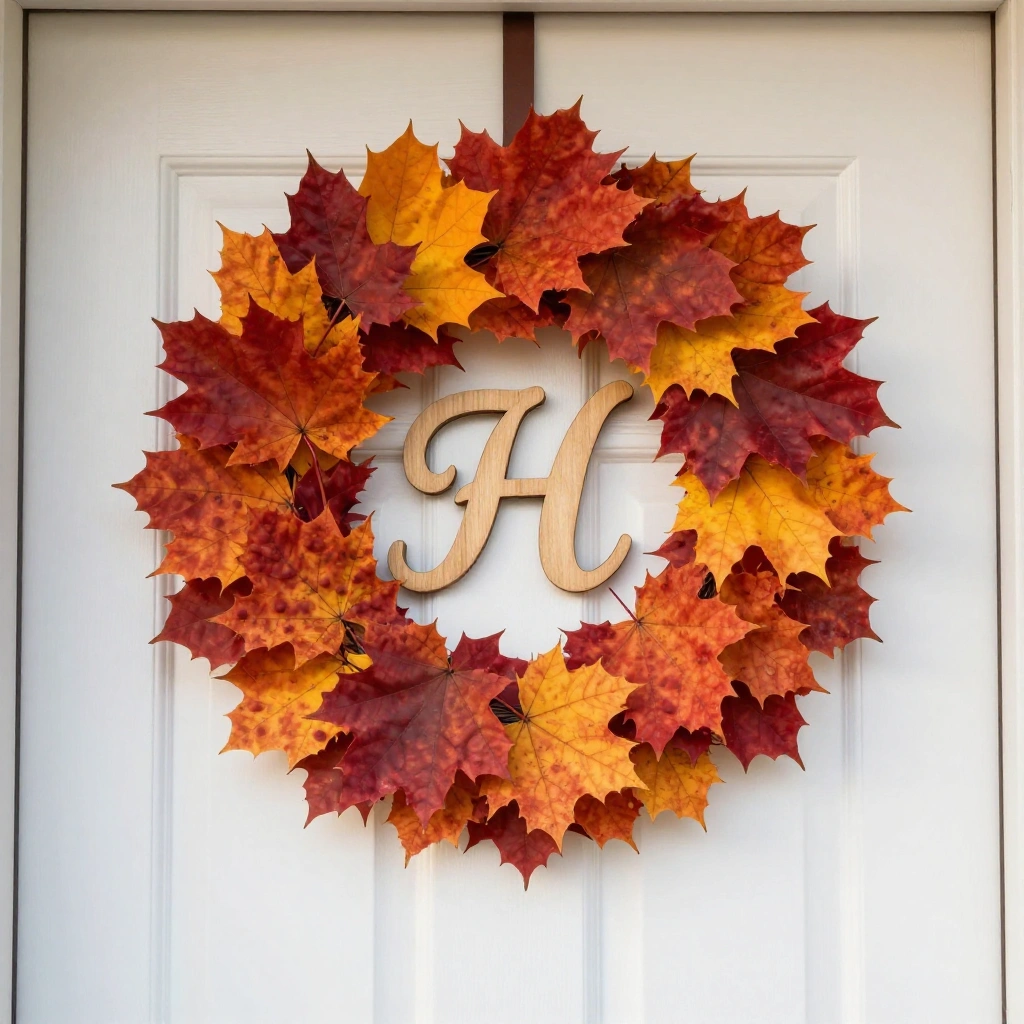
This wreath puts a personal touch on fall décor. A wooden letter centered in a leafy ring makes it feel custom and thoughtful. It also makes a wonderful housewarming or hostess gift.
Materials:
- Wire wreath frame
- Faux fall maple leaves (red, orange, yellow)
- Wooden letter (craft store)
- Hot glue gun
- Floral wire
- Optional: small acorns or berries
Steps:
- Attach faux maple leaves to the wire frame using floral wire, layering colors as you go.
- Continue until the full frame is covered.
- Paint or stain the wooden letter if desired; let it dry.
- Center and glue the letter to the front of the leaf-covered wreath.
- Add small acorns or berries around the letter for detail.
- Time: 45–60 minutes
- Difficulty: Easy–Medium
Tip: Use a mix of red, burnt orange, and yellow leaves so it looks like a real autumn canopy.
5. Dried Orange Slice and Cinnamon Wreath

This aromatic wreath is as beautiful as it smells. Dried orange slices are easy to make at home in the oven, and combined with cinnamon sticks they create a cozy, spiced fall display. It looks stunning in photos and even better in person.
Materials:
- 3–4 oranges
- Cinnamon sticks
- Grapevine or twig wreath base
- Twine
- Hot glue gun
- Optional: dried rosemary or bay leaves
Steps:
- Slice oranges thinly and bake at 200°F (93°C) for 3–4 hours, flipping halfway through.
- Let slices cool completely.
- Arrange dried orange slices and cinnamon sticks on the wreath base.
- Secure with hot glue or twine.
- Fill gaps with dried herbs or extra cinnamon sticks.
- Time: 4–5 hours (mostly drying time)
- Difficulty: Easy
Tip: Seal dried orange slices with Mod Podge to preserve them longer and add a slight sheen
6. Cotton Stem and Twig Minimal Wreath
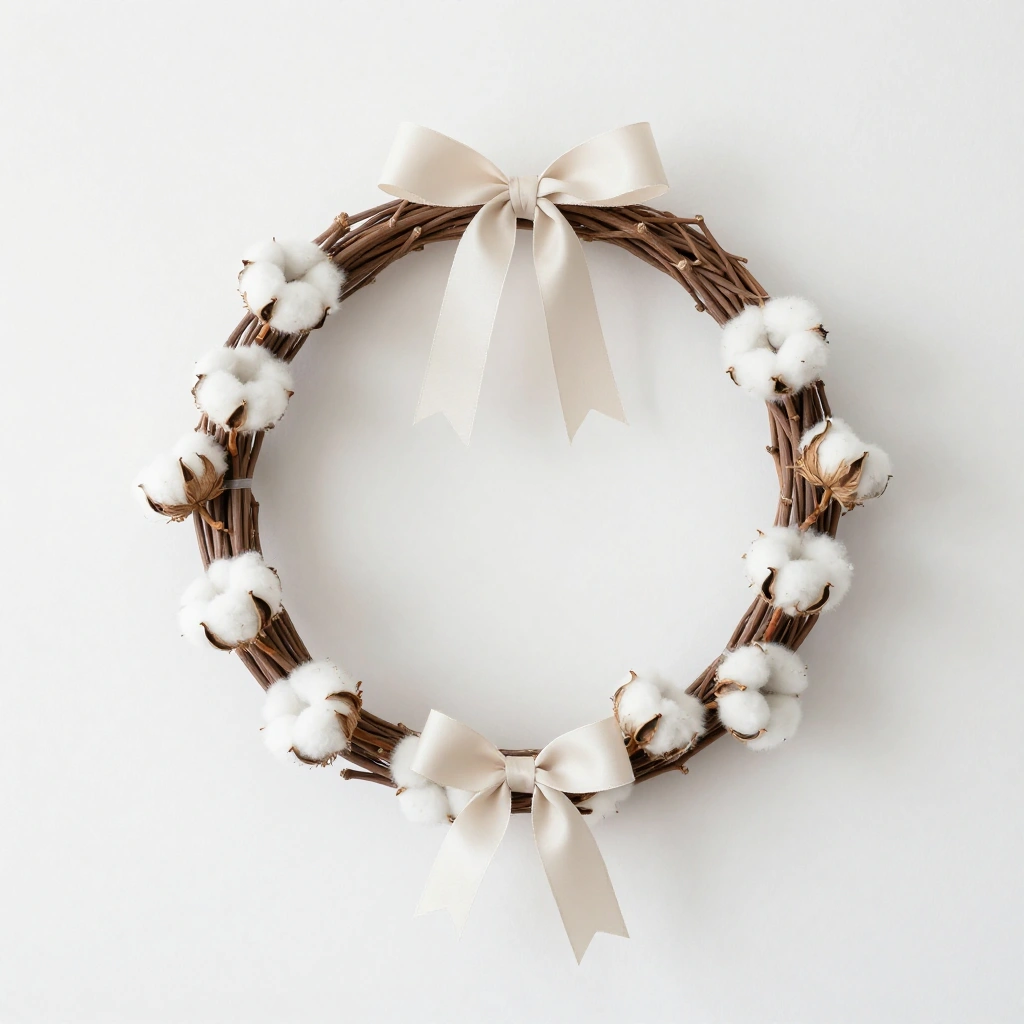
For those who prefer a cleaner aesthetic, this minimal wreath is stunning. White cotton stems against a simple twig base feel fresh, modern, and seasonally appropriate. It pairs well with neutral, Scandinavian, or boho home styles.
Materials:
- Twig or grapevine wreath base
- Faux cotton stems (5–7)
- Neutral ribbon (ivory or beige)
- Hot glue gun
- Optional: dried pampas grass
Steps:
- Space cotton stems evenly around the wreath base.
- Glue each stem firmly into the twigs.
- Add a few sprigs of pampas grass for texture if desired.
- Tie a simple ribbon bow at the top.
- Hang using a ribbon or clear wreath hanger.
- Time: 20–30 minutes
- Difficulty: Easy
Tip: Keep the color palette strictly neutral — ivory, beige, and white — for maximum minimal impact.
12 Fall Wreaths Crafts Ideas: Pinecone and Acorn Woodland Wreath
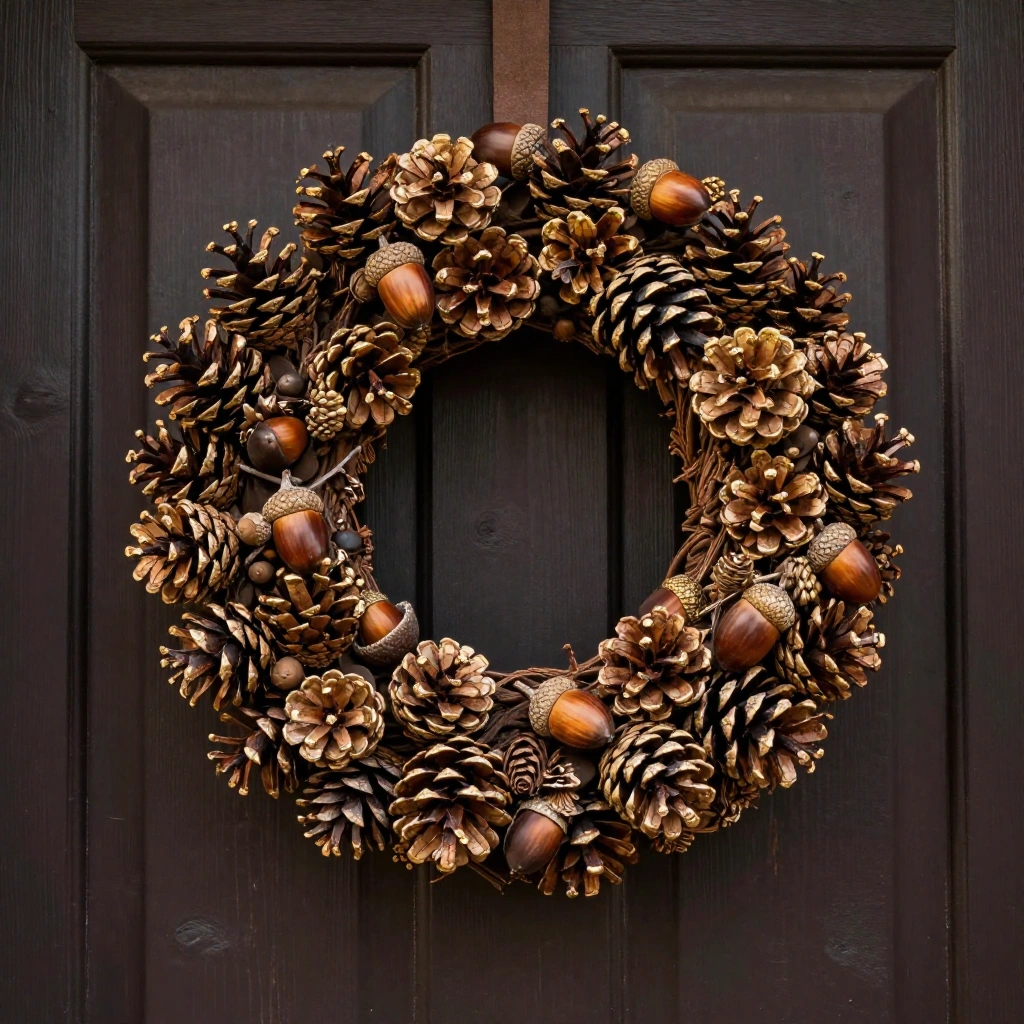
Bring the forest to your front door with this nature-inspired woodland wreath. Pinecones and acorns are often free to collect, making this one of the most cost-effective options on the list. It’s especially beautiful with a touch of gold spray paint.
Materials:
- Foam or wire wreath base
- Assorted pinecones (small, medium, large)
- Acorns or faux acorn picks
- Hot glue gun
- Gold or copper spray paint (optional)
- Twine for hanging
Steps:
- Lightly spray some pinecones with gold paint and let dry.
- Starting from the outer edge, hot glue large pinecones to the wreath base.
- Fill in gaps with medium and small pinecones.
- Tuck acorns into gaps between pinecones and glue in place.
- Add a twine loop for hanging.
- Time: 45–60 minutes
- Difficulty: Medium
Tip: Collect and bake pinecones at 250°F for 30 minutes first to kill any bugs or sap.
8. Pumpkin Patch Mini Wreath
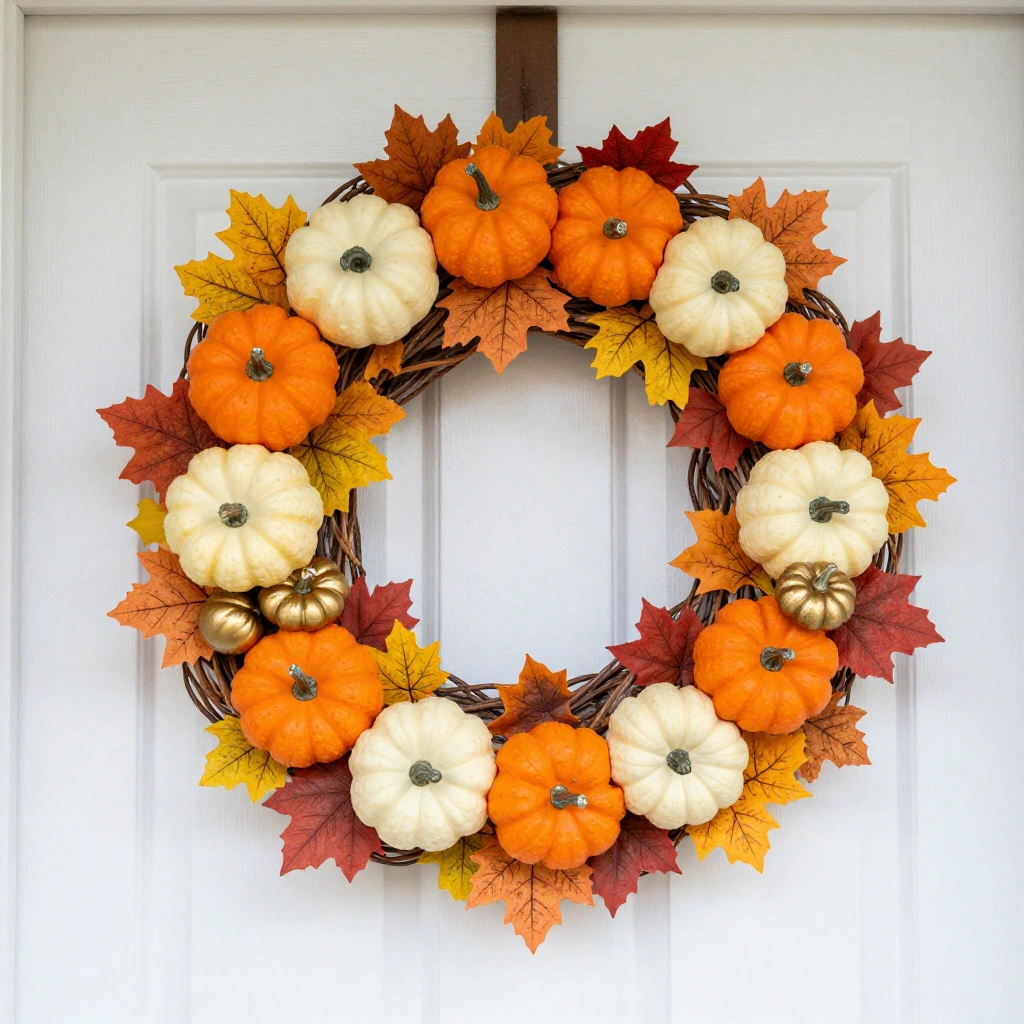
This charming small-scale wreath is perfect for interior doors, cabinets, or as a gift topper. Mini foam pumpkins in fall colors cluster together into a sweet, low-effort decoration. It takes under 30 minutes and looks adorable on any surface.
Materials:
- Small wire wreath frame (8–10 inch)
- Mini foam or faux pumpkins (assorted colors)
- Faux fall leaves
- Hot glue gun
- Thin ribbon
Steps:
- Arrange mini pumpkins on the wire frame to plan your layout.
- Glue each pumpkin firmly to the frame.
- Fill spaces between pumpkins with small faux leaves.
- Tie a thin ribbon bow at the top.
- Hang with a small command hook.
- Time: 20–30 minutes
- Difficulty: Easy
Tip: Use pumpkins in varying heights — stack two small ones together for a fun layered effect.
9. Mesh Ribbon Deco Mesh Wreath
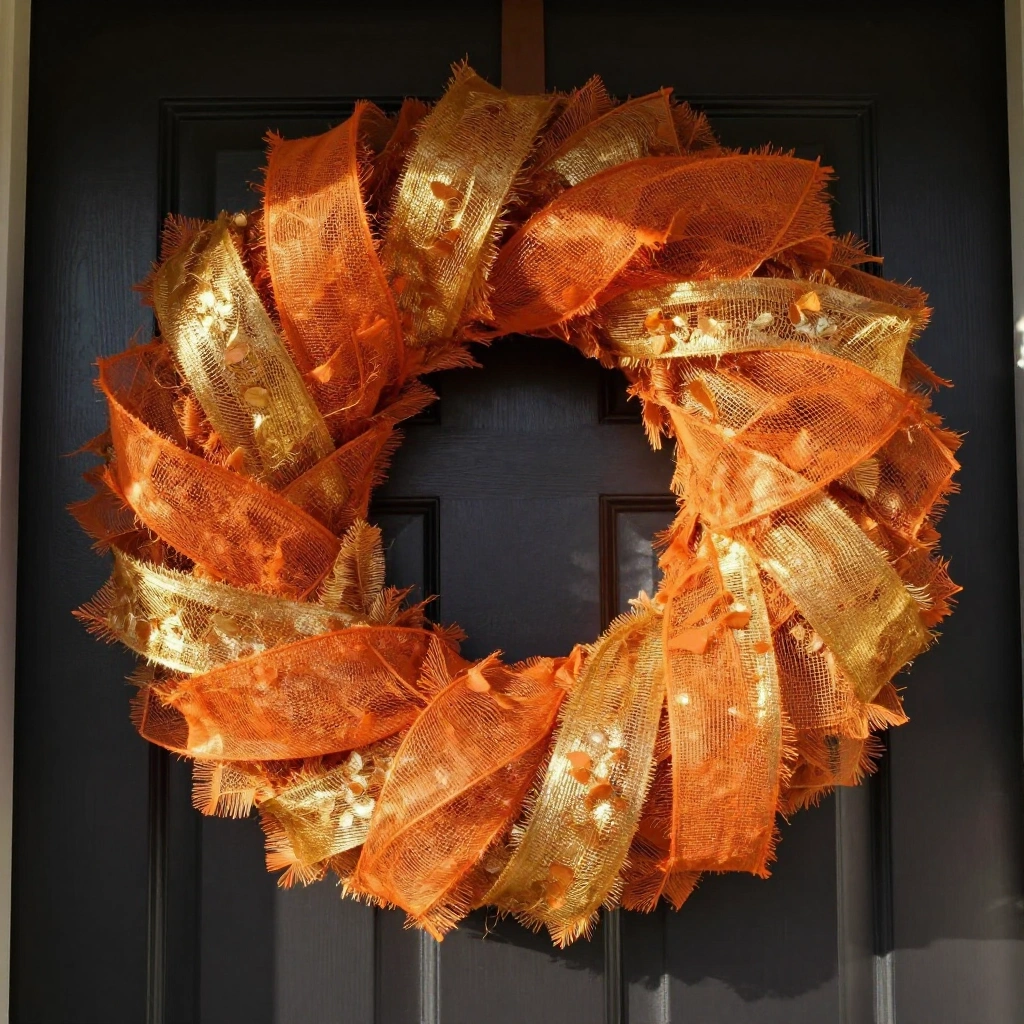
Deco mesh wreaths are bold, full, and eye-catching. The ruffled mesh creates a lush, almost flower-like texture that looks impressive on any front door. You can customize the colors to match your home’s exterior perfectly.
Materials:
- Wire wreath frame (18–21 inch)
- Deco mesh roll (orange, burgundy, or gold — 10 inch wide)
- Pipe cleaners or zip ties
- Optional: ribbon streamers or picks
Steps:
- Attach one end of the mesh to the outer ring of the frame with a pipe cleaner.
- Loop the mesh in and out of the wire rings, scrunching as you go to create ruffles.
- Secure each loop with a pipe cleaner.
- Continue around the full wreath until covered.
- Tuck in ribbon streamers or decorative picks to fill any thin spots.
- Time: 45–75 minutes
- Difficulty: Medium
Tip: Use two colors of mesh, alternating sections, for a more dynamic, layered look.
10. Felt Flower Autumn Wreath
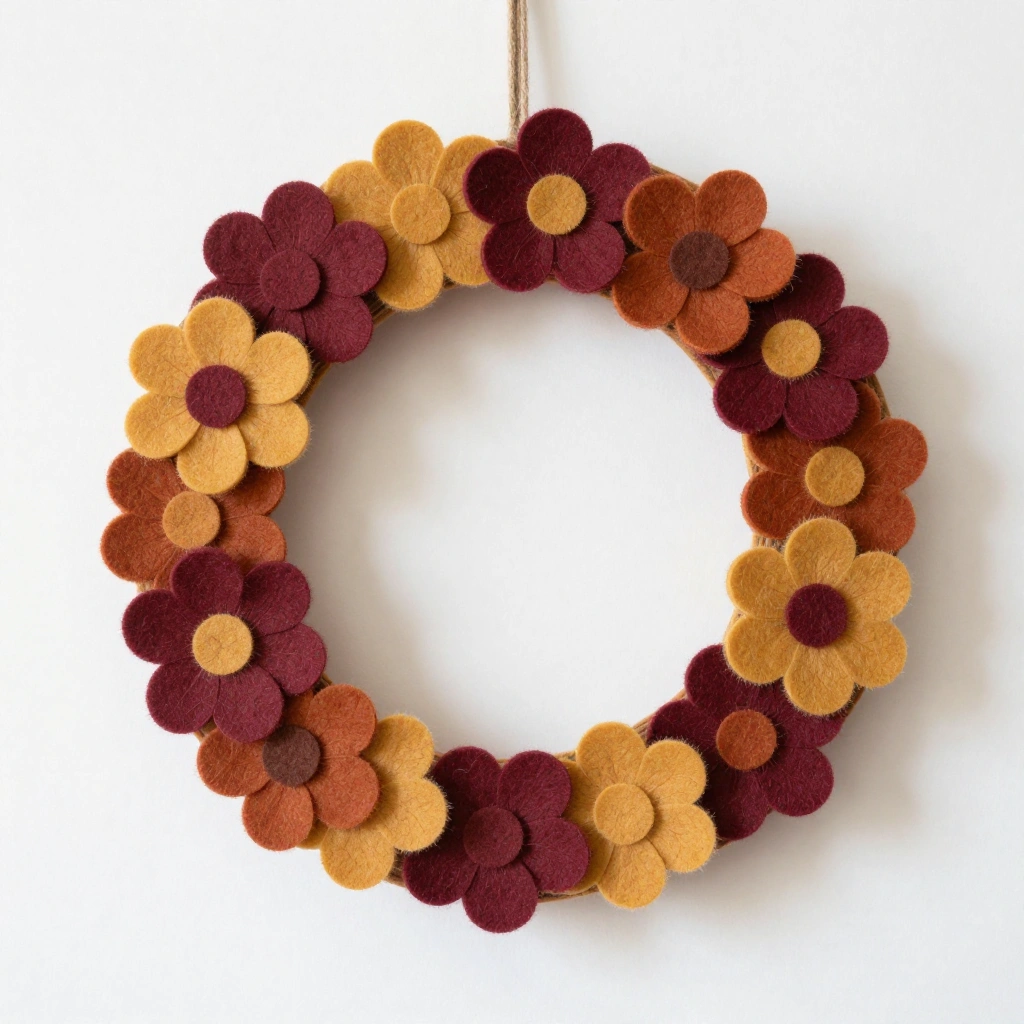
Felt flowers are lightweight, affordable, and incredibly customizable. You can cut them by hand or use a Cricut machine for perfectly uniform petals. This wreath works well indoors or in covered porch areas since felt isn’t weather-resistant.
Materials:
- Foam wreath base
- Felt sheets in fall colors (rust, mustard, burgundy, olive)
- Scissors or Cricut machine
- Hot glue gun
- Button or felt circle centers
Steps:
- Cut large and small petal shapes from felt sheets.
- Layer petals from large to small, gluing each layer to the center.
- Add a felt circle or button center to each flower.
- Make 10–15 flowers in varying sizes and colors.
- Glue flowers across the foam base until fully covered.
- Time: 60–90 minutes
- Difficulty: Medium
Tip: Vary the size of your flowers significantly — a few oversized blooms add a dramatic, editorial feel.
12 Fall Wreaths Ideas: Harvest Grain and Wheat Sheaf Wreath
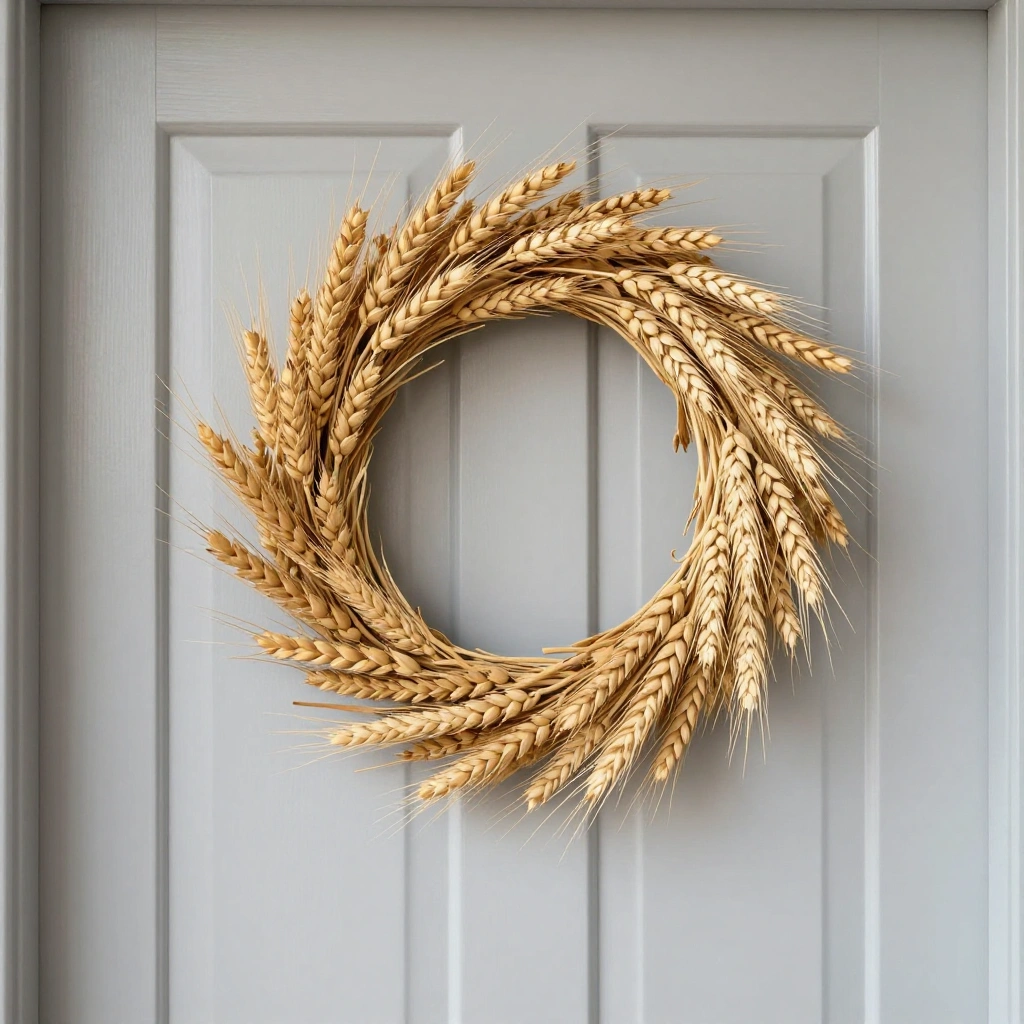
A wheat and grain wreath is elegant, understated, and deeply seasonal. The golden stalks evoke a true harvest feeling and pair well with neutral doors and porches. It’s one of the most sophisticated options on this list.
Materials:
- Dried wheat or grain stems (bundle of 30–50)
- Grapevine wreath base
- Twine or jute rope
- Hot glue gun
- Optional: dried lavender or baby’s breath
Steps:
- Divide wheat stems into small bundles of 5–7 stalks.
- Tie each bundle with a small piece of twine.
- Attach bundles around the wreath base, all facing the same direction, using glue or wire.
- Overlap each bundle to hide the tied ends.
- Add dried lavender or baby’s breath for a delicate accent.
- Time: 30–45 minutes
- Difficulty: Easy
Tip: Fan out the wheat heads slightly before gluing for a fuller, more generous look.
12. Ombre Leaf Color Wreath
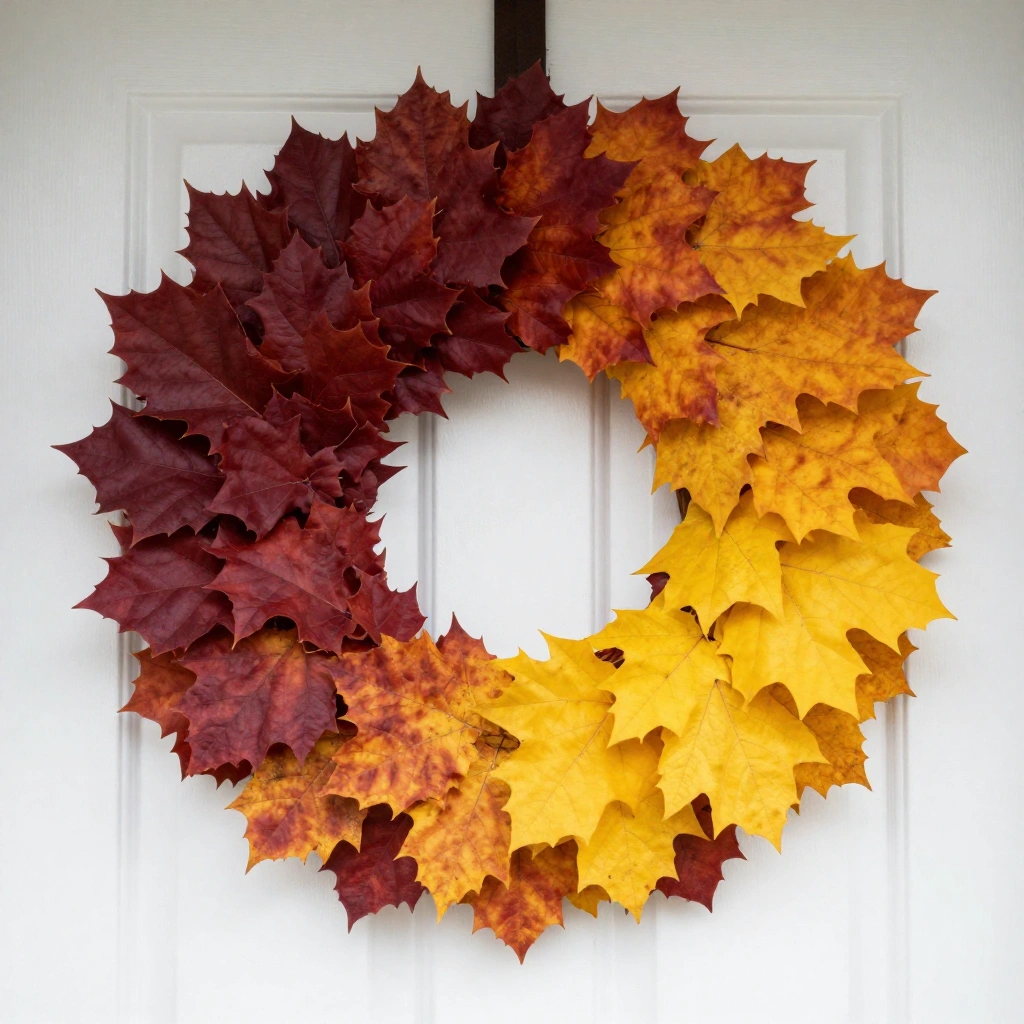
This wreath is a showstopper. By arranging fall leaves in a gradient from deep burgundy to bright yellow, you create a visual effect that mimics the changing autumn canopy. It takes a little planning but the result is absolutely stunning.
Materials:
- Wire wreath frame
- Faux fall leaves in burgundy, orange, amber, and yellow
- Floral wire or hot glue
- Ribbon for hanging
Steps:
- Sort your leaves into four color groups: burgundy, orange, amber, yellow.
- Divide the wreath into four sections mentally.
- Starting with burgundy, attach leaves to the first section using floral wire or glue.
- Continue through orange, amber, and yellow, blending slightly at each transition.
- Add a ribbon loop at the top for hanging.
- Time: 45–60 minutes
- Difficulty: Medium
Tip: Step back frequently while working to check that the color gradient reads clearly from a distance.
Common Mistakes to Avoid
- Using too little glue. Elements that aren’t secured well will fall off within days. Press each piece firmly for a few seconds after applying hot glue and let it cool fully before moving on.
- Ignoring weather exposure. Not all materials hold up outdoors. Felt, paper, and some ribbon types will deteriorate quickly in rain or humidity. Use faux or sealed natural elements for any wreath hanging outside.
- Skipping the wire frame for heavy wreaths. Grapevine bases are beautiful but not always strong enough for heavy materials like pinecones or thick mesh. Use a sturdy wire frame when your materials are dense or weighty.
Tips for Best Results
- Plan before you glue. Lay all your materials out on the wreath base first and take a photo of the arrangement you like before committing with glue.
- Work in sections. Divide the wreath into quarters and fill each one before moving on — this keeps the design balanced.
- Use odd numbers. When clustering focal elements like pumpkins or flowers, groups of 3 or 5 always look more natural than even numbers.
- Layer textures. The most visually interesting wreaths combine at least three different textures — smooth, rough, and fluffy.
- Check from the door. Hang your wreath on the actual door periodically as you build it. What looks good on the table may look different at eye level on a vertical surface.
- Seal natural elements. Spray dried flowers, leaves, and grains with a light coat of clear acrylic sealer to help them last the whole season.
FAQs
How long does a handmade fall wreath last? Most well-made fall wreaths last one full season — about 2–3 months. Using faux or sealed materials can extend their life to multiple years if stored properly.
What wreath base is best for beginners? A grapevine wreath base is the most beginner-friendly option. It has natural texture, looks beautiful on its own, and you can insert stems directly into it without glue.
Can I leave a wreath outside in the rain? It depends on the materials. Grapevine, pinecones, and wire frames are fine in light rain. Felt, paper flowers, dried citrus, and thin ribbon should be kept on covered porches or used indoors only.
How do I hang a wreath without damaging my door? Use an over-the-door wreath hanger or a large Command hook rated for the wreath’s weight. Both are damage-free and remove easily.
Where can I find affordable fall wreath supplies? Dollar Tree, Walmart, and Michaels (especially during fall sales) are great sources. You can also collect natural items like pinecones, acorns, and wheat stems for free outdoors.
How do I store a handmade wreath after fall? Store in a large plastic bin or a wreath storage box. Hang the wreath inside the container rather than laying it flat to preserve its shape.
Conclusion
Fall wreath-making is one of the most satisfying seasonal crafts you can try. Whether you’re drawn to rustic corn husks, elegant wheat sheaves, or bold ombre leaves, there’s a style here that fits your home and your skill level.
Pick one that excites you, gather your supplies, and give it a try this weekend. Your front door deserves a little autumn magic — and now you have 12 beautiful ways to create it.