16 Fall Pumpkin Crafts Ideas to Decorate Your Home This Season
Fall is here, and it’s the perfect time to get creative with one of autumn’s most iconic symbols. These 16 fall pumpkin crafts ideas will help you transform plain pumpkins into stunning seasonal decorations — no carving required.
Whether you’re crafting with kids or setting up a cozy home display, there’s something on this list for every skill level.
1. Glitter Dipped Pumpkin
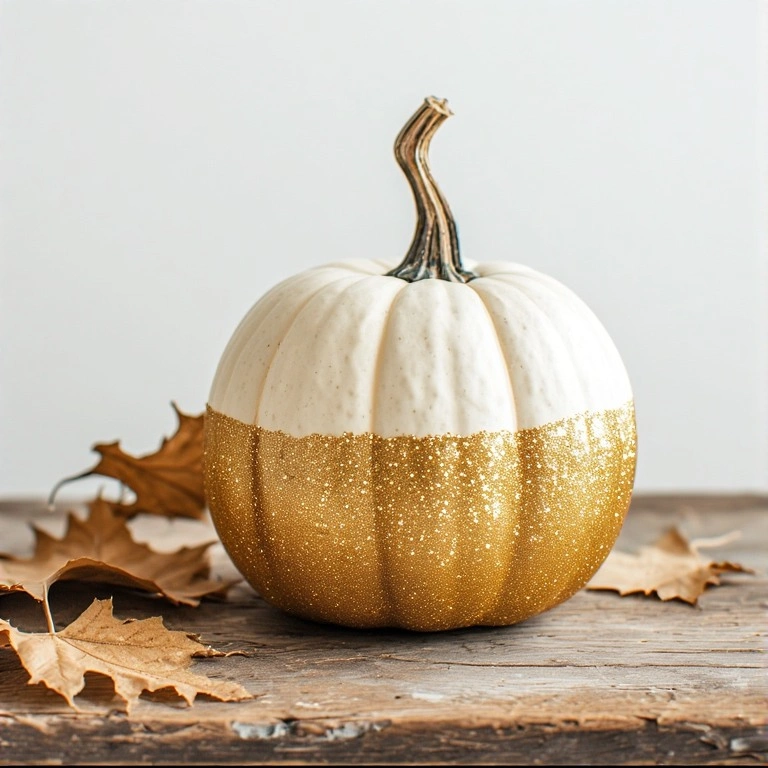
A glamorous twist on a classic pumpkin. Dipping the bottom half in glitter gives it a sparkling, Pinterest-worthy look that works beautifully on a mantel or entryway table.
Materials:
- Small white or orange pumpkin
- Craft glitter (gold or copper)
- Mod Podge
- Foam brush
- Newspaper or craft mat
Steps:
- Brush Mod Podge generously onto the bottom half of the pumpkin.
- Roll or sprinkle glitter over the wet Mod Podge.
- Let it dry for 30 minutes.
- Apply a second coat of Mod Podge over the glitter to seal it.
- Let dry completely before displaying.
- Time: 15–20 minutes (plus drying)
- Difficulty: Easy
💡 Tip: Use chunky glitter for a bolder effect, or fine glitter for an elegant look.
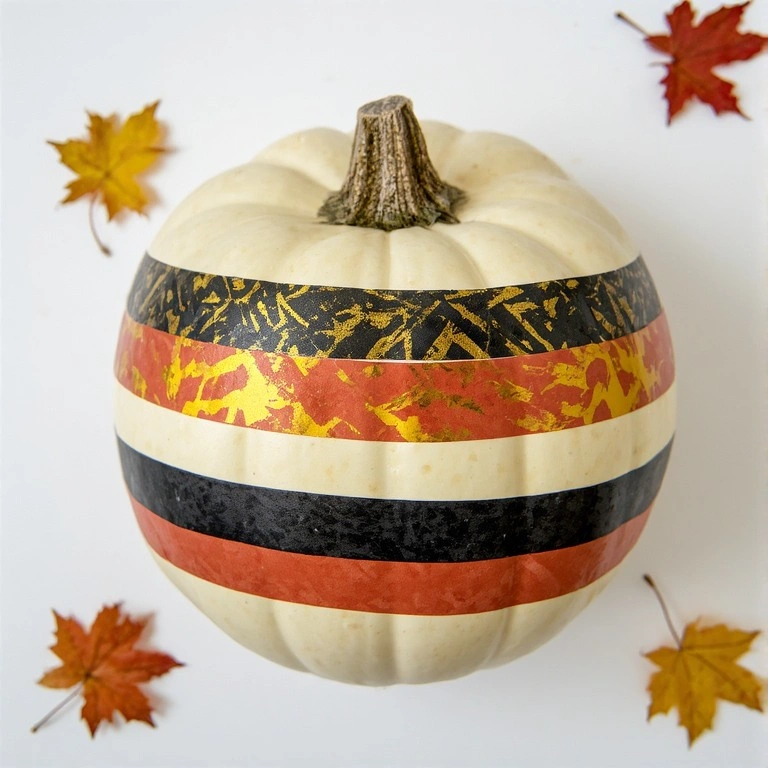
2. Painted Striped Pumpkin
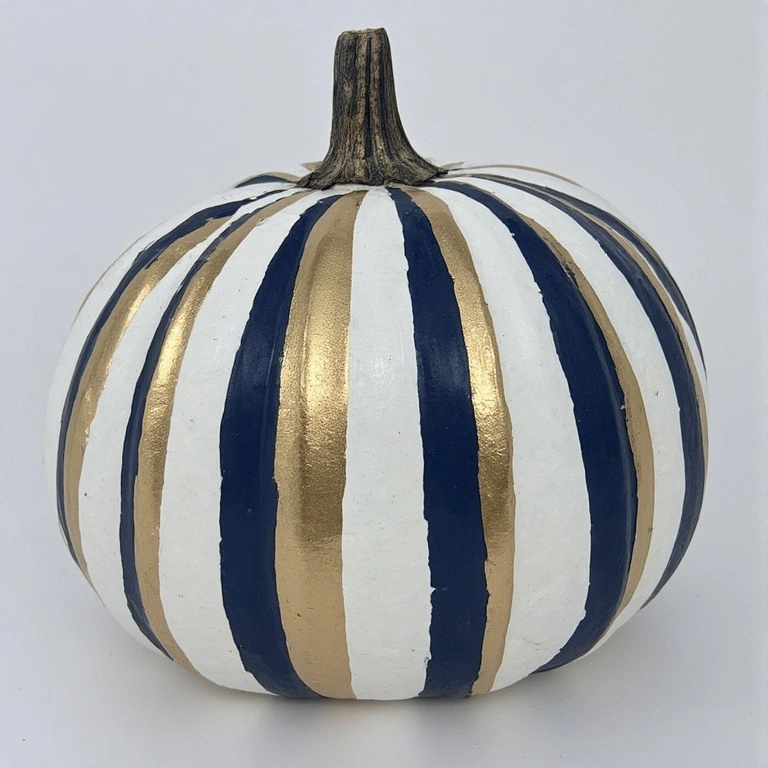
Stripes add a modern, graphic look to traditional pumpkins. This is one of the easiest fall pumpkin crafts to customize — pick any color palette to match your home decor.
Materials:
- Medium pumpkin (real or faux)
- Acrylic paint (2–3 colors)
- Painter’s tape
- Foam brush or sponge
Steps:
- Clean and dry the pumpkin surface.
- Apply painter’s tape in vertical stripes around the pumpkin.
- Paint alternating sections with your chosen colors.
- Let dry, then carefully peel off the tape.
- Touch up any edges with a fine brush.
- Time: 20–30 minutes
- Difficulty: Easy
💡 Tip: Use metallic paint for one stripe to add dimension.
3. Floral Pumpkin Centerpiece

This no-carve idea turns a pumpkin into a vase-style floral centerpiece. It’s stunning for fall tablescapes and dinner parties.
Materials:
- Large hollow pumpkin (real or faux)
- Fresh or faux autumn flowers (sunflowers, mums, dahlias)
- Small mason jar or plastic cup
- Floral foam or water
- Knife or drill (for real pumpkin)
Steps:
- If using a real pumpkin, carve out the top and hollow it out.
- Place a mason jar filled with water (or floral foam) inside.
- Cut flower stems to the desired length.
- Arrange flowers starting with the largest blooms first.
- Fill gaps with smaller flowers or greenery.
- Time: 20–30 minutes
- Difficulty: Medium
💡 Tip: Mist the flowers daily to keep them fresh longer.
4. Chalkboard Pumpkin
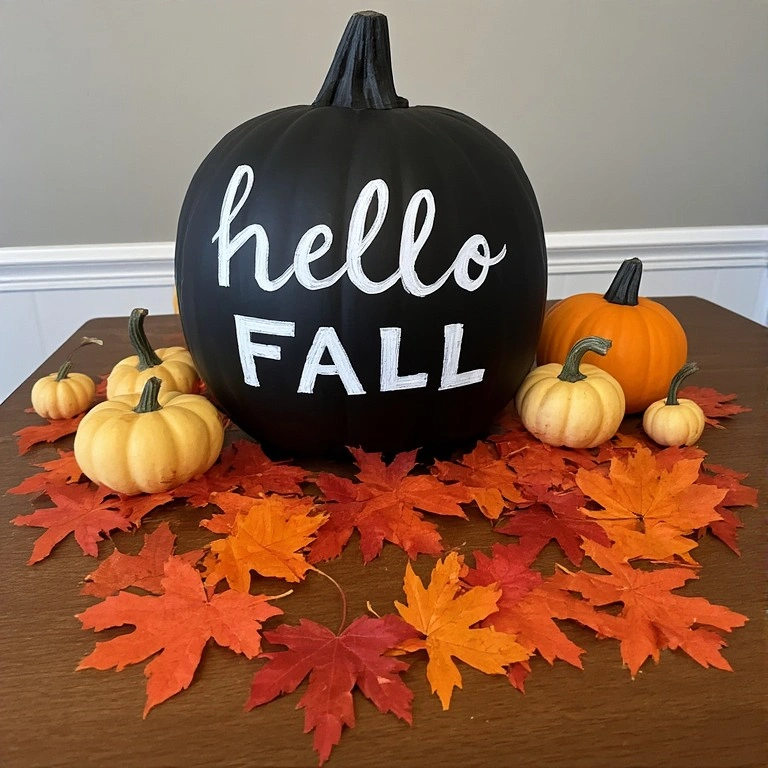
A chalkboard-painted pumpkin lets you write seasonal messages, names, or fun drawings — and erase and redo it as often as you like.
Materials:
- Pumpkin (real or faux)
- Chalkboard spray paint or brush-on chalkboard paint
- Chalk or chalk markers
- Sealer spray (optional)
Steps:
- Clean the pumpkin and let it dry.
- Apply 2–3 coats of chalkboard paint, letting each coat dry.
- Once fully dry, condition the surface by rubbing chalk all over it, then wiping clean.
- Write your message or draw a design with chalk.
- Time: 15–20 minutes (plus drying time)
- Difficulty: Easy
💡 Tip: Use chalk markers for more precise, permanent writing.
16 Fall Pumpkin Crafts Ideas: Idea 5 — Decoupage Napkin Pumpkin
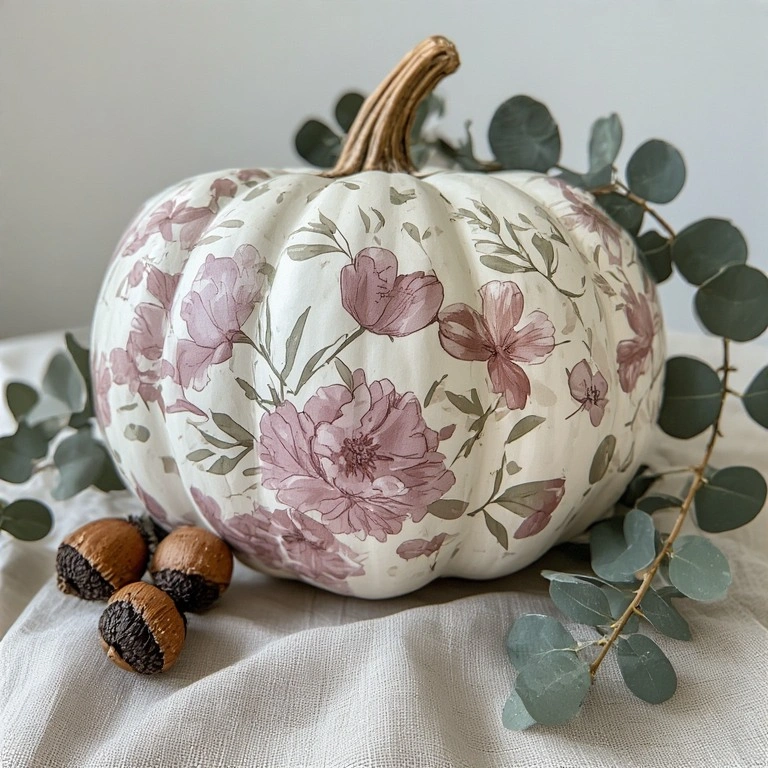
Decoupage is a simple technique that creates a beautiful, layered look using patterned napkins or tissue paper. The result looks high-end with minimal effort.
Materials:
- White or light-colored pumpkin
- Decorative paper napkins or tissue paper
- Mod Podge
- Foam brush
- Scissors
Steps:
- Separate the napkin layers and use only the printed top layer.
- Tear or cut napkin into pieces.
- Apply Mod Podge to a small section of the pumpkin.
- Lay napkin pieces onto the wet Mod Podge, smoothing as you go.
- Overlap pieces slightly. Seal with a final coat of Mod Podge.
- Time: 25–35 minutes
- Difficulty: Easy
💡 Tip: Floral or plaid napkins give a cozy, cottage-style finish.
6. Yarn-Wrapped Pumpkin
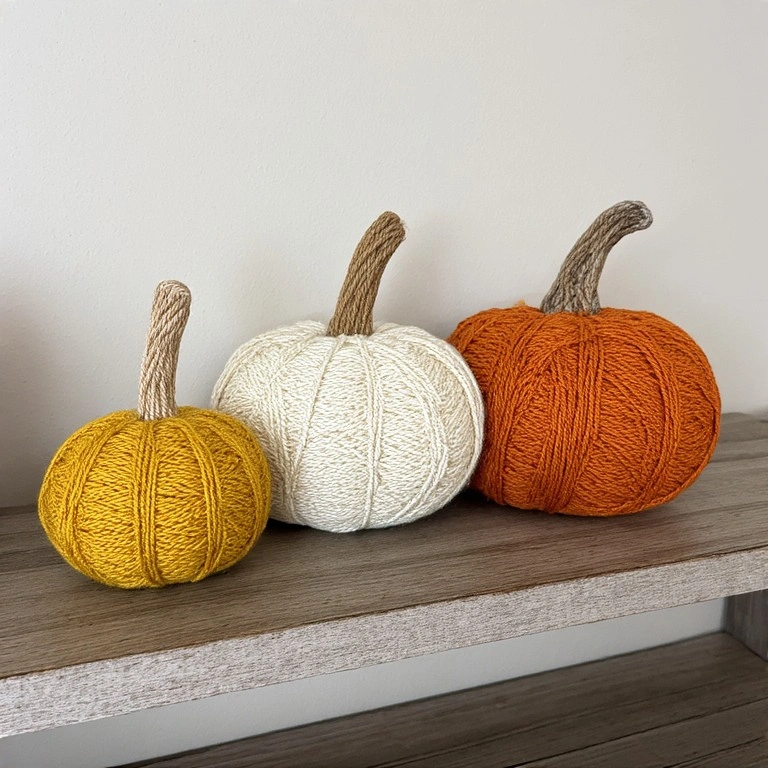
Yarn-wrapped pumpkins are cozy, tactile, and totally kid-friendly. They look adorable in a fall vignette and last for years if made on a faux pumpkin.
Materials:
- Faux or real pumpkin
- Yarn in fall colors (orange, cream, rust, mustard)
- Hot glue gun
- Scissors
Steps:
- Apply a small dab of hot glue near the stem to anchor the yarn.
- Wrap yarn tightly around the pumpkin, row by row.
- Change colors by cutting and gluing new yarn at any point.
- Secure the end with a final dab of hot glue.
- Time: 30–45 minutes
- Difficulty: Easy
💡 Tip: Alternate yarn textures (chunky, smooth) for a layered look.
7. Marbled Nail Polish Pumpkin
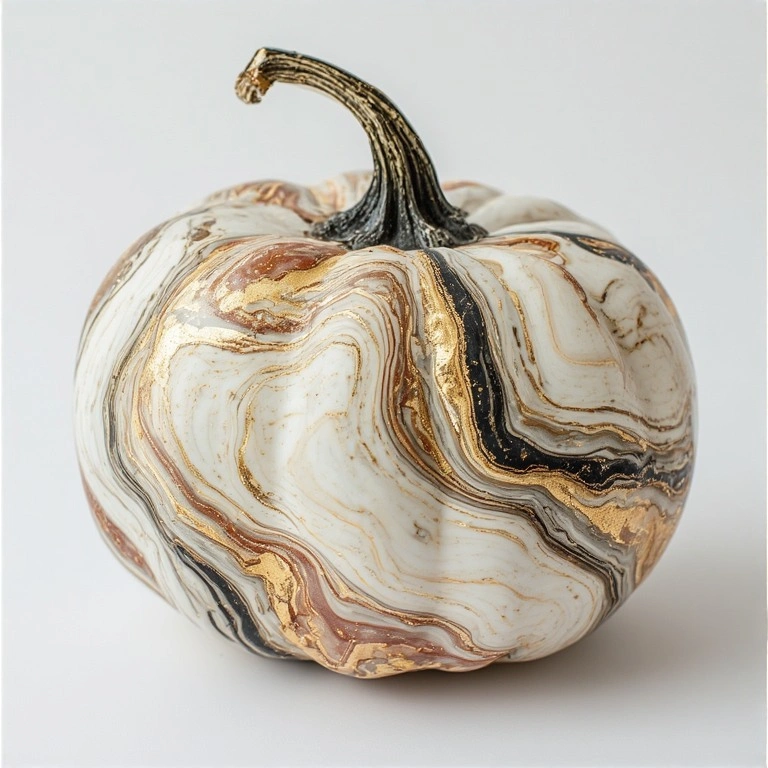
This water marbling technique creates a stunning swirled effect on pumpkins — every single one turns out unique and beautiful.
Materials:
- Small smooth pumpkin (white or light)
- Nail polish in 2–3 fall colors
- Disposable container of water
- Toothpick
- Plastic gloves
Steps:
- Fill a container with room-temperature water.
- Drop nail polish colors onto the water surface one by one.
- Swirl gently with a toothpick to create a marble pattern.
- Dip the pumpkin slowly into the water through the pattern.
- Lift out and let dry completely.
- Time: 15–25 minutes
- Difficulty: Medium
💡 Tip: Work quickly — nail polish dries fast on the water surface.
8. Succulent Pumpkin Planter

Hollow out a pumpkin and turn it into a living succulent planter. It’s one of the most unique fall pumpkin crafts that doubles as both a craft and a garden project.
Materials:
- Medium pumpkin
- Assorted small succulents
- Potting soil or floral foam
- Knife and spoon (for hollowing)
- Moss (optional)
Steps:
- Cut off the top of the pumpkin and scoop out the insides.
- Fill the base with potting soil or wet floral foam.
- Arrange succulents by pressing them into the soil.
- Fill gaps with moss for a finished, lush look.
- Mist lightly with water every few days.
- Time: 20–30 minutes
- Difficulty: Easy
💡 Tip: Real pumpkins last 2–4 weeks as planters. Use a faux pumpkin for a permanent display.
9. Gold Leaf Pumpkin
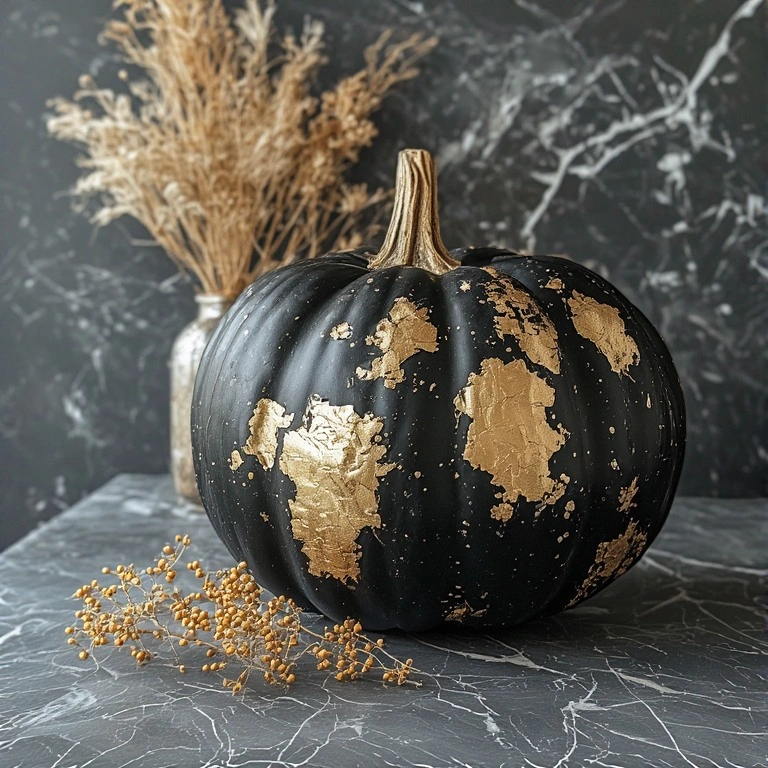
Gold leaf adds an instant luxurious, elegant look to any pumpkin. This is a stunning craft that works for both Halloween and Thanksgiving displays.
Materials:
- Dark or black pumpkin (real or faux)
- Gold leaf sheets
- Gold leaf adhesive (size)
- Soft brush
- Sealer spray
Steps:
- Apply gold leaf adhesive to sections of the pumpkin.
- Wait until the adhesive becomes tacky (about 15–20 minutes).
- Gently press gold leaf sheets onto the adhesive.
- Use a soft brush to smooth and remove excess leaf.
- Seal with a spray sealer to protect the finish.
- Time: 30–40 minutes
- Difficulty: Medium
💡 Tip: Patchy, uneven coverage looks intentionally artistic — don’t over-smooth.
10. Stenciled Monogram Pumpkin
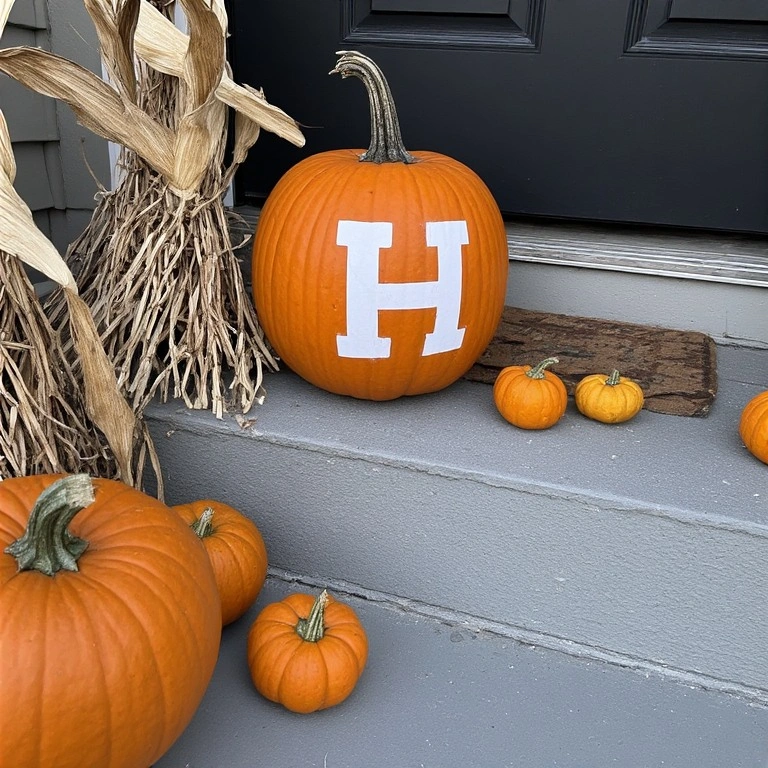
Personalize your pumpkins with a monogram or word using a stencil and paint. Great for front porch displays or as a personalized hostess gift.
Materials:
- Pumpkin (any size)
- Letter or monogram stencil
- Acrylic paint
- Stencil brush or sponge
- Painter’s tape
Steps:
- Tape the stencil securely onto the pumpkin.
- Dab paint onto the stencil using an up-and-down stippling motion.
- Apply 2 coats for full coverage.
- Carefully peel off the stencil before the paint dries completely.
- Let dry fully before handling.
- Time: 15–20 minutes
- Difficulty: Easy
💡 Tip: Use white paint on a dark pumpkin for maximum contrast.
11. Washi Tape Geometric Pumpkin
Washi tape makes it effortless to create geometric patterns on pumpkins with zero painting skills required. The best part — it’s completely removable!
Materials:
- White or cream pumpkin
- Washi tape in 2–4 patterns/colors
- Scissors
Steps:
- Plan your geometric pattern before applying tape.
- Apply strips of washi tape in diagonal, horizontal, or chevron patterns.
- Press firmly along the edges to prevent lifting.
- Trim excess tape at the edges with scissors.
- Layer different tapes to create depth and pattern.
- Time: 10–15 minutes
- Difficulty: Easy
💡 Tip: Combine wide and narrow tape widths for more visual interest.
12. Lace-Wrapped Pumpkin
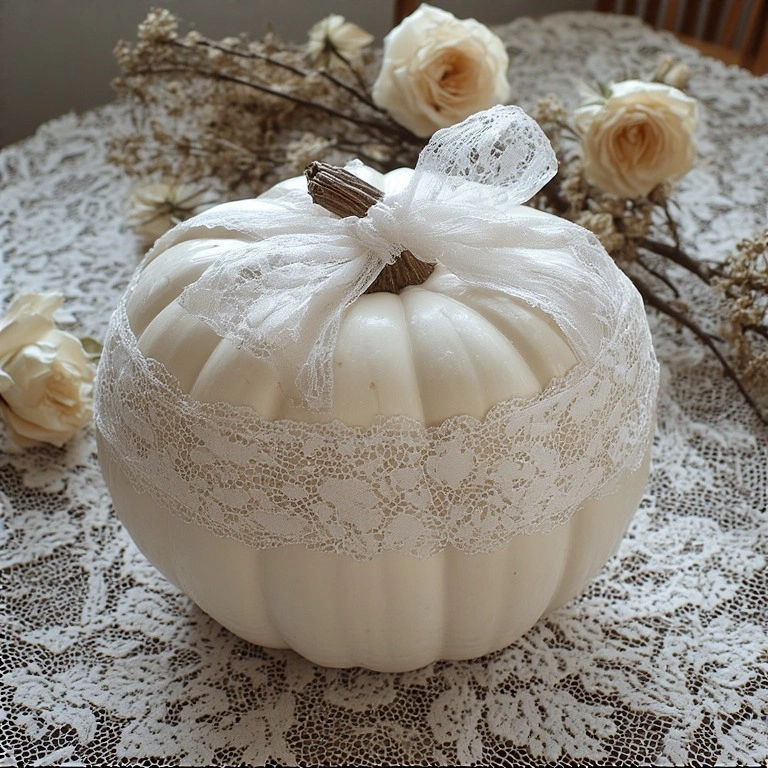
Wrapping a pumpkin in lace ribbon creates a romantic, vintage-inspired look. It’s quick, elegant, and requires no glue or painting.
Materials:
- White or ivory pumpkin
- Lace ribbon or lace trim (wide)
- Pins or hot glue
- Scissors
Steps:
- Cut lace ribbon into strips long enough to wrap around the pumpkin sections.
- Wrap each strip between the pumpkin’s ridges.
- Secure at the back with a pin or tiny dab of hot glue.
- Repeat for each section until the pumpkin is covered.
- Tie a small lace bow near the stem for a finishing touch.
- Time: 15–20 minutes
- Difficulty: Easy
13. Glow-in-the-Dark Pumpkin

This spooky, fun craft is perfect for Halloween. Glow-in-the-dark paint lets the pumpkin shine in the dark without any carving.
Materials:
- Orange or black pumpkin
- Glow-in-the-dark acrylic paint
- Fine paintbrush
- Pencil (for sketching design)
Steps:
- Lightly sketch a design on the pumpkin with pencil (stars, spiders, faces).
- Paint over the design with glow-in-the-dark paint.
- Apply 2–3 coats for maximum glow effect.
- Let dry completely in a bright area to charge the paint.
- Display in a dark room or outside at night.
- Time: 20–30 minutes
- Difficulty: Easy
💡 Tip: Hold a flashlight close to the pumpkin for 30 seconds to “charge” the glow.
14. Twine and Burlap Pumpkin
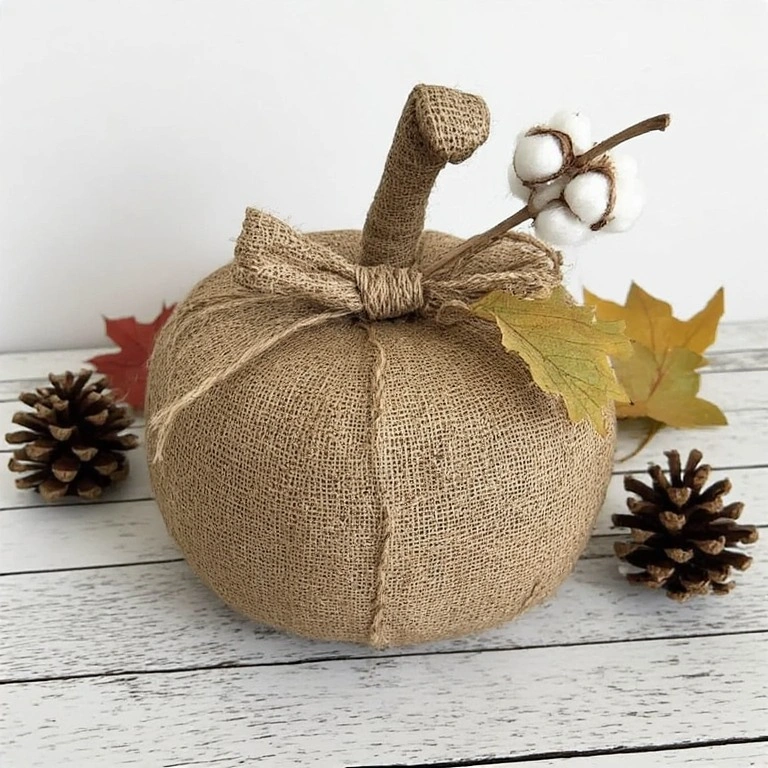
Rustic and farmhouse-inspired, this pumpkin uses natural twine and burlap to create a warm, textured look perfect for Thanksgiving tablescapes.
Materials:
- Faux pumpkin (foam or plastic)
- Jute twine or burlap fabric
- Hot glue gun
- Scissors
- Dried flowers or leaves (optional accent)
Steps:
- Start at the bottom of the pumpkin with a dab of hot glue.
- Wind twine tightly around the pumpkin, gluing every few rows.
- Alternatively, cut burlap into strips and glue to cover the surface.
- Tuck a stem of dried cotton or lavender near the top.
- Finish with a small burlap bow.
- Time: 25–35 minutes
- Difficulty: Easy
16 Fall Pumpkin Crafts Ideas: Idea 15 — Ombre Painted Pumpkin
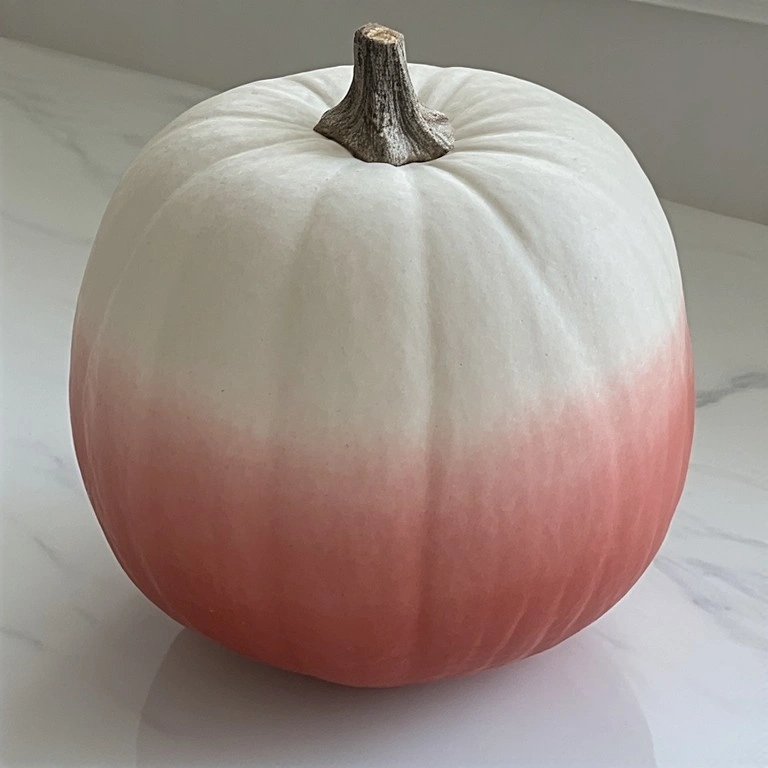
An ombre-painted pumpkin blends two or three colors seamlessly for a stunning, gallery-worthy effect. It looks complex but is surprisingly simple to achieve.
Materials:
- White pumpkin
- Acrylic paint in 3 shades (e.g., white → peach → deep orange)
- Sponge or blending brush
- Palette or plate
Steps:
- Paint the top third of the pumpkin with the lightest color.
- Paint the bottom third with the darkest color.
- While both are still wet, blend the middle using a damp sponge using circular motions.
- Add the mid-tone color in the center and blend into both sides.
- Let dry completely and apply a second coat if needed.
- Time: 20–30 minutes
- Difficulty: Medium
💡 Tip: Work fast while paint is wet for the smoothest blend.
16. Beaded and Jeweled Pumpkin
16 Fall Pumpkin Crafts Ideas: The Final Glamour Craft
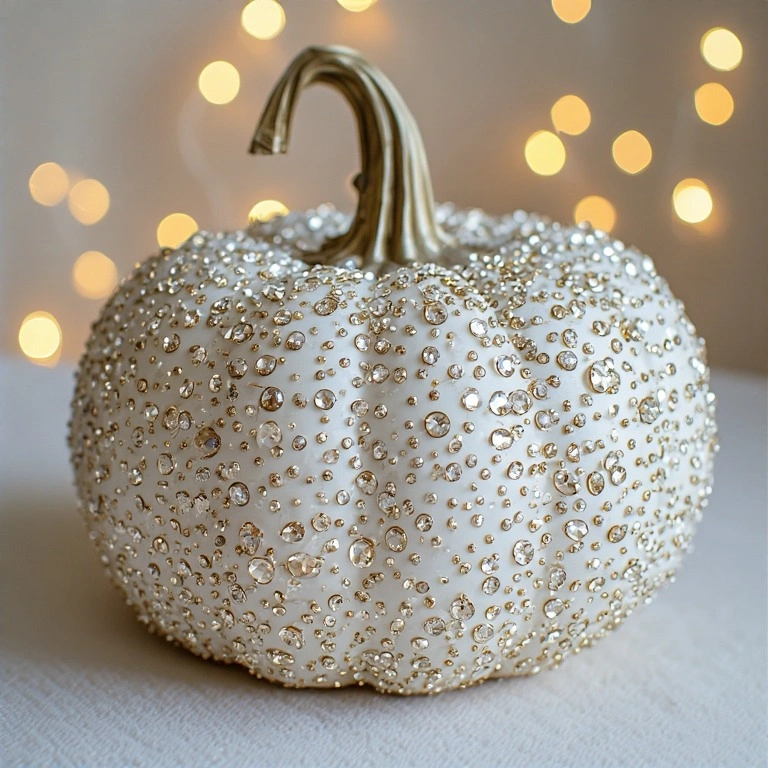
For a truly luxurious look, cover a pumpkin in flat-backed gems, beads, and rhinestones. This glam craft is perfect for upscale fall parties or holiday mantels.
Materials:
- Small smooth faux pumpkin
- Flat-back rhinestones and gems (mixed sizes)
- Craft tweezers
- Strong craft glue or gem glue
- Toothpick (for placing gems)
Steps:
- Apply craft glue to a small section of the pumpkin at a time.
- Use tweezers or a toothpick to place gems one by one.
- Fill each section completely before moving to the next.
- Mix gem sizes to avoid gaps.
- Let dry for at least 2 hours before moving.
- Time: 45–60 minutes
- Difficulty: Medium
💡 Tip: Start with a pattern (swirls or stripes) rather than random placement for a more polished result.
Common Mistakes to Avoid
- Skipping surface prep — Paint peels easily on a dirty or oily pumpkin. Always wipe it clean and let it dry fully before starting any craft.
- Using too much glue at once — Whether using Mod Podge, hot glue, or gem glue, applying it in large sections causes drips and uneven drying. Work in small areas at a time.
- Rushing the drying time — Moving or displaying a pumpkin before it’s fully dry can smudge paint, shift gems, or cause glitter to fall off. Always wait the full drying time.
Tips for Best Results
- Use faux pumpkins for crafts you want to keep year after year — they hold up to paint, glue, and wrapping better than real ones.
- Seal your painted pumpkins with a clear sealer spray to protect the design from chipping.
- Prep your workspace with a craft mat or newspaper before starting — glitter and paint are messy.
- Choose a color palette before you begin so your display looks cohesive when grouped together.
- Group odd numbers — Displays of 3, 5, or 7 pumpkins in varied sizes always look more natural and styled.
- Shop dollar stores and thrift shops for faux pumpkins — they’re just as good as craft store options at a fraction of the price.
FAQs
Q: Can I use real pumpkins for all of these crafts? Yes, most of these work on real pumpkins. However, for long-lasting results (especially with yarn, gems, or decoupage), faux pumpkins are recommended.
Q: What paint works best on pumpkins? Acrylic craft paint works best. It adheres well, dries quickly, and comes in hundreds of colors. Always seal with a Mod Podge or clear sealer spray for durability.
Q: How long do real pumpkins last when decorated? Uncarved real pumpkins typically last 2–4 weeks indoors. Avoid placing them in direct sunlight or near heat sources to extend their life.
Q: Are these crafts safe for kids? Most of these are very kid-friendly — especially yarn-wrapping, washi tape, and chalkboard painting. Avoid crafts that require hot glue guns or sharp tools for young children.
Q: Can I use spray paint instead of brush-on acrylic? Absolutely. Spray paint gives an even, smooth finish and works especially well for base-coating pumpkins before adding details. Use in a well-ventilated area.
Q: Where can I buy faux pumpkins? Craft stores like Michaels and Hobby Lobby, dollar stores, Amazon, and Target all carry foam or plastic pumpkins — especially in September and October.
Conclusion
There’s no wrong way to decorate a pumpkin this fall. Whether you go glamorous with gems, cozy with yarn, or modern with geometric tape, every one of these ideas brings something special to your seasonal decor. Pick one to start with today — and don’t be surprised if you end up making several. Fall only comes once a year, so make it count!