12 Circus Crafts Ideas for Preschool and Toddlers
Step right up! There’s something undeniably magical about the circus — the colors, the characters, the wild energy. Whether you’re planning a themed party, a rainy-day project, or a creative afternoon with kids, these circus crafts ideas are exactly what you need.
From paper clowns to tightrope acrobats, every project below is beginner-friendly, budget-conscious, and seriously fun to make.
1. Paper Plate Clown Face
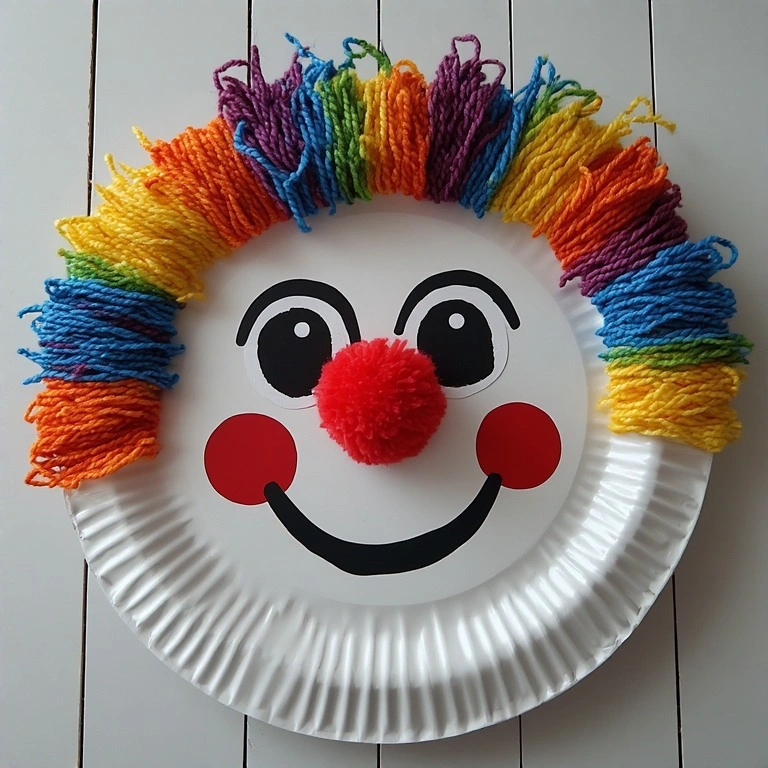
A classic that never gets old. This colorful clown face uses a simple paper plate as the base and turns everyday craft supplies into a cheerful, expressive character. Perfect for toddlers and younger kids.
Materials
- White paper plate
- Acrylic or tempera paint (red, white, yellow)
- Colored pom-poms
- Googly eyes
- Yarn (for hair)
- Glue stick or craft glue
- Scissors
Steps
- Paint the paper plate white and let it dry completely.
- Use red paint to draw a big rounded smile and cheeks.
- Glue on two googly eyes near the top.
- Press a large red pom-pom in the center as the nose.
- Cut yarn into equal lengths and glue around the rim for wild clown hair.
- Add a pointed paper cone hat on top with tape.
Time: 20–30 minutes Difficulty: Easy
💡 Tip: Use yarn in bright colors like orange or rainbow-dyed yarn for extra visual impact.
2. Toilet Roll Circus Tent
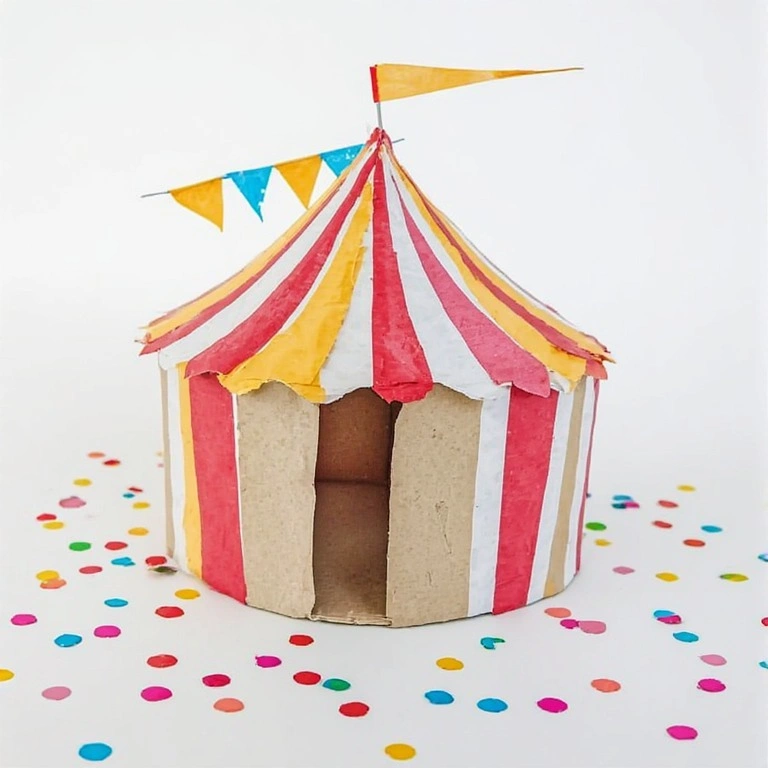
Transform a cardboard tube into a miniature big-top tent. This craft doubles as a toy and a decoration — kids can use it as part of a tabletop circus scene. Great for a group project.
Materials
- Empty toilet paper rolls
- Red and white striped paper or paint
- Toothpick
- Small triangle of paper (flag)
- Craft glue
- Scissors
Steps
- Wrap the toilet roll in red and white striped paper and secure with glue.
- Cut a circle of cardstock slightly larger than the roll’s diameter.
- Cut the circle into a cone shape and glue it closed to form the tent roof.
- Paint the cone in matching stripes and let dry.
- Glue the cone roof to the top of the roll.
- Attach a small paper triangle flag to a toothpick and insert into the top.
Time: 15–25 minutes Difficulty: Easy
💡 Tip: Make several in different sizes and arrange them as a full circus village display.
12 Circus Crafts Ideas: The Spinning Wheel of Fortune
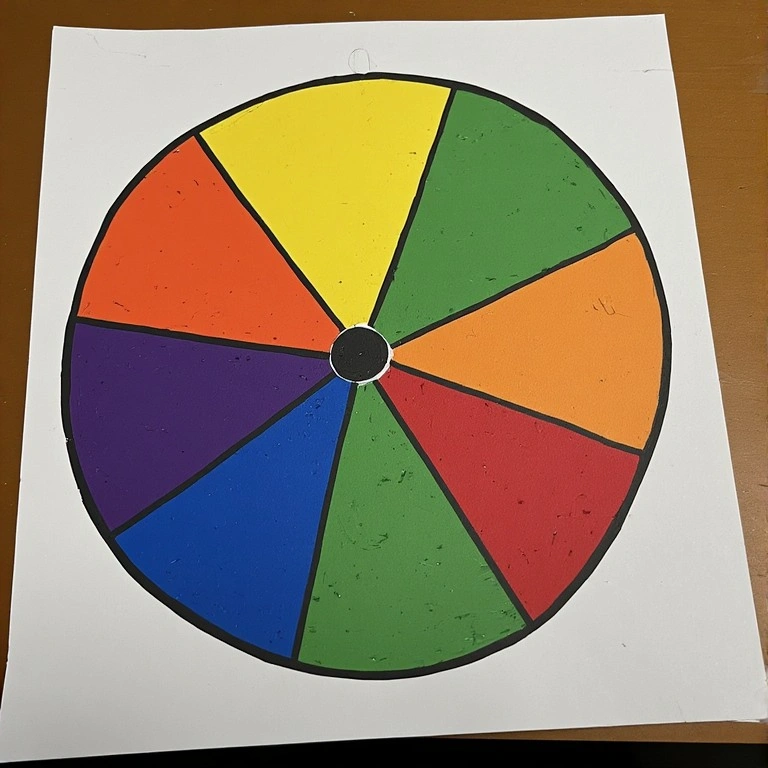
A spinning cardboard wheel decorated like a classic carnival game prop. This one is more of a display piece or party decoration — but older kids can make it fully functional with a pencil spindle.
Materials
- Large cardboard circle (cut from a cereal box or cardboard sheet)
- Acrylic paints (bold colors: red, yellow, blue, green)
- Black marker
- Pencil or wooden dowel
- Push pin or brad fastener
- Ruler
Steps
- Draw 8–10 equal pie sections on the cardboard circle using a ruler and pencil.
- Paint each section a different bold color.
- Once dry, outline each section with a black marker for a clean carnival look.
- Write numbers or prizes in each section.
- Poke a brad fastener through the center and attach to a square of cardboard as a backing.
- Flick with your finger to spin!
Time: 30–45 minutes Difficulty: Medium
💡 Tip: Laminate the wheel after painting so it lasts through repeated spins at a party.
3. Tightrope Walker Puppet
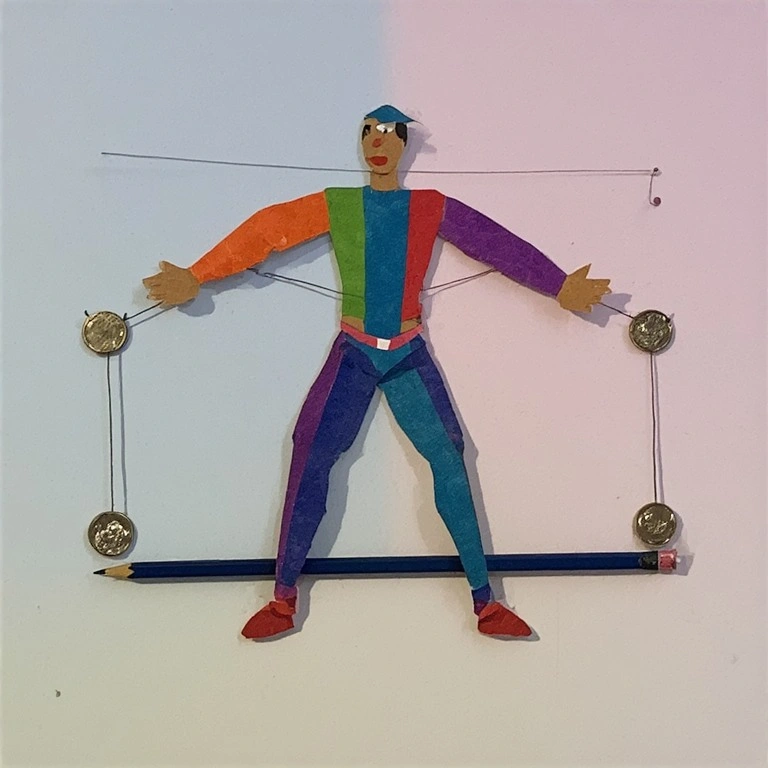
This whimsical craft creates a balancing acrobat puppet using a pencil, string, and simple paper cutouts. When you hold it over a stretched string, it actually balances — kids will be amazed every time.
Materials
- Colored cardstock
- Scissors
- String or thin twine
- Tape
- Markers or colored pencils
- Small metal washer or coin (for weight)
- Pencil
Steps
- Draw and cut out a simple human figure (acrobat) from cardstock.
- Decorate with colorful circus costume details using markers.
- Tape a small washer or coin to each hand of the figure.
- Tie the figure to the middle of a pencil with a short piece of string.
- Stretch another piece of string between two chairs or doorknobs.
- Balance the pencil over the string and watch your acrobat walk the tightrope!
Time: 20–30 minutes Difficulty: Medium
💡 Tip: Heavier weights on the arms make balancing easier — try small binder clips instead of coins.
4. Circus Elephant Handprint Art

Turn little hands into lovable circus elephants with this sweet handprint painting idea. It’s a keepsake craft that parents will want to frame — and it takes almost no prep time at all.
Materials
- Gray washable paint
- White cardstock or canvas paper
- Black fine-tip marker
- Small paintbrush
- Colorful tissue paper or stickers (for circus accessories)
- Glue
Steps
- Paint a child’s hand (fingers together, thumb out) in gray paint.
- Press firmly onto the paper to create the handprint — thumb becomes the trunk.
- Let dry completely.
- Use a black marker to add eyes, toenails, and ear details.
- Cut a small circus hat from tissue paper and glue above the wrist.
- Add confetti dots around the elephant for a festive feel.
Time: 10–20 minutes Difficulty: Easy
💡 Tip: Add a tiny tightrope beneath the elephant’s feet for a full circus scene.
5. Juggling Ball Bean Bags
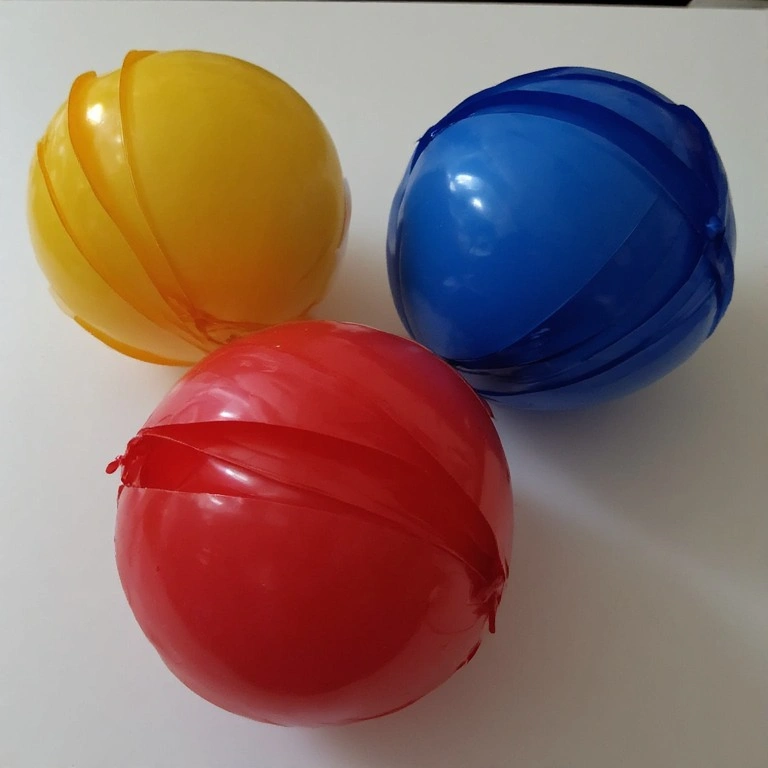
These DIY juggling balls are functional and fun. Filled with rice or beans and sewn (or taped) shut, they’re perfect for circus-themed play and easy enough for beginners to assemble without any sewing machine.
Materials
- Colorful balloons (at least 2 per ball)
- Dry rice or small dried beans
- Funnel
- Scissors
Steps
- Cut the neck off one balloon.
- Use a funnel to fill a second balloon with about ½ cup of rice.
- Tie off the filled balloon tightly.
- Stretch the cut balloon over the filled one to cover the knot.
- Repeat with a third balloon layer in a different color, cutting small slits for a fun striped look.
- Make 3 balls for a juggling set.
Time: 10–15 minutes Difficulty: Easy
💡 Tip: Use neon balloons and layer contrasting colors for a bold circus aesthetic.
6. Circus Crafts Ideas: Ringmaster Hat
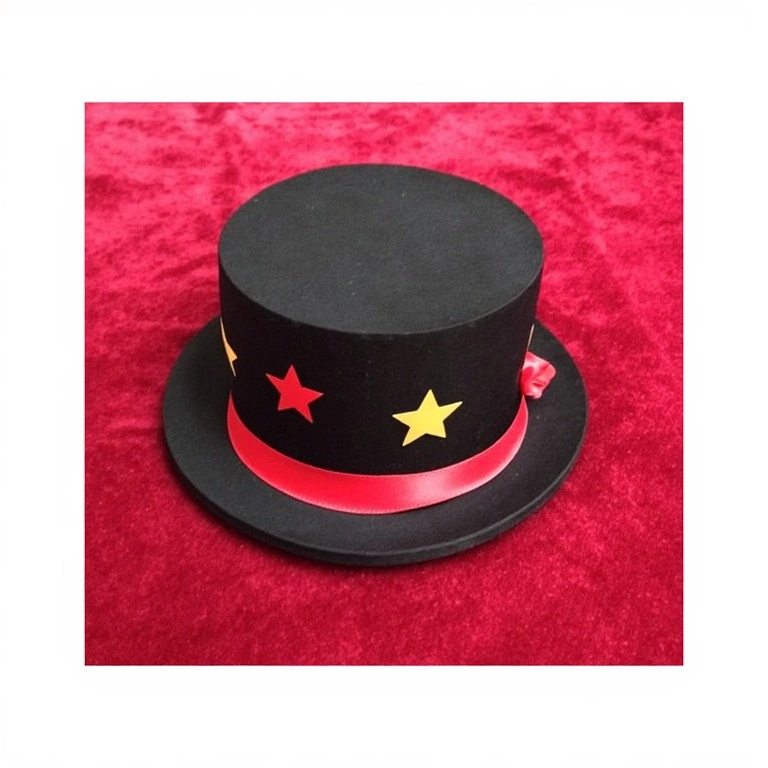
No circus is complete without a ringmaster! This oversized top hat is made from black cardstock and takes less than 30 minutes. It’s a show-stopping costume piece or party prop that kids will fight over.
Materials
- Black cardstock (2–3 sheets)
- Red ribbon or paper strip
- Tape and craft glue
- Scissors
- Gold star stickers
Steps
- Roll one sheet of black cardstock into a tall cylinder and tape closed.
- Trace the cylinder onto another sheet and cut a slightly larger circle for the brim.
- Cut tabs around the base of the cylinder and fold them out.
- Glue the cylinder onto the brim circle using the tabs.
- Wrap a strip of red ribbon around the base of the hat and secure with glue.
- Decorate with gold star stickers across the hat body.
Time: 20–30 minutes Difficulty: Easy–Medium
💡 Tip: Add a small paper feather or sequins to the red band for an extra theatrical look.
7. Popcorn Box Party Favor
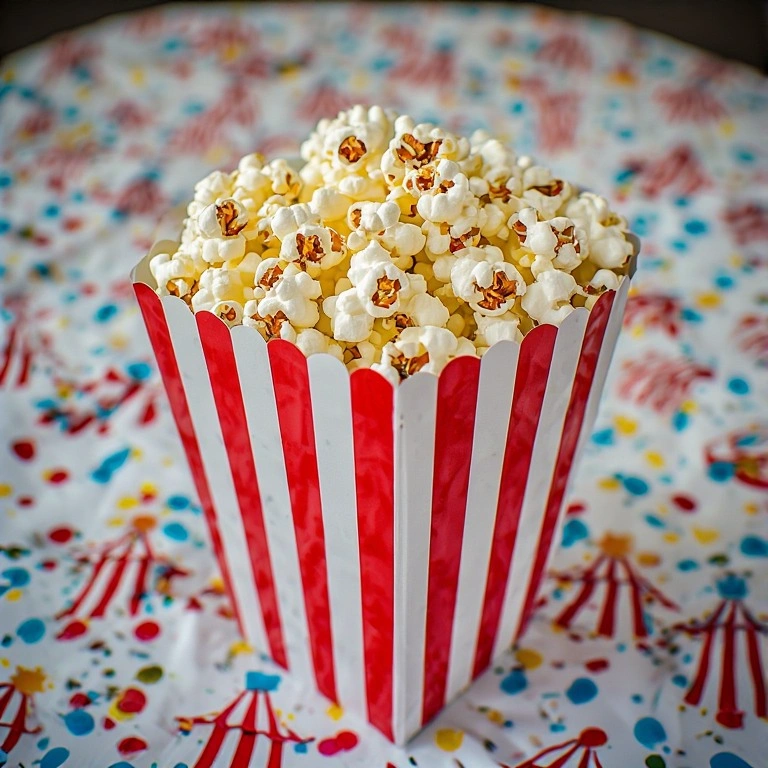
Classic red-and-white striped popcorn boxes made from cardstock — ideal as party favors, treat holders, or table decorations for a circus birthday party. Simple to fold and totally customizable.
Materials
- Red and white cardstock
- Scissors
- Ruler
- Craft glue or double-sided tape
- Stickers or stamps for decoration
Steps
- Cut cardstock into a rectangle (approx. 8″ × 10″).
- Mark and score fold lines to create a box shape with a small base and open top.
- Fold along the score lines and use tape to secure the sides.
- Create a striped pattern by alternating red and white strips glued vertically.
- Fold and tuck the base closed.
- Fill with popcorn, candy, or small toys.
Time: 15–20 minutes Difficulty: Easy
💡 Tip: Print a circus logo or “Big Top Treats” label on the front before assembling.
8. Wire Circus Acrobat Figure
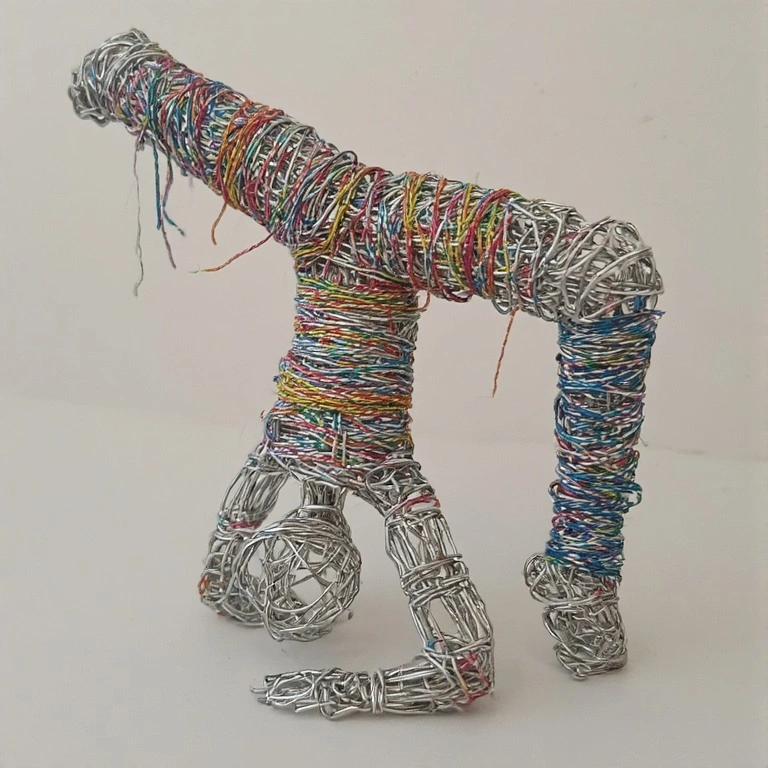
Using basic craft wire, shape a poseable acrobat figurine that can be twisted into any position — mid-flip, handstand, or tightrope pose. A great intro to wire sculpting for kids aged 8 and up.
Materials
- Aluminum craft wire (18–20 gauge)
- Wire cutters or strong scissors
- Small pliers
- Acrylic paint (optional)
- Colorful embroidery thread or tape
Steps
- Cut a long piece of wire (~24 inches) for the body and limbs.
- Bend the center into a small oval loop for the head.
- Twist wire down from the head to form the torso.
- Spread remaining wire to form arms and legs, bending at the ends for hands/feet.
- Wrap limbs with colorful embroidery thread to create a costume look.
- Bend into your desired acrobat pose.
Time: 30–45 minutes Difficulty: Medium
💡 Tip: Use two-tone wire wrapping on the legs to mimic sparkly tights.
9. Lion Mask Paper Craft
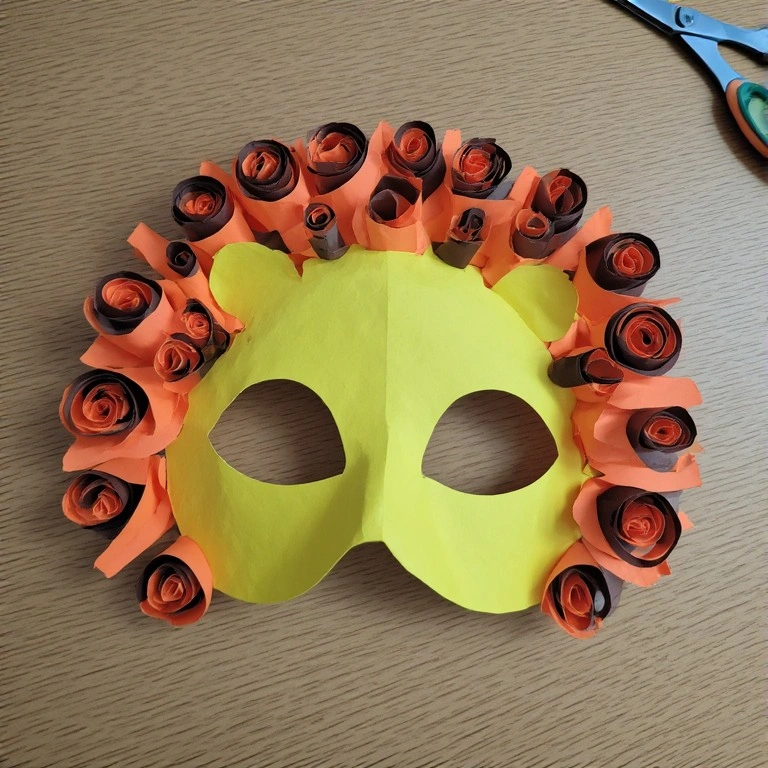
A bold and roar-worthy lion mask made entirely from paper. The layered mane technique gives it a lush 3D look that stands out instantly. Great for dress-up, storytelling, or a circus parade.
Materials
- Yellow and orange cardstock
- Scissors
- Elastic cord
- Glue stick
- Black marker
- Brown construction paper
Steps
- Cut a large oval from yellow cardstock for the face.
- Cut two eye holes and shape nostrils and a mouth with a black marker.
- Cut brown and orange paper into thin strips and curl them around a pencil.
- Glue curled strips around the entire face to create the mane.
- Add ears made from small yellow triangles at the top.
- Punch holes on each side and thread elastic to wear as a mask.
Time: 25–35 minutes Difficulty: Easy–Medium
💡 Tip: Use a mix of yellow, orange, and brown strips for a realistic layered mane effect.
10. Circus Train Cardboard Box
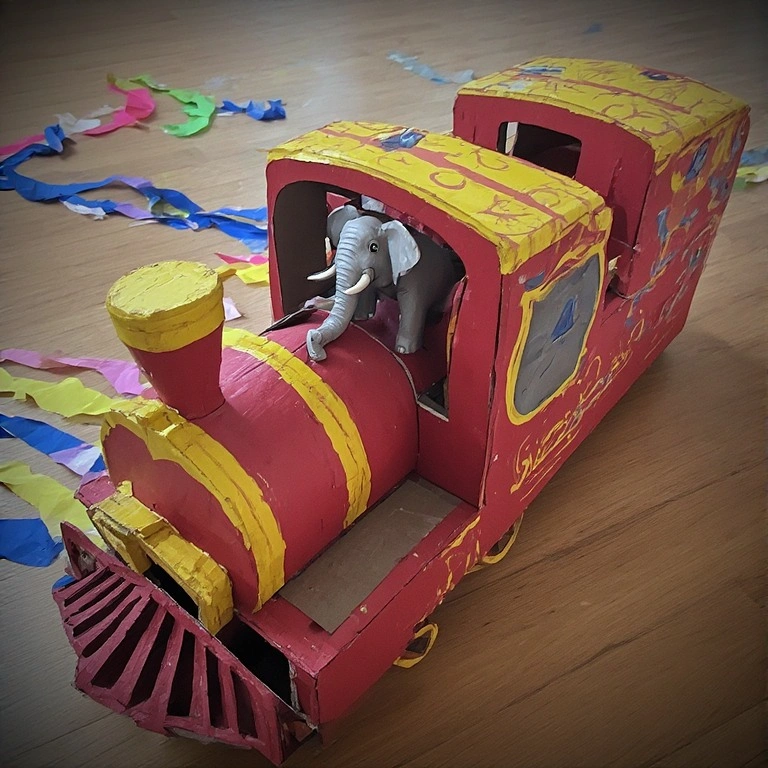
Repurpose a shoebox into a brightly painted circus train car — complete with animal “passengers” made from clay or printed cutouts. Linked together, several cars make an impressive display or play set.
Materials
- Shoebox
- 4 bottle caps (wheels)
- Acrylic paints (red, gold, yellow)
- Craft glue
- Cardboard scraps
- Small toy animals or printed paper animals
- Markers
Steps
- Paint the shoebox in bright red with gold trim details. Let dry.
- Cut bars from cardboard scraps and glue them vertically across the box opening to create a cage effect.
- Glue four bottle caps to the bottom corners as wheels.
- Add a small cardboard rectangle to the front as a connector hook.
- Place small toy or paper animals inside.
- Label the car with “Big Top Circus” using a marker.
Time: 40–60 minutes Difficulty: Medium
💡 Tip: Use a hot glue gun for faster, sturdier assembly — adults should handle this step.
11. Confetti Cannon Party Popper

A simple DIY party popper made from a toilet roll and a balloon that launches confetti with a satisfying pop. Perfect for circus party countdowns and guaranteed to get kids cheering.
Materials
- Toilet paper roll
- 1 large balloon
- Colorful tissue paper or pre-cut confetti
- Scissors
- Tape
Steps
- Cut the neck off a balloon and stretch it tightly over one end of the toilet paper roll.
- Secure the balloon with a small piece of tape around the edges.
- Fill the open end with tissue paper confetti.
- Point the balloon end away from faces.
- Pull back the balloon knot and release to launch confetti.
- Decorate the outside of the roll with circus-themed wrapping paper if desired.
Time: 10 minutes Difficulty: Easy
💡 Tip: Use biodegradable tissue confetti for an eco-friendly option.
12 Circus Crafts Ideas: DIY Pennant Banner
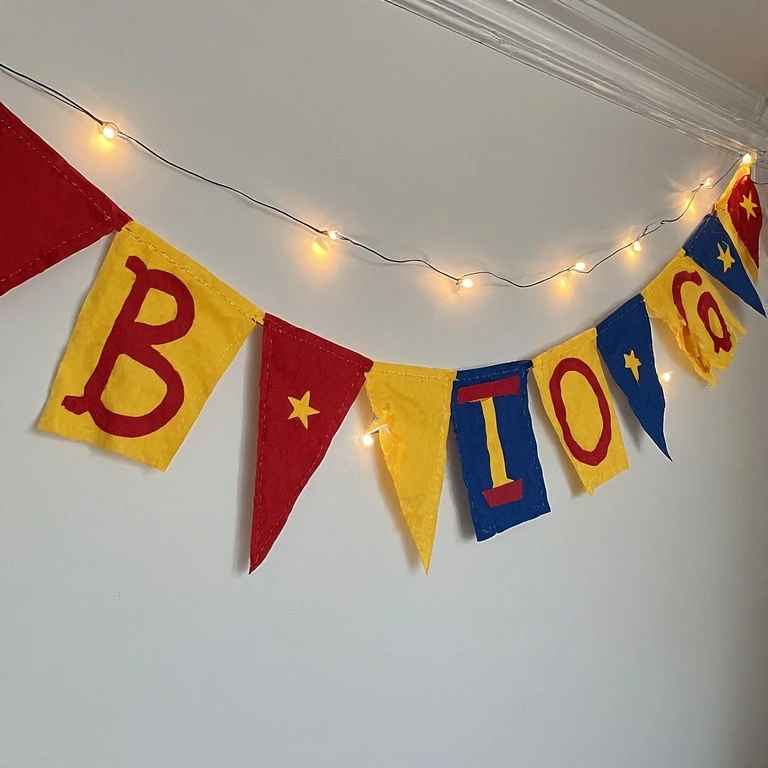
String together a row of colorful triangular flags to create classic circus pennant bunting. This decoration is reusable, easy to customize, and instantly transforms any space into a big-top atmosphere.
Materials
- Felt or cardstock in circus colors (red, yellow, blue, white)
- Scissors or pinking shears
- Twine or ribbon (at least 6 feet)
- Glue gun or fabric glue
- Letter stamps or markers
Steps
- Cut large triangles from felt or cardstock (approx. 6″ wide × 8″ tall).
- Use pinking shears on felt for a decorative zigzag edge.
- Fold the top of each triangle over the twine and glue closed.
- Alternate colors as you attach each flag.
- Stamp or write letters spelling “BIG TOP” or “CIRCUS” across the flags.
- Hang across a wall, doorway, or table for an instant party backdrop.
Time: 20–30 minutes Difficulty: Easy
💡 Tip: Laminate cardstock pennants so they can be stored and reused for future parties.
Common Mistakes to Avoid
- Skipping the drying time. Layering paint or glue before the previous coat dries leads to smudging and peeling. Always wait — even if it feels dry to the touch.
- Using too much glue. Excess glue causes paper to warp and buckle. Use thin, even layers and press flat under a heavy book if needed.
- Cutting too fast. Rushing curved cuts (like manes, cone roofs, or circle bases) results in jagged edges. Go slow, especially with cardstock.
Tips for Best Results
- Work on a silicone mat or parchment paper to protect your surface and make cleanup easier.
- Use a bone folder or dull butter knife to score cardstock before folding — it gives crisp, clean lines.
- Keep a damp cloth nearby when painting to quickly clean brushes between colors.
- Set up a “drying station” with a wire rack so pieces don’t stick to your workspace.
- Pre-cut materials in batches if doing this as a group activity — it speeds things up significantly.
- Let kids personalize with their own color combinations — it makes every piece unique.
FAQs
Q: What age group are these circus crafts ideas best for? Most projects are suitable for ages 4 and up with adult supervision. Wire sculpting and hot glue gun projects are better for ages 8+.
Q: Can I use these crafts for a circus birthday party? Absolutely. Projects like the pennant banner, popcorn boxes, and ringmaster hats are perfect party activities or decorations.
Q: What paint works best on cardboard and cardstock? Acrylic paint is the top choice — it dries fast, covers well, and comes in vivid colors. Tempera works great for younger kids since it’s washable.
Q: How do I make these crafts last longer? A light coat of Mod Podge or clear craft sealant over painted surfaces adds durability and a polished finish.
Q: Can these be made with recycled materials? Yes! Toilet rolls, shoeboxes, bottle caps, and old cardboard are the backbone of several projects on this list. Go green and raid your recycling bin first.
Q: How long does it take to do all 12 crafts? Each project takes 10–60 minutes individually. For a full crafting session, plan around 3–4 hours, or spread them across multiple days.
Conclusion
The circus crafts ideas is all about wonder, color, and a little bit of magic — and now you can bring all of that to your craft table. Whether you pick one project or tackle all twelve, these ideas are designed to be fun, accessible, and genuinely impressive. Grab your scissors, paint your paper plates, and let the show begin.