15 Watermelon Craft Ideas That Kids Will Love
Summer is here, and nothing says the season better than a slice of watermelon. These 15 watermelon craft ideas are perfect for kids, adults, and anyone who loves a fun DIY project.
Whether you’re planning a summer party or just looking for a creative afternoon activity, watermelon-themed crafts are bright, cheerful, and surprisingly versatile.
1. Watermelon Paper Plate Craft
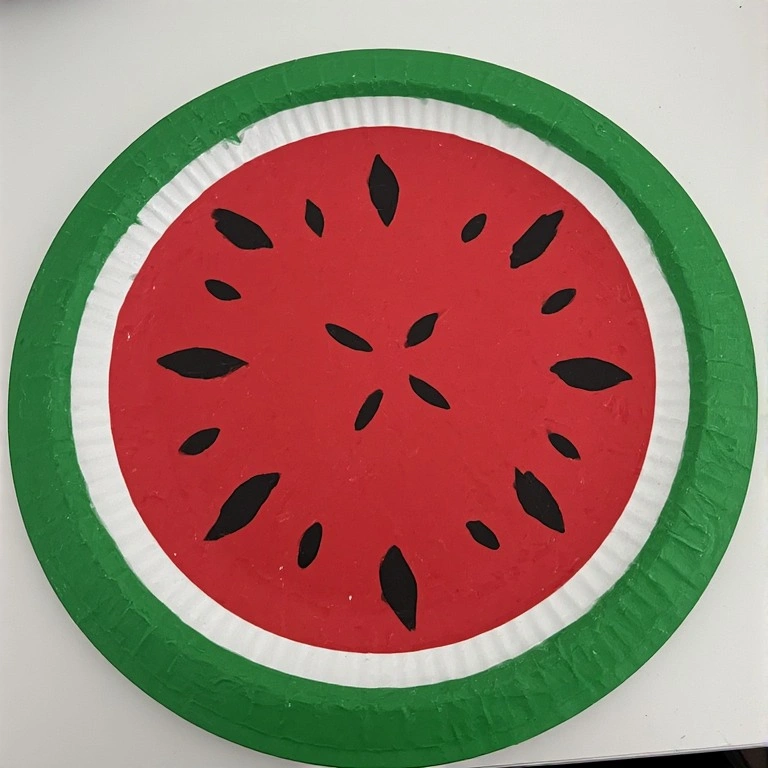
A classic beginner project that kids absolutely love. You only need a paper plate and a few craft supplies to create an adorable watermelon decoration in minutes.
Materials:
- White paper plate
- Green, red, and black paint
- Paintbrush
- Scissors
Steps:
- Paint the back of the plate red in the center.
- Paint a green border around the edge.
- Let it dry completely.
- Add small black oval shapes for seeds.
- Cut in half for a “slice” look if desired.
- Time: 15–20 minutes
- Difficulty: Easy
💡 Tip: Use a sponge instead of a brush for a more textured, realistic watermelon look.
2. Watermelon Suncatcher
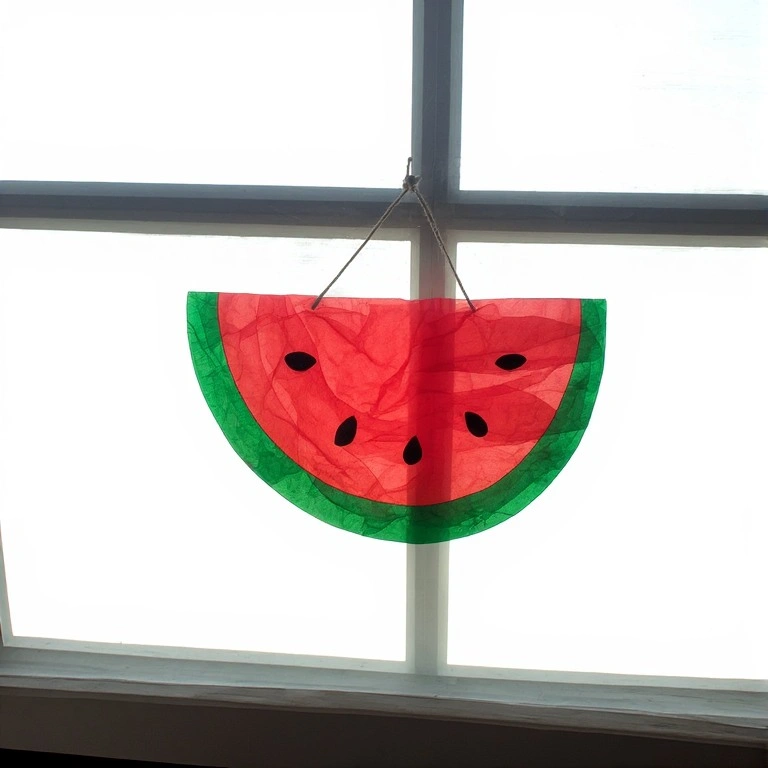
Hang this colorful suncatcher in a window and watch it glow all summer long. It’s a simple craft with a stunning result.
Materials:
- Clear contact paper
- Red, green, and black tissue paper
- Scissors
- String or ribbon
Steps:
- Cut two identical watermelon slice shapes from contact paper.
- Peel the backing off one piece.
- Press red tissue paper onto the sticky side for the flesh.
- Add green tissue paper strips along the rind edge.
- Tear tiny black pieces for seeds.
- Seal with the second contact paper piece.
- Punch a hole at the top and thread string through.
- Time: 20–30 minutes
- Difficulty: Easy
💡 Tip: Trim the edges with scissors after sealing for a clean, professional shape.
3. Watermelon Craft: Painted Rock
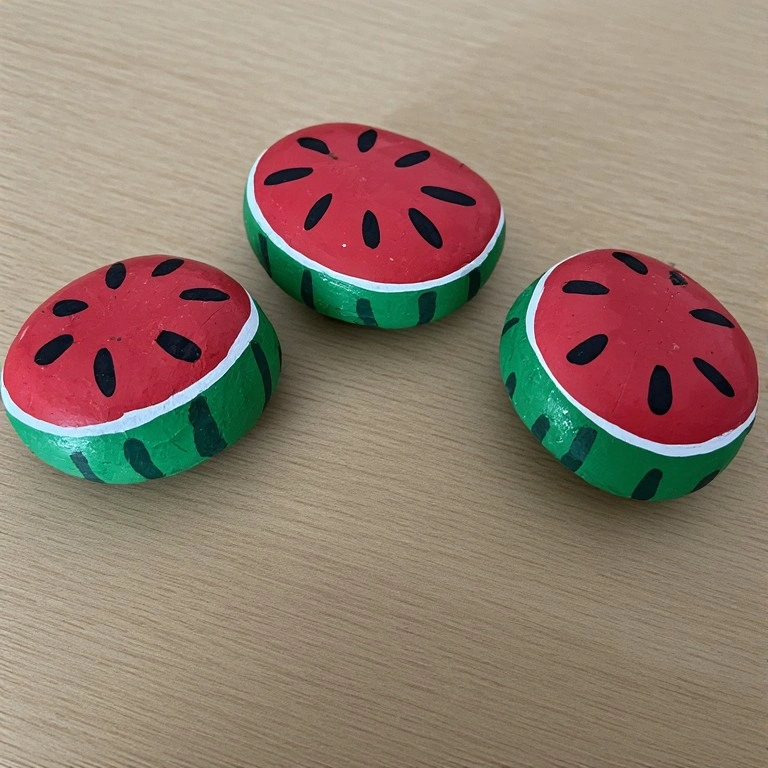
Rocks make the most satisfying canvas. These painted watermelon rocks look adorable as garden decorations, paperweights, or tabletop accents.
Materials:
- Smooth, flat river rocks
- Acrylic paint (red, green, white, black)
- Paintbrush
- Mod Podge or clear sealer
Steps:
- Clean the rock and let it dry.
- Paint the entire rock green.
- Once dry, paint a large red oval on the top center.
- Add a thin white line between red and green.
- Paint small black seed shapes on the red area.
- Seal with Mod Podge when fully dry.
- Time: 30–45 minutes (includes drying time)
- Difficulty: Easy
💡 Tip: Apply two coats of sealer if placing outdoors for weather resistance.
4. Watermelon Balloon Decoration
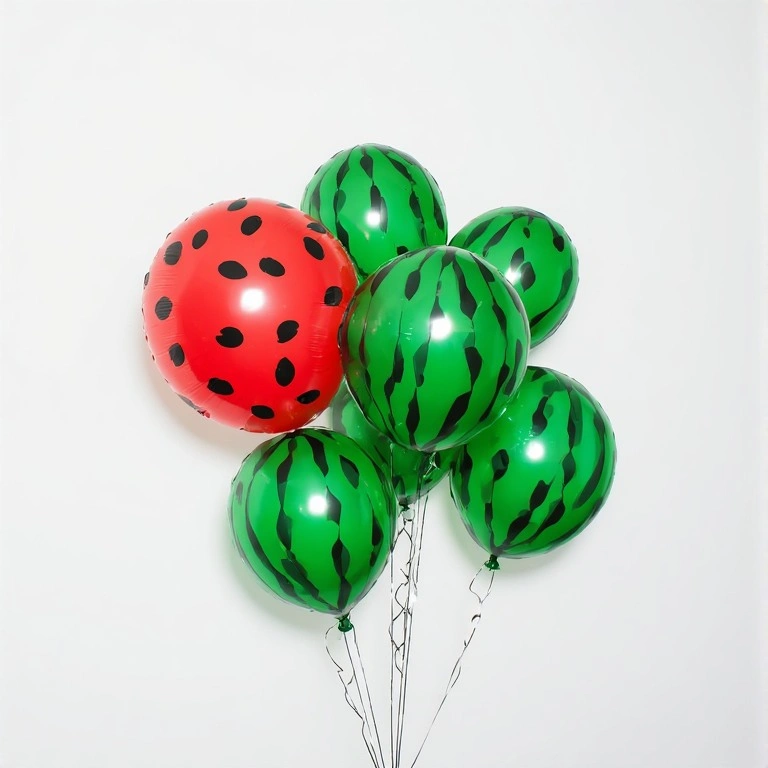
Perfect for parties! These balloon decorations take just minutes to assemble and make a huge visual impact.
Materials:
- Large red balloons
- Green balloons
- Black permanent marker
- Green tape or ribbon
Steps:
- Inflate red balloons to about 80% capacity.
- Use a black marker to draw seed shapes on the red balloon.
- Inflate green balloons partially and cluster them around the red balloon base.
- Secure with green tape to form the “rind.”
- Display in bunches for full effect.
- Time: 10–15 minutes
- Difficulty: Easy
5. Watermelon Tote Bag
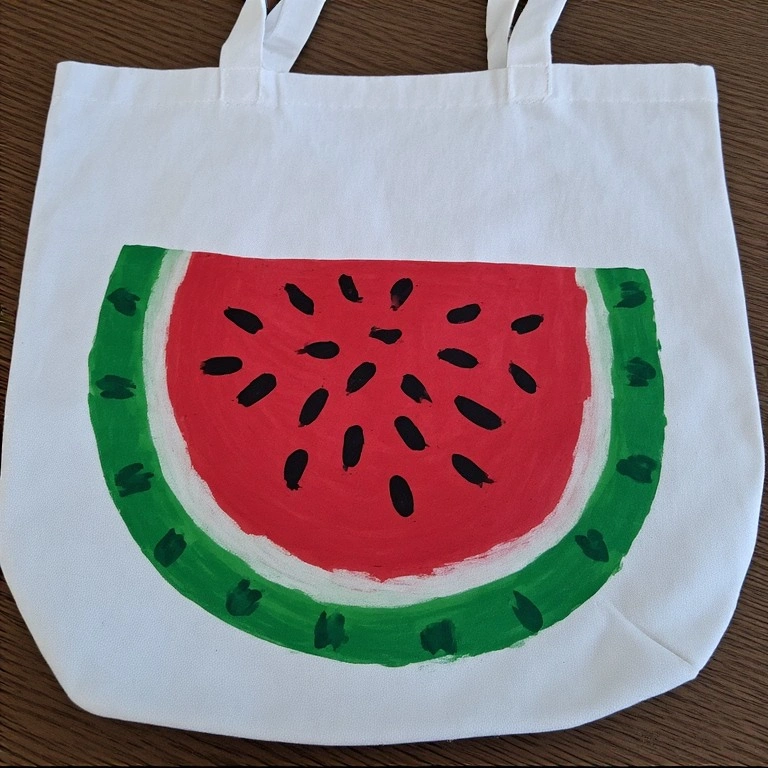
Turn a plain tote bag into a summer statement piece. This is a great project for teens and adults who love wearable art.
Materials:
- Plain white canvas tote bag
- Fabric paint (red, green, black, white)
- Foam brush or fabric brush
- Cardboard insert
- Pencil
Steps:
- Slide cardboard inside the bag to prevent bleed-through.
- Lightly sketch a large watermelon slice in pencil.
- Paint the flesh area red, let it dry.
- Paint the rind green.
- Add a thin white stripe between flesh and rind.
- Dot on black seeds.
- Heat-set the paint with an iron per paint instructions.
- Time: 45–60 minutes
- Difficulty: Medium
💡 Tip: Tape off the rind area with painter’s tape for crisp, clean lines.
6. Watermelon Craft ideas: Paper Roll Lantern
Transform a toilet paper roll into a glowing watermelon lantern. It’s a fantastic evening craft for summer nights.
Materials:
- Cardboard paper rolls
- Red, green, and black paint
- Battery-powered tea light
- Scissors or craft knife
- Paintbrush
Steps:
- Paint the roll red on the top 2/3 and green on the bottom 1/3.
- Let it dry completely.
- Add black seed shapes to the red section.
- Carefully cut small triangular or rectangular windows around the red area.
- Place a battery tea light inside.
- Set on a flat surface and enjoy the glow.
- Time: 25–35 minutes
- Difficulty: Easy
7. Watermelon Seed Art
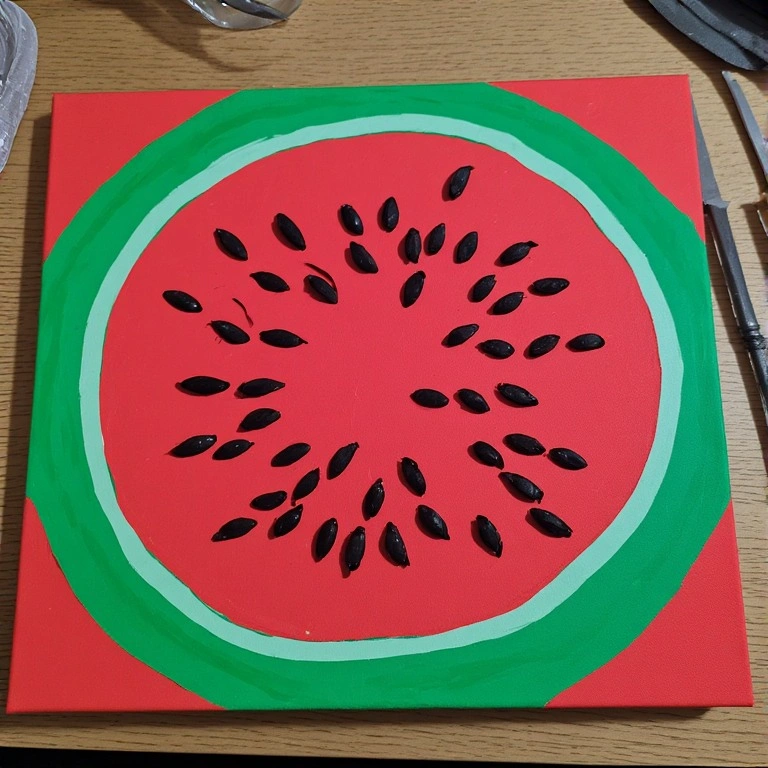
This project is all about pattern and texture. Sunflower or pumpkin seeds can be painted and arranged into beautiful watermelon-inspired art pieces.
Materials:
- Canvas or thick cardboard
- Sunflower or pumpkin seeds
- Red and green acrylic paint
- Black paint or marker
- Strong craft glue
Steps:
- Paint the canvas in a watermelon slice shape with red and green.
- Let it dry fully.
- Paint seeds black (or leave natural for contrast).
- Arrange and glue seeds in curved rows across the red section.
- Allow glue to dry overnight before displaying.
- Time: 40–50 minutes + drying time
- Difficulty: Medium
💡 Tip: Use tweezers for precision when placing seeds in a clean pattern.
8. Watermelon Headband
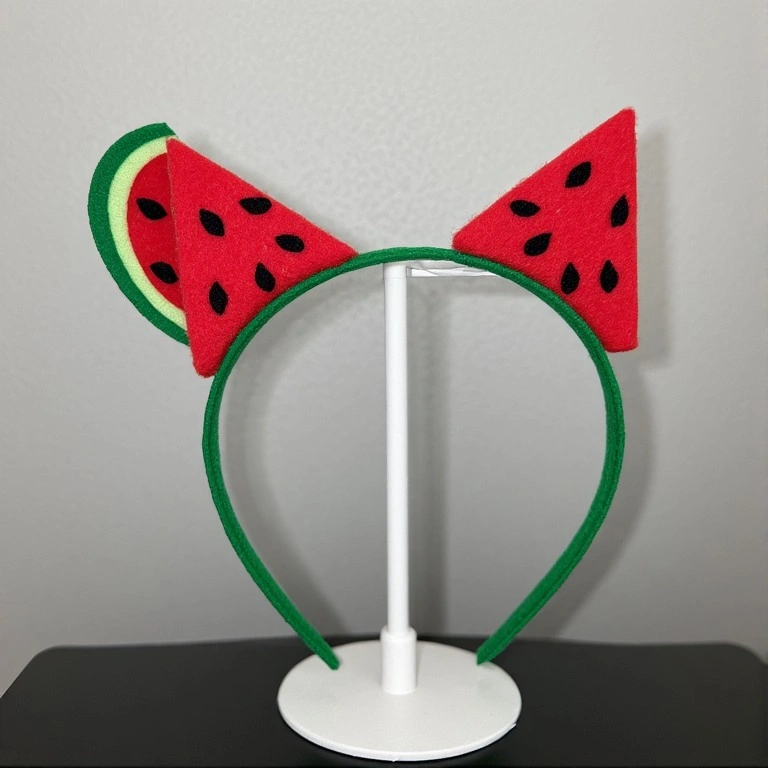
A fun accessory craft for summer parties, photoshoots, or just a whimsical afternoon. Kids go wild for these.
Materials:
- Plain green headband
- Red and green felt
- Black foam or felt
- Hot glue gun
- Scissors
Steps:
- Cut two large watermelon slice shapes from red felt.
- Cut green rind strips and glue along the flat edge of each slice.
- Cut small black oval seed shapes from foam.
- Glue seeds onto the red felt.
- Glue both felt slices together, sandwiching the headband between them at the top.
- Hold in place until glue sets.
- Time: 20–30 minutes
- Difficulty: Easy
9. Watermelon Wind Chime
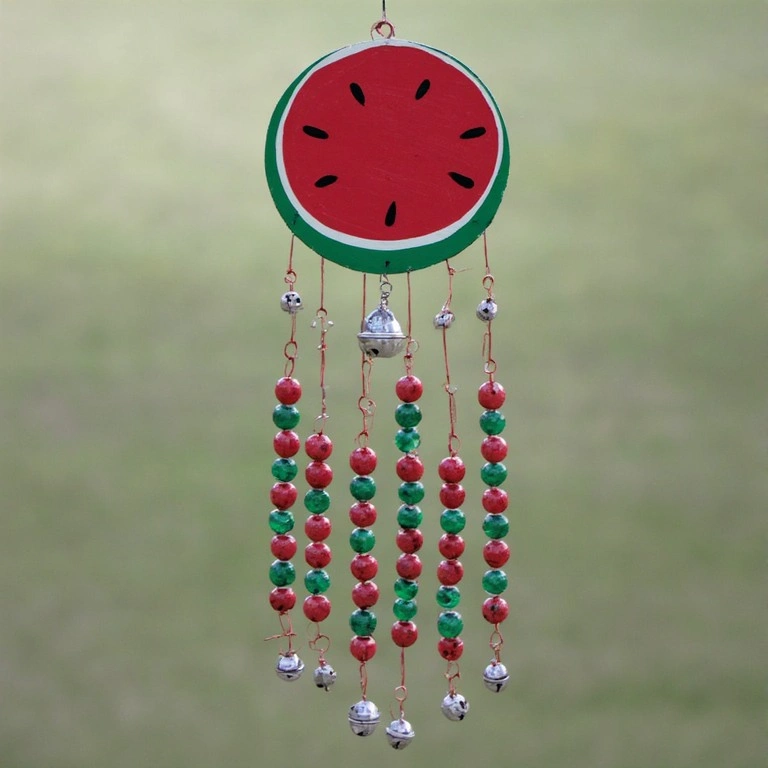
Add some summery charm to your porch with this sweet watermelon wind chime made from simple craft supplies.
Materials:
- Wooden disc or thick cardboard circle
- Green and red paint
- Black marker
- Fishing line or twine
- Wooden beads (red and green)
- Small bells
Steps:
- Paint the disc red in the center and green around the edge.
- Add black seed dots with a marker.
- Drill or poke 5–6 evenly spaced holes along the bottom.
- Thread fishing line through each hole.
- String alternating red and green beads, then a small bell at the bottom.
- Attach a hanging loop at the top.
- Time: 45–60 minutes
- Difficulty: Medium
💡 Tip: Seal the painted disc with outdoor Mod Podge if hanging outside.
10. Watermelon Craft: Felt Plushie
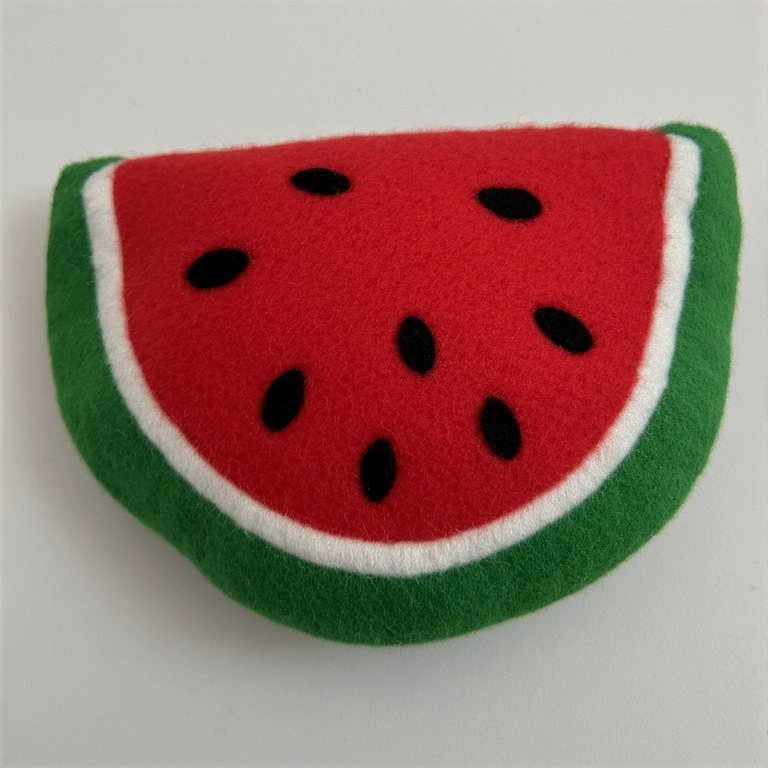
Sew or glue together this adorable felt watermelon slice plushie. It makes a great stress ball or decorative pillow for a child’s room.
Materials:
- Red, green, and white felt sheets
- Black felt or buttons for seeds
- Polyfill stuffing
- Needle and thread (or fabric glue)
- Scissors
Steps:
- Cut two matching watermelon slice shapes from red felt.
- Cut green rind pieces and white thin strips.
- Layer and sew (or glue) the rind and white strip along the curved bottom edge of one piece.
- Attach black felt seeds to the front piece.
- Place both red pieces together and sew or glue around the edges, leaving a small gap.
- Stuff with polyfill, then close the gap.
- Time: 30–45 minutes
- Difficulty: Medium
11. Watermelon Jar Vase
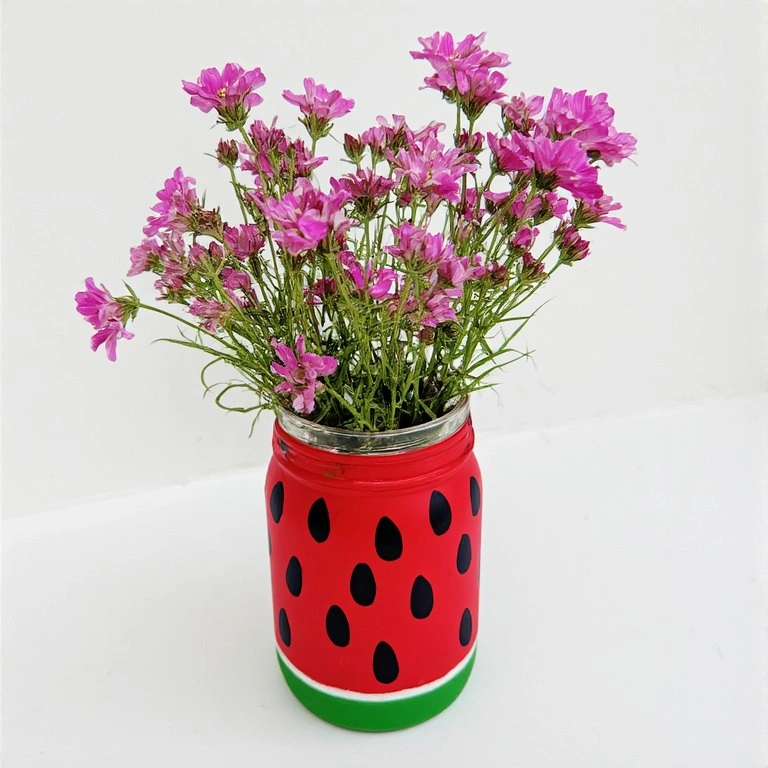
Upcycle a glass jar into a cheerful watermelon vase. Perfect for holding summer wildflowers or pencils on a desk.
Materials:
- Clean glass jar (mason jar or pasta jar)
- Red, green, black, and white acrylic paint
- Paintbrush
- Clear sealer or Mod Podge
Steps:
- Paint the bottom third of the jar green.
- Paint a thin white band just above the green.
- Paint the rest of the jar red.
- Once dry, add small black oval seeds scattered on the red area.
- Seal the entire jar with clear sealer.
- Let dry 24 hours before use.
- Time: 30–40 minutes + drying
- Difficulty: Easy
💡 Tip: Do not paint the inside of the jar if using it as a vase with water.
12. Watermelon Wreath
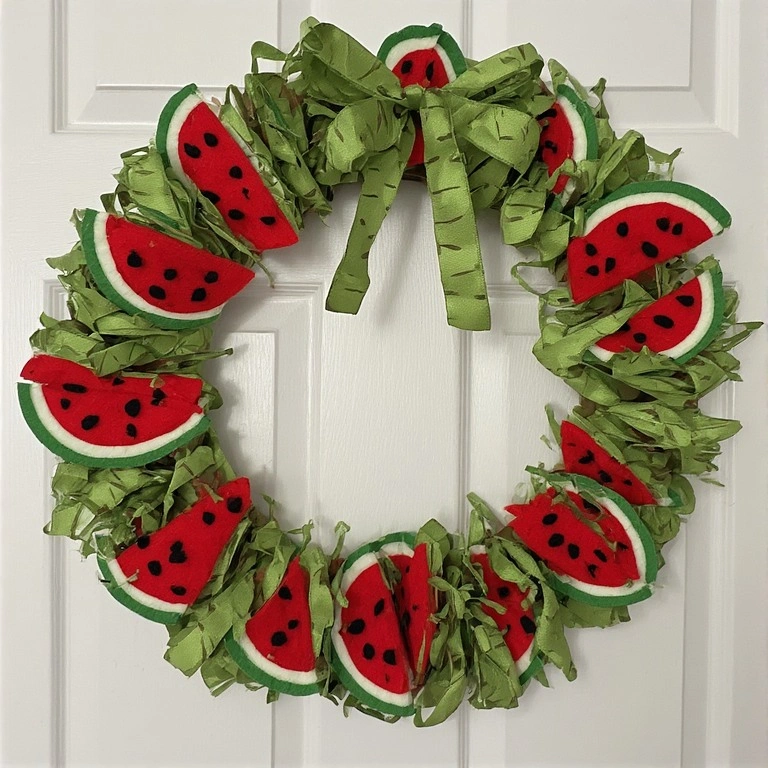
Make a bold front-door statement with this fun summer watermelon wreath. It’s colorful, festive, and completely customizable.
Materials:
- Foam or wire wreath form
- Green ribbon or yarn
- Red felt or foam sheets
- Black foam circles or buttons
- Hot glue gun
Steps:
- Wrap the wreath form tightly with green ribbon.
- Cut several large watermelon slice shapes from red felt.
- Add black foam seed dots to each slice.
- Hot glue the slices evenly around the wreath.
- Add a bow or ribbon at the top for hanging.
- Time: 45–60 minutes
- Difficulty: Medium
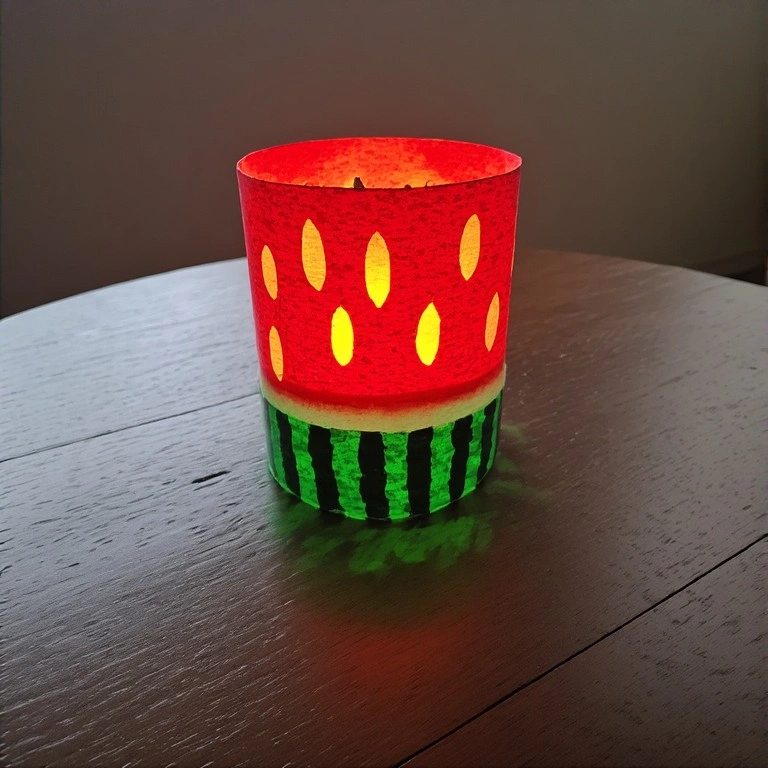
13. Watermelon Craft: Candle Holder
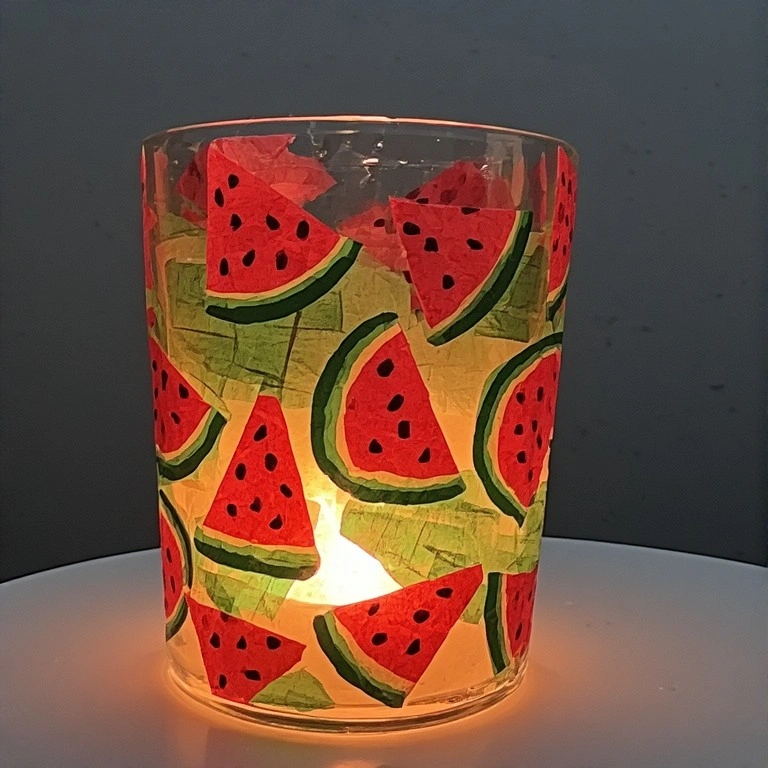
Turn a plain candle holder into a glowing watermelon decoration. A perfect table centerpiece for summer dinners.
Materials:
- Clear glass candle holder or votive
- Red and green tissue paper
- Mod Podge
- Foam brush
- Black permanent marker
- Tea light candle
Steps:
- Tear red tissue paper into small pieces.
- Brush a thin layer of Mod Podge onto the glass.
- Press red tissue pieces onto the upper portion.
- Add green tissue pieces to the bottom third.
- Apply another coat of Mod Podge over everything.
- Once dry, draw small seed shapes with a black marker.
- Place a tea light inside to glow.
- Time: 20–30 minutes + drying
- Difficulty: Easy
14. Watermelon Bookmark
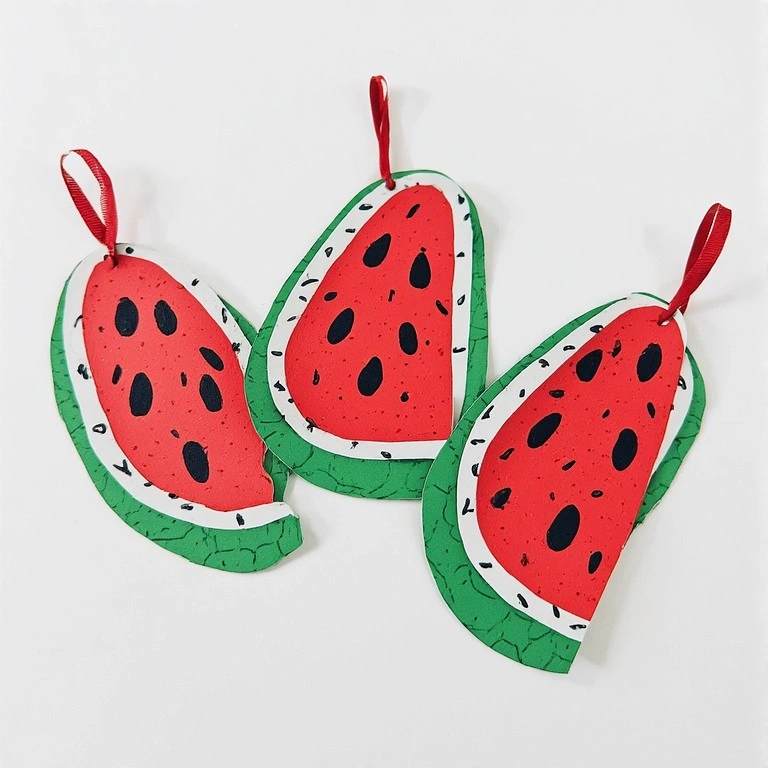
A quick and satisfying craft that readers will use every day. These make wonderful handmade gifts too.
Materials:
- Green cardstock
- Red and black marker or paint
- Scissors
- Laminator or clear tape (optional)
- Hole punch and ribbon
Steps:
- Cut a long rectangle from green cardstock (about 2 x 7 inches).
- Round one end to create the shape of a watermelon slice top.
- Color the rounded top section red.
- Add a thin green arc at the boundary to represent the rind.
- Draw small black oval seeds on the red section.
- Punch a hole at the top and thread a short ribbon through.
- Laminate for durability if desired.
- Time: 10–15 minutes
- Difficulty: Easy
💡 Tip: Make a set of three in different sizes for a cute gift set.
15. Watermelon Craft: Stamped Gift Wrap
Use a real watermelon as a stamp to create beautiful, one-of-a-kind gift wrap. This idea is as fun to make as it is to give.
Materials:
- Plain kraft paper or white butcher paper
- Small watermelon (cut into slices)
- Red, green, and black paint
- Paper towels
- Flat tray or plate for paint
Steps:
- Cut a thin, flat watermelon slice.
- Pat the cut side dry with paper towels.
- Press the slice into red paint on a flat tray.
- Stamp firmly onto kraft paper.
- Repeat across the sheet with varying pressure for texture.
- Use green paint and a brush to fill in rind edges if desired.
- Let dry completely before wrapping gifts.
- Time: 20–30 minutes
- Difficulty: Easy
Common Mistakes to Avoid
- Skipping the drying time between layers. Rushing paint or glue layers leads to smearing and muddy colors. Always let each coat dry fully before moving on.
- Using too much glue with felt or fabric. Excess hot glue creates messy strings and lumpy surfaces. Apply in small, controlled amounts for a cleaner finish.
- Not sealing painted surfaces. Paint on glass, rocks, or wood can chip or fade without a protective topcoat. Always finish with Mod Podge or clear acrylic sealer.
Tips for Best Results
- Use bright, saturated paints. Watermelon craft look best with bold, vivid reds and greens — avoid dull or muted shades.
- Prep your surfaces first. Sand wood, clean glass, and wash fabric before painting for better adhesion.
- Work in a well-ventilated space. Especially when using spray sealers or strong craft glues.
- Let kids help with the easy steps. Stamping, adding seeds, and wrapping ribbon are great tasks for little hands.
- Batch-make for parties. Set up an assembly line for decorations or favors — it’s faster and more fun with others.
- Photograph your finished crafts. Natural light near a window makes colors pop beautifully for sharing online.
FAQs
Q: What age is best for watermelon crafts? Most of these projects are suitable for ages 4 and up with adult supervision. The bookmark, paper plate, and stamped gift wrap are especially great for young children.
Q: Can I use watercolor paint instead of acrylic? Yes, but acrylic is recommended for most projects as it’s more opaque and durable. Watercolor works well for paper-based crafts like bookmarks.
Q: How do I make the crafts last longer? Seal all painted surfaces with Mod Podge or a clear acrylic sealer. For outdoor projects, use a weather-resistant spray sealant.
Q: Where can I find the materials? Most supplies are available at dollar stores, craft stores like Michaels or Hobby Lobby, or on Amazon. Many materials — like jars, paper rolls, and rocks — can be found around the house.
Q: Are these crafts good for summer camps? Absolutely. The paper plate craft, balloon decoration, and bookmark are all low-cost, low-mess options ideal for group settings.
Q: Can I sell watermelon crafts I make? Yes! Painted rocks, tote bags, felt plushies, and wreaths are popular items at craft fairs and on platforms like Etsy.
Conclusion
There’s no shortage of creativity when it comes to watermelon-themed crafts. Whether you’re making a quick bookmark or a showstopping wreath, every project on this list is designed to be fun, accessible, and totally summer-ready.
Pick one idea, gather your supplies, and get crafting. The best project is always the one you actually start — so why not today?