10 Creative Sand Dollar Craft Ideas for Beautiful Beach Decor
Sand dollars are one of nature’s most elegant gifts from the sea. Instead of leaving them in a drawer, why not turn them into something truly special? These 10 sand dollar craft ideas are beginner-friendly, budget-conscious, and guaranteed to bring a coastal charm to your home, gifts, and celebrations.
Whether you collected them on a beach trip or found them at a craft store, there’s a project here for every skill level.
2. Sand Dollar Photo Frame Accent
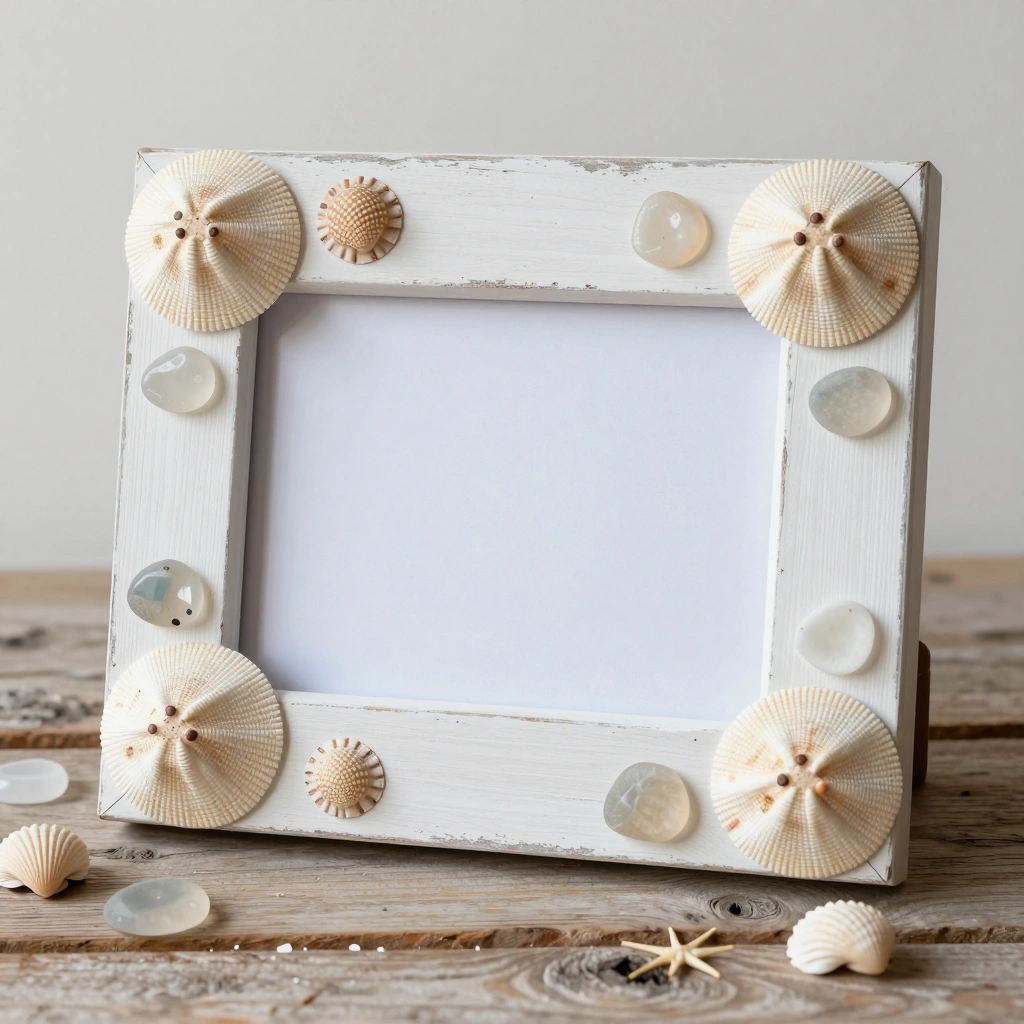
Overview
Add a coastal touch to a plain picture frame by decorating it with sand dollars, sea glass, and shells. This makes a gorgeous handmade gift for beach lovers.
Materials:
- Plain wooden photo frame
- 3–5 small sand dollars
- Sea glass and small shells
- Hot glue gun
- White or beige paint (optional)
- Sandpaper
Steps:
- Lightly sand the frame if needed, then paint it white or beige and let it dry.
- Arrange your sand dollars, sea glass, and shells on the frame before gluing to plan the layout.
- Use a hot glue gun to secure each piece firmly in place.
- Let everything set for 15 minutes before handling.
- Insert your favorite photo and display!
Time: 30–45 minutes Difficulty: Easy
💡 Tip: Seal the finished frame with a matte spray to protect it from dust and humidity.
3. 10 Sand Dollar Craft — Painted Mandala Wall Art
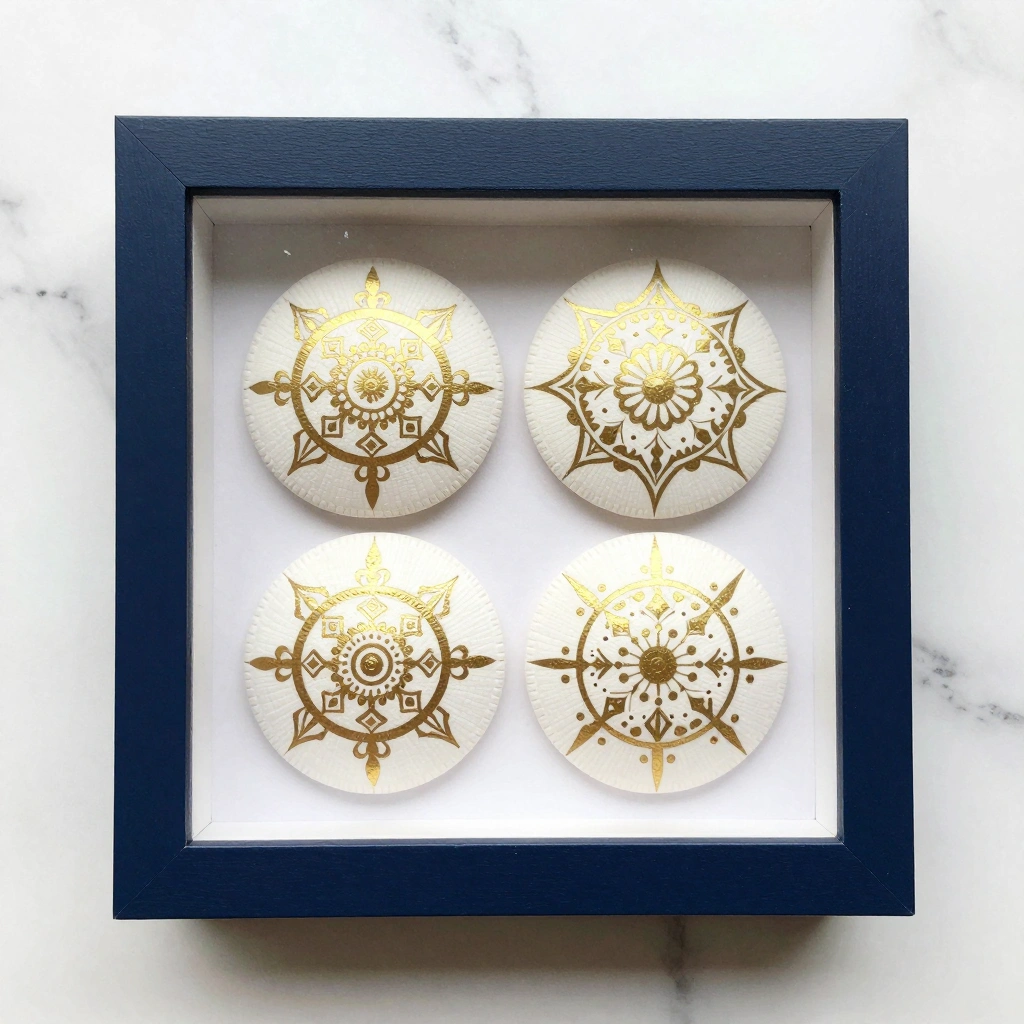
Overview
Using fine brushes and acrylic paint, you can transform sand dollars into miniature mandala masterpieces. Grouped together in a shadow box, they make stunning wall art.
Materials:
- 4–6 sand dollars (various sizes)
- Fine-tip paint brushes
- Acrylic paints (white, gold, navy, coral)
- Shadow box frame
- Small dots of hot glue
- Black or white cardstock backing
Steps:
- Lay sand dollars flat and plan your mandala pattern lightly with pencil if needed.
- Start from the center and work outward using a fine brush to paint symmetrical dots, lines, and curves.
- Let each layer dry before adding the next color.
- Once fully dry, arrange them on cardstock inside the shadow box.
- Secure each sand dollar with a tiny dot of hot glue and close the frame.
Time: 45–60 minutes Difficulty: Medium
💡 Tip: Use a dotting tool or the end of a pencil eraser for perfect, uniform dots.
4. Sand Dollar Wedding Place Cards

Overview
Looking for a unique wedding table idea? Write guests’ names directly on sand dollars for a coastal-themed wedding. They double as a beautiful keepsake for attendees to take home.
Materials:
- Sand dollars (one per guest)
- Gold or white paint marker
- Fine sandpaper (optional, for smoothing)
- Small easel card holders or ribbon
Steps:
- Gently sand any rough edges off the sand dollars.
- Use a gold or white paint marker to write each guest’s name in your chosen lettering style.
- Allow to dry completely (about 10 minutes).
- Place each sand dollar on a small easel holder or lean against a glass at each table setting.
Time: 5–10 minutes per card Difficulty: Easy
💡 Tip: Practice your lettering on paper first for consistent, elegant handwriting.
5. Sand Dollar Candle Holders
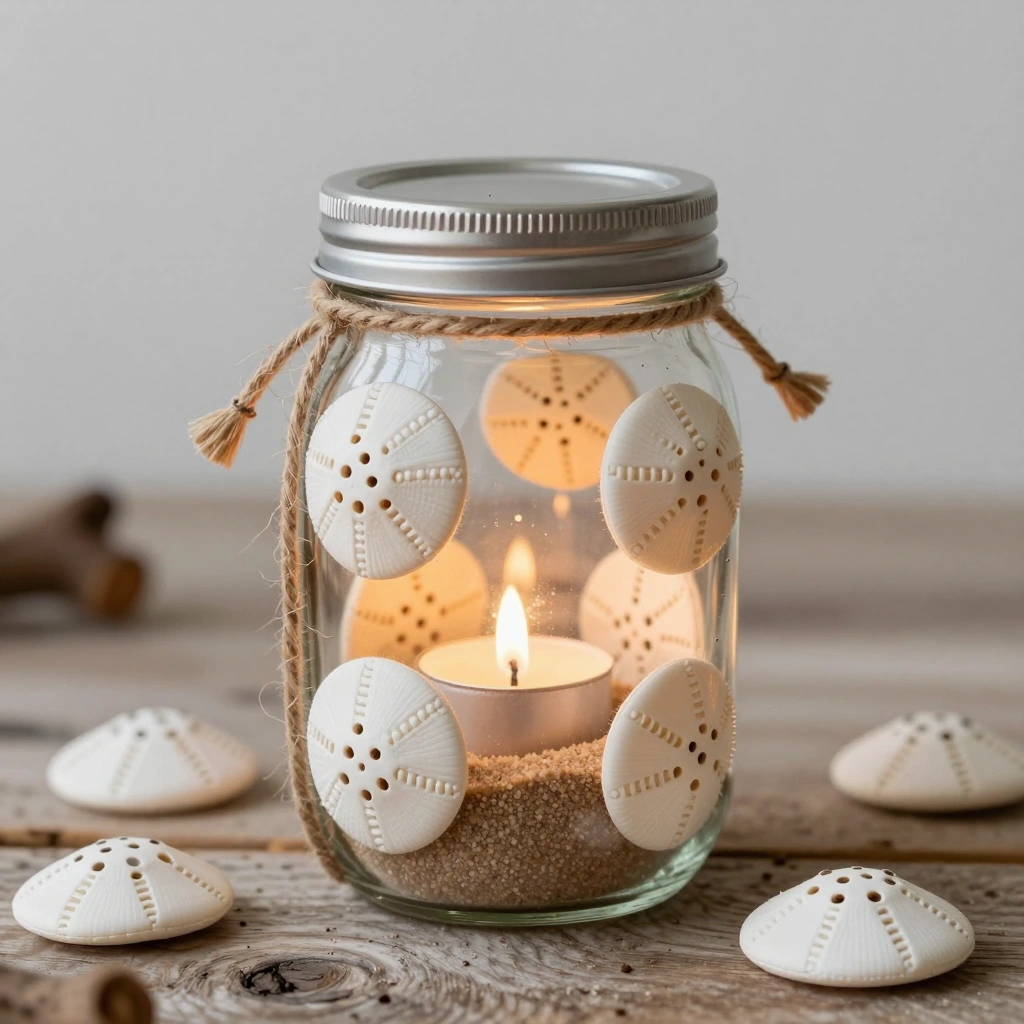
Overview
Arrange sand dollars around a glass votive or mason jar to create a beautiful coastal candle holder. These look stunning as centerpieces or bathroom décor.
Materials:
- Glass votive or mason jar
- 3–5 sand dollars (flat, similar size)
- Twine or jute rope
- Hot glue gun
- Tea light candles
- Small starfish or shells (optional accent)
Steps:
- Wrap the glass jar with a layer of twine using hot glue to secure as you go.
- Position the sand dollars evenly around the outside of the jar and glue them in place.
- Add small shells or starfish in the gaps between sand dollars.
- Let the glue set completely before handling.
- Place a tea light inside and enjoy the warm glow.
Time: 20–30 minutes Difficulty: Easy
💡 Tip: Use battery-operated tea lights for safety, especially if using indoors on shelves.
6. Sand Dollar Wreath
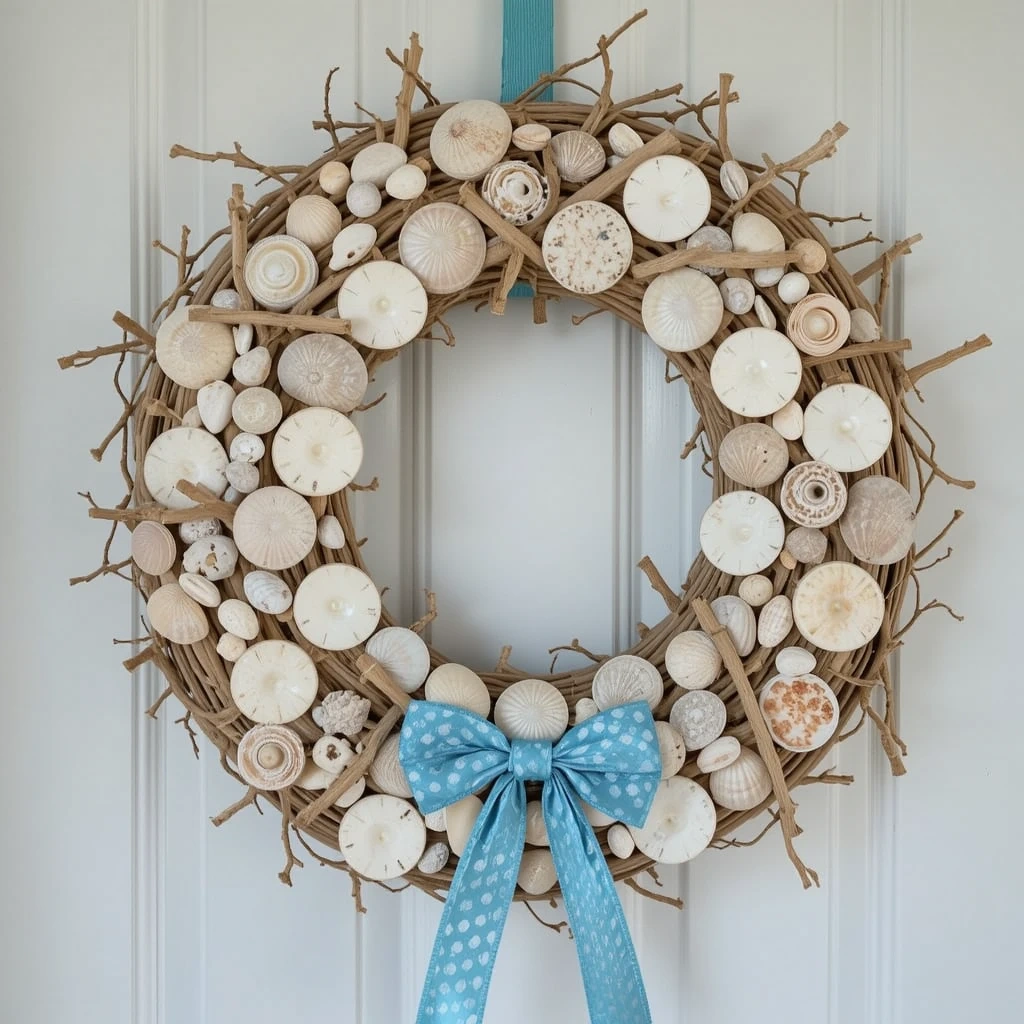
Overview
Create a stunning coastal wreath using a foam or grapevine base decorated with sand dollars, shells, and sea-inspired accents. Perfect for front doors or entryway walls year-round.
Materials:
- 10–15 sand dollars (various sizes)
- Foam or grapevine wreath base (12-inch)
- Hot glue gun
- Seashells and starfish
- Ribbon (blue, white, or natural)
- Faux greenery or dried flowers (optional)
Steps:
- If using foam, wrap the base with burlap or natural rope using hot glue.
- Arrange your sand dollars on the wreath to plan placement before gluing.
- Glue sand dollars in clusters, mixing sizes for a natural look.
- Fill gaps with shells, starfish, and greenery.
- Attach a ribbon loop at the top for hanging.
Time: 45–60 minutes Difficulty: Medium
💡 Tip: Spray the finished wreath with a clear sealant to protect it from humidity if hanging outdoors.
7. Sand Dollar Wind Chime
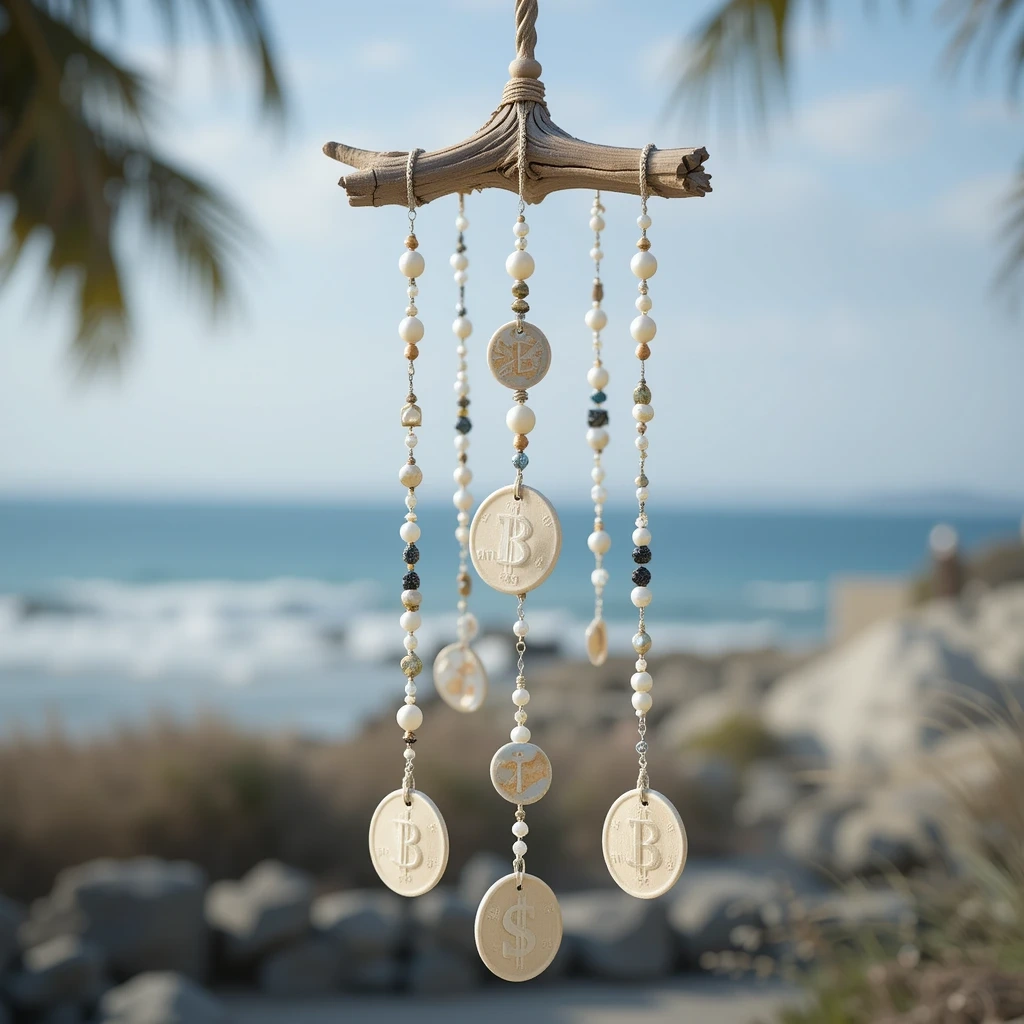
Overview
Drill a series of sand dollars and hang them on driftwood with fishing line to create a delicate, beachy wind chime. The soft clinking sound is incredibly soothing.
Materials:
- 5–8 sand dollars (assorted sizes)
- Piece of driftwood (8–12 inches)
- Fishing line or clear nylon thread
- Small drill or nail
- Beads or shells (for spacing)
- Twine for hanging
Steps:
- Carefully drill a small hole at the top and bottom of each sand dollar.
- Thread fishing line through each hole, knotting below to hold it in place.
- Space the sand dollars at varying heights by knotting between beads.
- Tie each strand to the driftwood piece at equal intervals.
- Attach twine to both ends of the driftwood to create a hanging loop.
Time: 30–45 minutes Difficulty: Medium
💡 Tip: Use a very thin drill bit at low speed to avoid cracking the delicate sand dollars.
8. 10 Sand Dollar Craft — Resin Jewelry Pendants
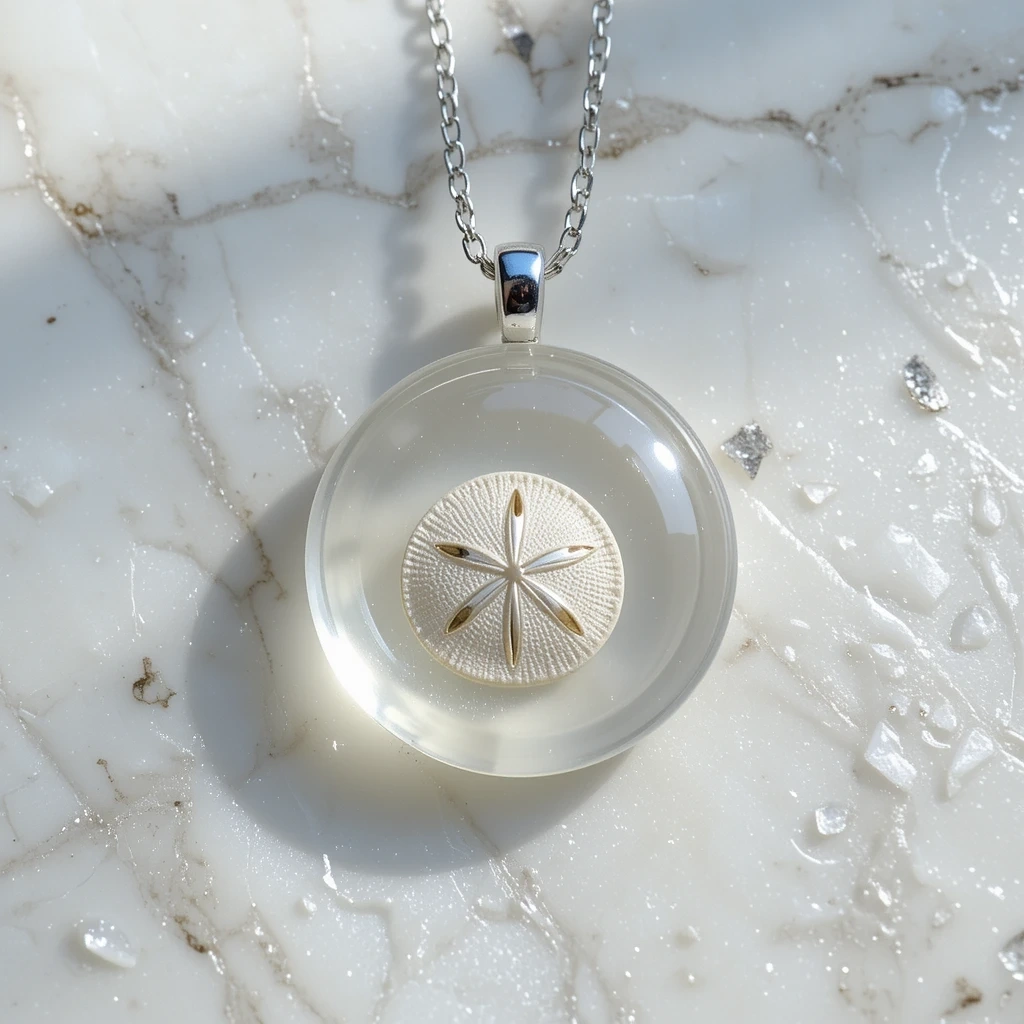
Overview
Preserve small sand dollars inside clear resin to create wearable art. These pendants make incredibly thoughtful, personalized gifts for beach lovers.
Materials:
- Small sand dollars
- Clear UV or epoxy resin
- Pendant molds (oval or round)
- Jump rings and necklace chain
- Tweezers
- Gloves and mixing tools
Steps:
- Mix the epoxy resin according to package instructions and pour a thin base layer into the mold.
- Let the base layer cure slightly (about 5–10 minutes), then use tweezers to place the sand dollar face-up inside.
- Pour a second layer of resin to fully cover the sand dollar.
- Allow to cure fully (8–24 hours depending on resin type).
- Pop the pendant out of the mold, attach a jump ring, and thread onto a chain.
Time: 24 hours (including cure time) Difficulty: Medium
💡 Tip: Add a tiny drop of blue dye to the resin for a stunning ocean effect around the sand dollar.
9. Sand Dollar Gift Tags

Overview
Skip the paper gift tag this year and tie a painted sand dollar to a wrapped present instead. It’s a simple, zero-waste idea that doubles as a keepsake the recipient will love.
Materials:
- Small sand dollars
- Paint markers (gold, silver, or white)
- Small drill or nail
- Ribbon or baker’s twine
- Wrapped gift boxes
Steps:
- Drill or punch a small hole at the top of each sand dollar.
- Write a short message, name, or holiday greeting with a paint marker.
- Let it dry completely (about 5 minutes).
- Thread ribbon or baker’s twine through the hole and tie it around your gift.
Time: 5–10 minutes Difficulty: Easy
💡 Tip: Coat with Mod Podge before writing to create a smoother writing surface.
10. Sand Dollar Craft — Painted Inspirational Stones Display
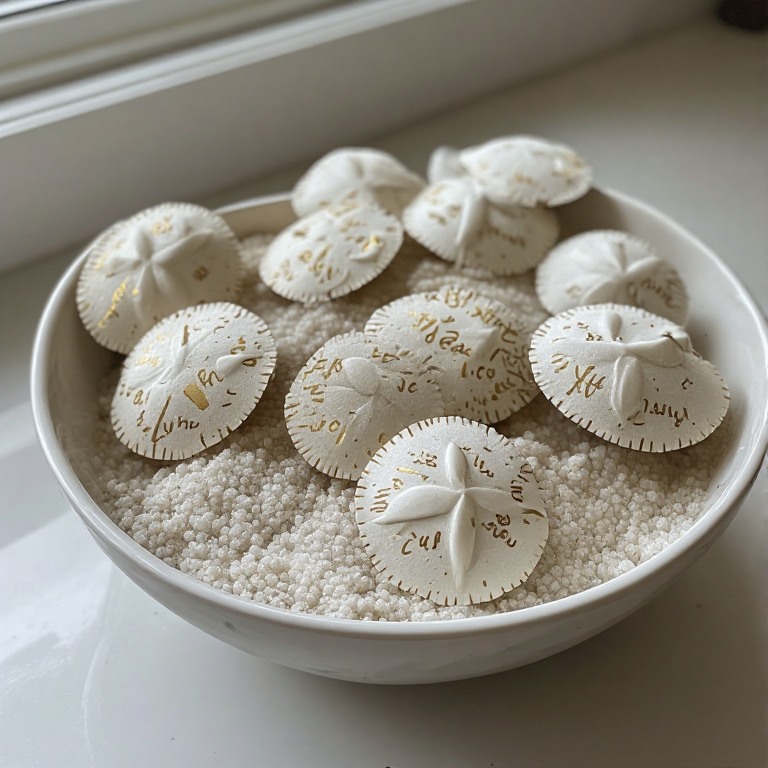
Overview
Paint uplifting words or quotes on sand dollars and arrange them in a decorative bowl or tray. This makes a beautiful and meaningful shelf or desk accent for any room.
Materials:
- 5–8 sand dollars
- Fine-tip paint pens (black, white, or gold)
- Decorative bowl, tray, or shadow box
- White sand or pebbles (for display base)
- Optional: small succulent or air plant
Steps:
- Choose short words or phrases: “Hope,” “Dream,” “Be Still,” “Joy,” etc.
- Using your paint pen, carefully write one word per sand dollar in the center.
- Add small accent dots or lines around the edges for decoration if desired.
- Let fully dry (10–15 minutes).
- Fill your bowl or tray with white sand and arrange the sand dollars on top.
Time: 20–30 minutes Difficulty: Easy
💡 Tip: Seal with a clear matte spray to prevent the paint from chipping over time.
Common Mistakes to Avoid
- Skipping the sealing step — Sand dollars are fragile and porous. Always apply a sealant (Mod Podge, clear spray, or resin coat) to protect your finished craft from moisture, dust, and chipping paint.
- Drilling too fast or with too much pressure — Sand dollars crack easily. Always use a thin drill bit at the lowest speed setting, and support the sand dollar on a soft surface like a folded cloth when drilling.
- Using wet or uncleaned sand dollars — Crafting with fresh or improperly dried sand dollars leads to odor and crumbling. Always bleach, rinse, and dry them fully (24–48 hours) before using.
Tips for Best Results
- Choose quality sand dollars: Look for ones without cracks or chips, whether collected or store-bought.
- Seal before AND after decorating for maximum durability — a base coat prevents paint bleed, and a top coat locks everything in.
- Work on a silicone mat to avoid sticking and to make cleanup much easier.
- Let each layer of paint dry fully before adding the next — rushing causes smearing and muddy colors.
- Store finished crafts away from direct sunlight to prevent fading over time.
- Start with easier projects like gift tags or ornaments before attempting resin pendants or mandalas.
Frequently Asked Questions
Q: Where can I buy sand dollars for crafting? A: You can find them at craft stores like Michaels or Hobby Lobby, online on Amazon or Etsy, or you can collect them yourself on sandy coastal beaches — just make sure they’re bleached white (not living) before taking them.
Q: How do I clean and prepare sand dollars before crafting? A: Soak them in a 50/50 mix of water and bleach for 10–15 minutes, rinse thoroughly with clean water, and allow them to dry completely for 24–48 hours before crafting.
Q: Will sand dollars crack easily during crafts? A: They can be fragile, especially thin ones. Handle gently, avoid dropping, and always support them when drilling. Thicker, heavier sand dollars are more durable for projects like wind chimes or jewelry.
Q: What kind of paint works best on sand dollars? A: Acrylic paints and paint pens work best — they adhere well, dry quickly, and come in a huge range of colors. Always seal your work with Mod Podge or a clear spray afterward.
Q: Are these crafts suitable for kids? A: Most are! Projects like gift tags, ornaments, and inspiration displays are great for children with adult supervision. Save resin jewelry and wind chimes for older kids or adults due to drilling and chemical handling.
Q: How long do sand dollar crafts last? A: With proper sealing and indoor display, sand dollar crafts can last for many years. Avoid prolonged exposure to moisture, direct sunlight, or outdoor elements without weatherproof sealant.
Conclusion
Sand dollars are one of the most versatile and beautiful natural materials for crafting. Whether you’re making holiday ornaments, wedding décor, or wearable jewelry, each of these 10 sand dollar craft ideas offers a chance to bring a little piece of the ocean into your everyday life.
Pick your favorite idea, gather your supplies, and start creating. You’ll be amazed at what a little creativity and a handful of sea treasures can produce!